Month: June 2013

Cake Doctor Book and Recipe Review

Cake Mix Doctor Books


I was first introduced to the Cake Mix Doctor books a couple of years ago from one of my knitting group friends.  She made this wonderful Apple Cider Cake and brought it to one of our meetings.  It was so good she sent me the recipe and told me the book it came from.

I usually check the library for any books I am interested in and did so with this book.  To my delight they had 3 different titles of the cake doctor books so I checked them all out.  My local library allows you to check books out for 3 weeks and renew, if no one has requested it, for another 3 weeks so that was more than enough time to try out various cakes in the books and decide I would like to own at least one, if not 2 of the titles.

The titles I own are the original Cake Mix Doctor, copyright 1999, and the Chocolate Cake Mix Doctor, copyright 2001.  The original title I received as a gift a couple of years ago for Christmas.  I just recently bought the Chocolate version at my local Half Price Books for only $5.99.  My oldest son and I went there a couple weeks ago to trade in some books and DVD’s – after my DVD organizing we had some to get rid of.

The Cake Mix Doctor books have a variety of different types and styles of cakes to bake.  All of the directions are easy to read and follow and lots of other helpful baking tips and ideas are offered throughout the book.  All of the recipes start with a basic cake mix but lots of other ingredients are added to produce rich and delicious cakes.  These cakes are not made from scratch cakes.

I was never one before to bake tube cakes, I usually stuck with the 13 x 9 or round cakes.  These books have some awesome tube cake recipes and have inspired me to bake a lot more of this style cake and they are so easy!  I made this one in the photo below for my birthday yesterday.

chocolate cream cheese pound cake made from Chocolate Cake Mix Doctor Book

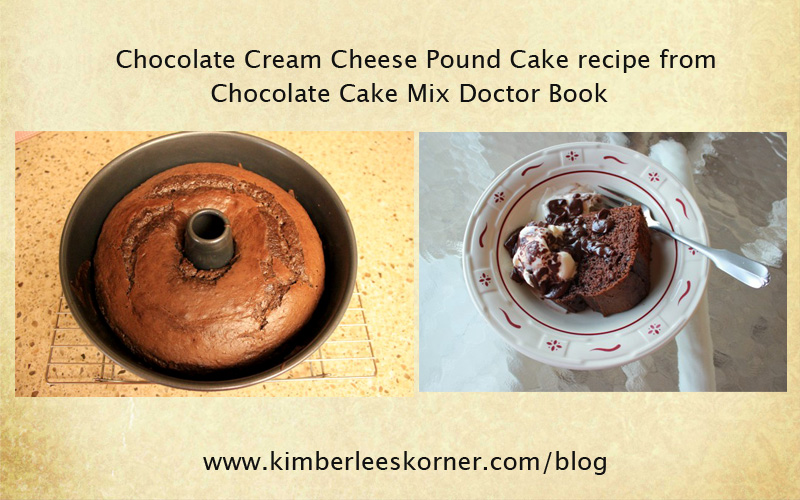
It is a chocolate pound cake that uses cream cheese in the recipe.  It is very good.  I had made some homemade hot fudge sauce, a recipe I found on pinterest, that was so good and went perfectly with this cake as a topping.  My sons loved it!  The hot fudge sauce recipe was from a blog called Chocolate, Chocloate and more.

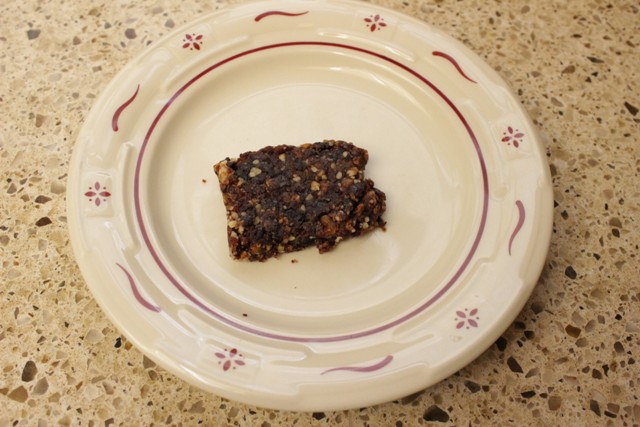
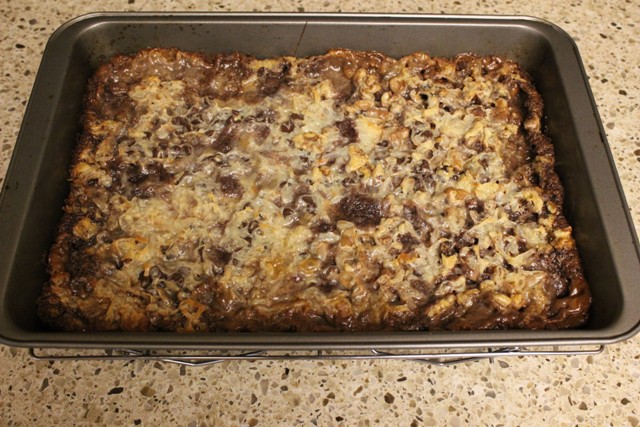
Another recipe I recently tried from the Chocolate book is the Hello Dolly Bars.  These are made with a cake mix and are just wonderful.  Very easy to make, too.  They do require a few ingredients but are a cinch to throw together and bake in about 25 to 30 minutes.  The perfect cake-bar treat for my hungry kids.

Hello Dolly Bars recipe made from Chocolate Cake Mix Doctor book

I hope you enjoyed this review of the books and a couple of the recipes.  I have tried many more and they are all delicious.  The ones mentioned above are the ones I have most recently made.  Subscribe via RSS feed or through bloglovin for future book and recipe reviews.


Recycle Plastic Ice Cream Bins for Storage Containers

Gallon Plastic Ice Cream container recyled into storage container   I try and reuse containers that food or other household items came in as much as possible.  One of the types of containers I have found several good uses for is a large plastic rectangle ice cream container, the 1  gallon and 1 pint size, with a handle. The great thing about these containers is they clean up easily and the lids fit on securely, if you want to use the lid.  They also stack nicely.  The handle is another bonus.

I have been using this type of container to keep my compost stored under my kitchen sink for several years now.  It is great to have a container with a lid for this purpose.  Each day I take the bin filled with fruit and veggie scraps and coffee grounds out to my big compost bin behind the shed out in our backyard.  The handle makes it easy to carry.

Recycled Ice Cream Bin used under kitchen sink for Composting Bin

I have also used this type of ice cream bin to store and somewhat organize my beading supplies.  The idea for using this container for this purpose came to me last summer when I was going out of town.  I decided I wanted to take my beading supplies so my niece and I could make some bracelets while I was visiting her.  This container was perfect for travelling.  It did not take up too much space in the car and the lid held everything in there securely without spilling.  I had already bought some of those little bead organizers with small compartments and those containers fit right inside this larger ice cream bin with my beading mats on the top.

Recycled ice cream container used for beading supplies

Another idea for using these containers is to hold old rags under the sink, or scrub brushes.  I use one under the bathroom sink to hold some rags and old toothbrushes I use for cleaning.

I have also bought ice cream in the round plastic containers and use some of those as well for soaking small laundry items or in the past for my kids bath toys when they were young.  There are lots of possibilities with these large 1 gallon ice cream containers.  Let me know what you come up with by leaving a reply.

Crochet Headband Pattern

Openwork Crochet Headband Pattern by Kimberlees Korner

A quick and easy free crochet headband pattern.  Perfect hair accessory for summer or anytime of year.  Click on the highlighted text below to download or view the pdf file of this free pattern.

Openwork Crochet Headband Pattern by Kimberlees Korner

This pattern is very easy and super fast to crochet.  You can finish this project in 2 to 3 hours.  A great project to work on for the summer months.  The headband is also very comfortable to wear and does not give me a headache.  Another bonus.

This pattern is one of 3 patterns included in a pdf pattern I offer for sale in my etsy shop.  Please visit my etsy shop if you are interested in purchasing the complete pattern which includes a mobius cowl and a mobius wrap along with this headband pattern.  Items made from my patterns may be sold but the pattern is my own design and not to be resold.  Thanks.

Crochet Openwork Headband Pattern by Kimberlees Korner


Summer Reading

Books to Read this Summer

Well, it is officially not summer for a couple more days but I have chosen some of the books I would like to read this summer.  The books can be seen in the above photo.

I have divided the books into 2 stacks.  One stack, on the left, is my fiction stack and the other, on the right, is my non-fiction stack.  I tend to read non fiction in the morning.  I am currently reading Becoming the Woman I Want To Be by Donna Partow.  I also like to read non fiction during the day sometimes if I have a free moment or I am supervising my kids and their friends swimming in our pool.  The fiction books are my evening-bedtime reading choice.

My boys have been out of school for a week and a half now.  Last week I began a reading schedule with them.  We went to the library on Monday and each of us checked out 2 books.  They are reading for 30 minutes every day before lunch.  After lunch they have a choice to read for 30 more minutes, write in a journal, or practice their instrument.

So far our schedule is working out well.  We have had a couple of days where there was and afternoon appointment or something we had to do so we didn’t get the 30 minutes after lunch in.  One of my 12 year old boys (I have twins) has read 2 chapter books so far and my older son, who is 15, has finished one book.  I also have finished one book.  I had started reading Somewhere Along The Way by Jodi Thomas a couple of weeks before we began this schedule.  I finished the book about 5 days ago.  It was a very enjoyable read.  Now I am on to reading Speak No Evil by Allison Brennan.  I got this book from the library a week ago.  I learned about it from Goodreads.  So far I am about 95 pages into the book and like it.

I also like to listen to audio books while I cook, drive, knit or sew.  I am currently listening to Love Kills by Edna Buchanan.  It is a mystery and suspense type of novel.  The library is a great place to find lots of wonderful audio books.

So, what are you reading this summer?  Let me know by leaving a reply.

I hope you enjoyed this latest post.  Don’t forget to subscribe via RSS feed or through Bloglovin by clicking in the sidebar.

Categories: Books

Tags: , , ,

Vanilla Chai Iced Tea Recipe

1 Comment
Vanilla Spiced Chai Latte Iced Tea Recipe

A sweet vanilla chai tea to cool you off on a hot summer day.  I made this tea following this recipe below:

  • Bring 4 c. water to a boil
  • Place 10 tea bags in boiling water, turn off heat
  • Steep tea 10-15 minutes then remove tea bags
  • Place 3 c. ice cubes in 2 quart pitcher
  • Stir in 1/4 to 1/2 c. sugar into hot tea mixture and mix well, until sugar dissolves (I used 1/4 c. in mine as I wanted it only slightly sweet – chai latte is generally very sweet)  
  • Pour hot tea and sugar mixture over ice cubes in pitcher
  • Stir in 1 c. Vanilla Soymilk
  • Refrigerate
  • Enjoy tea over a glass of ice

I have made this tea several times in the last couple of weeks and my kids really like it.  It does not last long in our refrigerator.   I have made it using the decaf Tazo Chai tea or using the Bigelow Spiced Chai.  I tried it using the Bigelow Vanilla Spiced Chai but we did not care for that as much.  I am now mainly making it using the decaf since the kids like to drink it.   I hope you enjoy the recipe.

Decaf or Regular Chai Tea used to make Vanilla Chai Latte Iced Tea


Book Review – Extraordinary Women

1 Comment
Extraordinary Women book by Julie Clinton

Today I finished my 10 week journey reading this wonderful book Extraordinary Women by Julie Clinton and Mary M. Byers.  The subtitle of the book is Discovering the Dream God Created for You.

I purchased this book from Mardel a few months ago and began reading it 10 weeks ago.  I usually try and do my TAG (time alone with God) time every morning after my workout and decided this was the perfect book for that.  The book is divided into 10 segments with different titles for each week.  The book is laid out so that you only read it 5 days out of the week so I would strive for Monday through Friday.  Each daily page that you read is only about 2 or 3 pages long.   The titles of the weeks are as follows:

  • Week 1:  Secrets to Living God’s Dream for Your Life
  • Week 2:  Secrets to Knowing God Really Loves You
  • Week 3:  Secrets to Meaningful Relationships
  • Week 4:  Secrets to Handling Testosterone
  • Week 5:  Secrets to Mastering Your Emotions
  • Week 6:  Secrets to Handling Imbalance
  • Week 7:  Secrets to Getting Through Tough Times
  • Week 8:  Secrets to Finding Freedom
  • Week 9:  Secrets to Creating an Intimate Relationship with God
  • Week 10:  Secrets to Making Every Day Count

There is a motivating quote at the end of each daily read along with journal prompts if you decide to keep a journal.  I also like the fact that there are lots of meaningful scriptures throughout the entire book.

Overall I think this is a wonderful book for those wanting to keep a connection to God in their daily life.  The book is very positive and uplifting – getting your day off to a wonderful start.  This is the type of book that I will be able to apply to everyday life and will put it on my book shelf and read it again in years to come.

I will now begin to read Becoming the Woman I Want To Be by Donna Partow.  It is another book that is set up to read on a daily basis.  I read another book by her last summer called Becoming the Woman God Wants Me to Be and thought it was an excellent book.  That is actually the book that taught me the acronym TAG – time alone with God.

I am in no way affiliated with the author or publisher of this book or any books mentioned in this post.  I just enjoyed the book and wanted to write a review to share.

Please follow my blog via RSS feed or through bloglovin by clicking one of the icons in the sidebar.


Categories: Books

Tags: , ,

New Recipes Recently Tried

I have been trying some of the recipes I have pinned from pinterest lately.   To check out my recipe board on pinterest click on this link.  I wanted to share 2 that I made yesterday that turned out really good.

The first was the date and nut energy bars.  I took a photo of them but they don’t photograph too well.  They taste much better than they look.  Very sweet and satisfying!  I will definitely make them again.  I didn’t have any whole dates so I used some chopped ones I had on hand.  I think they will turn out better with the whole dates as recommended in the recipe.  They are a tad bit crumbly and I think it is because of the chopped dates.  I made mine with dates, dried cherries and walnuts.  They only take 3 ingredients.

Date Energy Bars - with dried cheeries and walnuts
Date Energy Bars – with dried cherries and walnuts

The other recipe was Cheesy Tex-Mex Chicken in the crock pot.  I made it yesterday as well and we had it for dinner.  Everyone loved it!  I made it using my own homemade salsa and without the corn.  I didn’t have any and figured it would be fine without it.  We ate it with some yellow rice and wrapped the chicken mixture in flour tortillas.  I will say that my sons were questioning the meal when they looked at it but once they tried it they loved it!  I told them it is better to try it first than to judge how it will taste by how it looks.  Some things taste really good but don’t always look so appealing.   If you click on the link above it will take you to the recipe and there is a  photo there.

I will be trying other recipes from my pinterest boards during the summer so check back often or follow my blog via RSS feed by clicking on the icon in the sidebar or through bloglovin which is also in the sidebar.  You can also follow me on Pinterest.


Lettuce Storage Method

3 Comments

I recently read this blog post on Blissful and Domestic  about buying your produce for the month then storing it wisely so it will last.  After reading this I decided I needed to get better about storing my produce to make it last longer.

I remembered how I used in the past this lettuce cleaning and storage method I learned about from a book I read a couple of years ago.  The book is called More Hours In My Day by Emilie Barnes and Sheri Torelli.  It is a great book with lots of helpful ideas for anyone who wants to improve their home and family organization.

Okay – on to the lettuce information – to keep your lettuce fresh for a week or longer you will follow this procedure:

  • wash all lettuce
  • dry lettuce on towels – blot with another towel 
  • place lettuce in mesh laundry-lingerie bag 

    Photos of lettuce washed, dried and placed in mesh laundry bag
    Photos of lettuce washed, dried and placed in mesh laundry bag
  • put lettuce in empty washing machine – Yes, your washing machine!
  • Select the spin cycle (mine says drain & spin) – usually this is at the end of the cycle
  • let the drain and spin cycle run its course

    Lettuce in mesh laundry bag placed in washing machine - then run spin cycle to remove all excess water
    Lettuce in mesh laundry bag placed in washing machine – then run spin cycle to remove all excess water
  • remove lettuce and store in large ziploc storage bags or in mason jar
  • place in your refrigerator
Lettuce placed in ziploc bag or mason jar after hand washed and put through spin cycle in washing machine

I can keep lettuce fresh for at least 7 to 10 days using this method.  It takes approximately 15 to 20 minutes to prep everything for this method but then all your lettuce is all clean, fresh and crisp – ready for any salad or sandwich.  I seem to eat a lot more salads in the summer so it is nice to have lettuce that is ready to use.  I usually process a whole bag of 3 romaine hearts and some red or green leaf artisan lettuce so I have a variety available in the refrigerator.  Note:  I have not yet tried this method using the washing machine with iceberg lettuce.  I don’t buy that type of lettuce that frequently.

I you like this post please follow me via RSS feed by clicking on the icon on the sidebar or through bloglovin. 


Organizing DVD’s

5 Comments
photo of dvd's organized in 3 ring binder
photo of dvd’s organized in 3 ring binder

I am on an organizing mission lately.  I spent most of last weekend organizing all of our DVD’s when I wasn’t keeping up with the normal daily tasks in our home.  I decided I was tired of looking at 2 shelves of movies and workout DVD’s.             See photo below:

2 shelves of DVD's before being organized into binders
2 shelves of DVD’s before being organized into binders


After searching for organizing ideas on pinterest I made a plan.


I went to Target in search of binders and DVD binder inserts but did not find what I needed there.  However I did buy 2 CD holders that each hold 48 CD’s and a smaller one that held 24 and began to organize all our music CD’s that took up a whole entertainment drawer of space.   See photos below of this project:

cd's in entertainment stand draw before organizing
cd’s in entertainment stand draw before organizingCD's organized into 3 zippered cases that used to take up this whole drawerCD’s organized into 3 zippered cases that used to take up this whole drawer 


I ended up finding the supplies I needed at Office Depot.  They had a couple varieties of DVD-CD inserts and I decided on this style so I could organize them in 3 ring binders.

clear plastic binder insert pages used to organize dvd's in 3 ring binders
clear plastic binder insert pages used to organize dvd’s in 3 ring binders

So, this is my end result after my project was done:

After view of shelf organized - all dvd's now stored in several 3 ring binders leaving lots of open shelf space
After view of shelf organized – all dvd’s now stored in several 3 ring binders leaving lots of open shelf space

I was able to get 2 shelves, that were 32 inches long, into 3 binders.  The photo of the one binder is of my yoga information in the photo above.  Also, included in the binders were a few other movies we had in our other entertainment center – the one with the CD’s – they are shown in the plastic bin in the photo below.

DVD's to organized from entertainment cabinet
DVD’s to organize from entertainment cabinet

I organized the DVD’s into categories like Family, Holiday, Fitness and made divider tabs for the categories.  I then alphabetized the DVD’s so we can find them easily.  I decided to save the DVD cover inserts so I would know the rating and movie summary but you don’t have to do that if you don’t want to.  If you choose to do that option you will have to trim the DVD insert paper to fit into the page protector insert.

Before you begin this project a word of advice – count all of your DVD’s and figure out how many DVD page inserts you need.  They come in a package of 10 and hold 2 to 4 movies per page.  I did not count all of our movies and ended up making a couple of trips to the store.

Supplies needed for project:

  • 1 or 1 1/2 in. 3 ring binders (I needed 3 binders for all of my DVD’s)
  • DVD clear plastic inserts for binders
  • Tab dividers – (optional)
  • Scissors
  • Time – this took me approx. 3 days but I only worked on it for about 1 to 2 hours each day – note:  time did not include trips to store

I am so happy with the way my binders turned out and how much cleaner and neater the shelves look.

I hope you enjoyed this post – please follow me via RSS feed by clicking the icon in the sidebar or through bloglovin to read future posts.


Organizing Sewing Patterns

1 Comment
patterns stored in clear plastic container with lid from Office Depot
patterns stored in large envelopes and clear plastic container with lid from Office Depot

Years ago I learned of this pattern storage method from a book I read called Confessions of an Organized Homemaker by Deniece Schofield.  I have been using this method to store my patterns ever since as it is much more efficient than keeping them in the original small envelope.

To Store your patterns you will need:

sewing pattern and blank envelope
  • 10 x 13 envelopes
  • Scissors
  • Glue or Glue Sticks
  • Bankers Box or Plastic Storage Box

Here is what you do:

  • Remove all pattern pieces and instructions
  • Cut envelope down one side and the bottom so it lays out flat
  • Glue this cut pattern envelope to the front of large 10 x 13 envelope
  • Place all pattern pieces inside large envelope
pattern glued to blank envelope for more efficient storage


Now your pattern pieces fit neatly inside this larger envelope and do not get so squished up and wrinkled.  It is also easier to read the pattern yardage and see the front view without having to flip it around.  The patterns store perfectly inside of bankers boxes or I recently found this plastic storage box at Office Depot that has a lid and stores the patterns perfectly.  The photo above at the top is of the plastic storage box.  I have used the bankers boxes for years as you can tell by the wear on my box – it still has tape marks around it from when we moved 7 years ago and places where labels fell off.

Use Bankers boxes for storing your sewing patterns

Follow me through RSS feed by clicking the icon in the sidebar or through Bloglovin if you like this post.