Category: Organizing

Cork Tile and Denim Project

3 Comments

I got the idea for making this project from pinterest.  Here is my pin for the project.  The project is just an image and does not link to any site or instructions.  I thought this was a really cute idea and a great way to organize some things so I made two of them.  I am using one on a wall behind my desk and the other on the wall behind my sewing machine.

denim pocket and clothespin wall organizer project by kimberlee from kimberleeskorner.com/blog

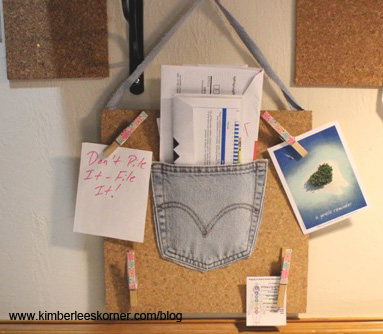
The photo above was the first one I made.  That is the one I am using on the wall behind my desk to hold notes and the pocket holds important info like bills to pay, etc.  I was able to clear a basket off my small desk that was holding some of these things and now I have a lot more usable desk space.

This project is so quick and easy to make.  You will need:

  • cork tiles – 12 x 12 (I got mine at Hobby Lobby)
  • old jeans – cut out the pocket
  • clothes pins
  • glue gun
  • washi tape (optional – for clothes pins)

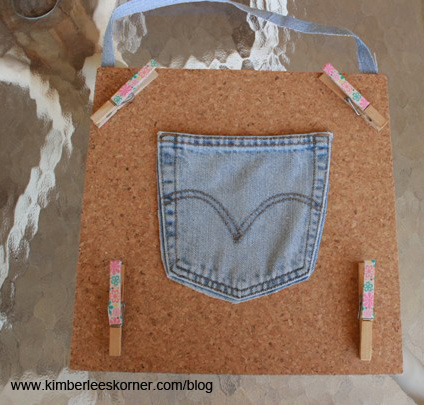
Basically you just figure out where you want your pocket and clothes pins to go and glue them down with a glue gun.  You can put the washi tape on the clothes pins after you are done if you want to add some color to them.  I guess you could also write on them with permanent marker if you wanted to label them.  I chose to hang the first one I made so I cut a strip of denim and glued it to the back of the cork board.  I used a small cup hook on the wall to hang it with.

cork tile and denim pocket project 2 by kimberlee from www.kimberleeskorner.com/blog

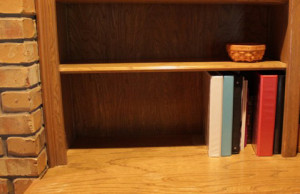
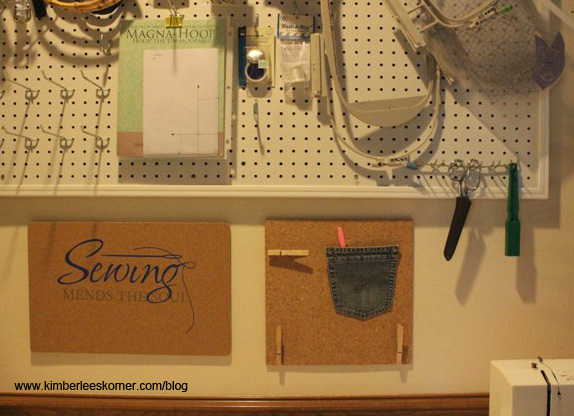
The one above here is the second one that I made and I am using that on the wall behind my sewing machine.  This one is very basic.  I think the clothes pin clips will be nice for holding pattern instructions or photos of ideas I have to inspire me.  The pocket can hold smaller items like a seam ripper, seam gauge or pencils and pens.  This one I chose to use the sticky back squares the cork tiles came with and put it on the wall.

Below are the photos of my projects hanging on the wall in my sewing – office room.  The photos are not great due to the fact that this room needs better lighting – something I am going to be working on changing soon – and also both areas where the cork tiles hang I have a shelf above that area so it gives a shadow.  It gives you the basic idea of how I am using them though.

corkboard denim pocket project hanging on the wall  www.kimberleeskorner.com/blog
corkboard denim pocket project hanging on the wall
www.kimberleeskorner.com/blog
corkboard denim project - second one made for sewing area  www.kimberleeskorner.com/blog
corkboard denim project – second one made for sewing area www.kimberleeskorner.com/blog


If you would like to receive future updates please subscribe via RSS feed, with bloglovin or through email by clicking any of those icons in the sidebar.  I hope everyone is having a great day!


Recycle Plastic Ice Cream Bins for Storage Containers

Gallon Plastic Ice Cream container recyled into storage container   I try and reuse containers that food or other household items came in as much as possible.  One of the types of containers I have found several good uses for is a large plastic rectangle ice cream container, the 1  gallon and 1 pint size, with a handle. The great thing about these containers is they clean up easily and the lids fit on securely, if you want to use the lid.  They also stack nicely.  The handle is another bonus.

I have been using this type of container to keep my compost stored under my kitchen sink for several years now.  It is great to have a container with a lid for this purpose.  Each day I take the bin filled with fruit and veggie scraps and coffee grounds out to my big compost bin behind the shed out in our backyard.  The handle makes it easy to carry.

Recycled Ice Cream Bin used under kitchen sink for Composting Bin

I have also used this type of ice cream bin to store and somewhat organize my beading supplies.  The idea for using this container for this purpose came to me last summer when I was going out of town.  I decided I wanted to take my beading supplies so my niece and I could make some bracelets while I was visiting her.  This container was perfect for travelling.  It did not take up too much space in the car and the lid held everything in there securely without spilling.  I had already bought some of those little bead organizers with small compartments and those containers fit right inside this larger ice cream bin with my beading mats on the top.

Recycled ice cream container used for beading supplies

Another idea for using these containers is to hold old rags under the sink, or scrub brushes.  I use one under the bathroom sink to hold some rags and old toothbrushes I use for cleaning.

I have also bought ice cream in the round plastic containers and use some of those as well for soaking small laundry items or in the past for my kids bath toys when they were young.  There are lots of possibilities with these large 1 gallon ice cream containers.  Let me know what you come up with by leaving a reply.

Organizing DVD’s

5 Comments
photo of dvd's organized in 3 ring binder
photo of dvd’s organized in 3 ring binder

I am on an organizing mission lately.  I spent most of last weekend organizing all of our DVD’s when I wasn’t keeping up with the normal daily tasks in our home.  I decided I was tired of looking at 2 shelves of movies and workout DVD’s.             See photo below:

2 shelves of DVD's before being organized into binders
2 shelves of DVD’s before being organized into binders


After searching for organizing ideas on pinterest I made a plan.


I went to Target in search of binders and DVD binder inserts but did not find what I needed there.  However I did buy 2 CD holders that each hold 48 CD’s and a smaller one that held 24 and began to organize all our music CD’s that took up a whole entertainment drawer of space.   See photos below of this project:

cd's in entertainment stand draw before organizing
cd’s in entertainment stand draw before organizingCD's organized into 3 zippered cases that used to take up this whole drawerCD’s organized into 3 zippered cases that used to take up this whole drawer 


I ended up finding the supplies I needed at Office Depot.  They had a couple varieties of DVD-CD inserts and I decided on this style so I could organize them in 3 ring binders.

clear plastic binder insert pages used to organize dvd's in 3 ring binders
clear plastic binder insert pages used to organize dvd’s in 3 ring binders

So, this is my end result after my project was done:

After view of shelf organized - all dvd's now stored in several 3 ring binders leaving lots of open shelf space
After view of shelf organized – all dvd’s now stored in several 3 ring binders leaving lots of open shelf space

I was able to get 2 shelves, that were 32 inches long, into 3 binders.  The photo of the one binder is of my yoga information in the photo above.  Also, included in the binders were a few other movies we had in our other entertainment center – the one with the CD’s – they are shown in the plastic bin in the photo below.

DVD's to organized from entertainment cabinet
DVD’s to organize from entertainment cabinet

I organized the DVD’s into categories like Family, Holiday, Fitness and made divider tabs for the categories.  I then alphabetized the DVD’s so we can find them easily.  I decided to save the DVD cover inserts so I would know the rating and movie summary but you don’t have to do that if you don’t want to.  If you choose to do that option you will have to trim the DVD insert paper to fit into the page protector insert.

Before you begin this project a word of advice – count all of your DVD’s and figure out how many DVD page inserts you need.  They come in a package of 10 and hold 2 to 4 movies per page.  I did not count all of our movies and ended up making a couple of trips to the store.

Supplies needed for project:

  • 1 or 1 1/2 in. 3 ring binders (I needed 3 binders for all of my DVD’s)
  • DVD clear plastic inserts for binders
  • Tab dividers – (optional)
  • Scissors
  • Time – this took me approx. 3 days but I only worked on it for about 1 to 2 hours each day – note:  time did not include trips to store

I am so happy with the way my binders turned out and how much cleaner and neater the shelves look.

I hope you enjoyed this post – please follow me via RSS feed by clicking the icon in the sidebar or through bloglovin to read future posts.


Organizing Sewing Patterns

1 Comment
patterns stored in clear plastic container with lid from Office Depot
patterns stored in large envelopes and clear plastic container with lid from Office Depot

Years ago I learned of this pattern storage method from a book I read called Confessions of an Organized Homemaker by Deniece Schofield.  I have been using this method to store my patterns ever since as it is much more efficient than keeping them in the original small envelope.

To Store your patterns you will need:

sewing pattern and blank envelope
  • 10 x 13 envelopes
  • Scissors
  • Glue or Glue Sticks
  • Bankers Box or Plastic Storage Box

Here is what you do:

  • Remove all pattern pieces and instructions
  • Cut envelope down one side and the bottom so it lays out flat
  • Glue this cut pattern envelope to the front of large 10 x 13 envelope
  • Place all pattern pieces inside large envelope
pattern glued to blank envelope for more efficient storage


Now your pattern pieces fit neatly inside this larger envelope and do not get so squished up and wrinkled.  It is also easier to read the pattern yardage and see the front view without having to flip it around.  The patterns store perfectly inside of bankers boxes or I recently found this plastic storage box at Office Depot that has a lid and stores the patterns perfectly.  The photo above at the top is of the plastic storage box.  I have used the bankers boxes for years as you can tell by the wear on my box – it still has tape marks around it from when we moved 7 years ago and places where labels fell off.

Use Bankers boxes for storing your sewing patterns

Follow me through RSS feed by clicking the icon in the sidebar or through Bloglovin if you like this post.