Tag: sewing clothes

Sewing Ruched Front Top

5 Comments

The new ruched front tops I recently made are so simple to sew and super comfortable to wear, too.  I decided to make these after seeing some tops like this somewhere and I liked the look.   I didn’t even have to go and buy another pattern, thankfully, since I have quite a few already.  Ruched Front Top in Cotton fabric Red Ruched Front Top in Knit Fabric

The red top in the photo just above is the first one I made.  I bought this fabric on clearance and I decided to use something that wasn’t real expensive in case the top didn’t turn out.  Well, it did turn out and I have already wore it several times.  I am glad the clearance fabric is soft and washes well.

Ruched Knit Top

After making the light red color one in a knit fabric I decided to make one in a cotton fabric.  I love good quality cotton fabrics and I think some of the cottons I find at quilt shops make great fabrics for clothes and bags, too.

Ruched Cotton Floral Top

I have plenty of cotton fabric in my stash and I had this one in a pretty summer looking floral.  I have had it for a couple of years as I remember I made a skirt with some of it and a bag, too, a couple of years ago – both of them I still have and wear-use.  I really like how this one turned out bright and colorful and I have a couple of pairs of shorts to wear with it.

Both versions of this top turned out well.  In my opinion though the knit one has a better drape and look to it for this type of design.

How To Make a Ruched Front:

To make a top like this you just need to know how to sew and to gather fabric.  You will need a two piece pattern for a top with a front and back and a small cap sleeve or even a sleeveless top.  Below are some photos on how to create the ruched front.

Creating ruched front top with pattern drafting material

I used a pattern for a cap sleeve top that I have designed from the Bernina My Label program I own.  I recommend using pattern drafting material – its kind of like interfacing – and tracing your top front pattern piece so you don’t ruin your actual pattern.  (mine is kind of wrinkled in the photo from use and also from a cat who likes to sit on it)  You will just need one side of the front traced.  Then draw lines which start at the center front and extend almost to the side edge.  You can see in my photo above I have 6 slash lines.  Cut these lines and then spread them apart to open the center front – this is the part that will be gathered.  I used some tape to hold the slashes about 1 to 2 inches apart.  I then retraced the pattern piece.  Front of Ruched Top pattern cut out

Above is the photo of my cut out pattern piece and the marked areas for where I gathered the fabric.  To do this I just ran two long basting stitches on each side of the front piece and then pulled them up to gather until the lower part of the top seemed straight.  I then placed the fronts right sides together and sewed them.  You may want to sew an extra row of stitching to hold the gathers in place.  I then just finished the top according to the pattern.  Super fun and simple to sew.

What projects are you currently working on?  Click on Leave a Reply and tell me about them.

Have a great day!

Kimberlee

Sewing Jeans

11 Comments

Sewing your own jeans is a lot easier than you think.  About 5 years ago I made my first pair of jeans because I was fed up with buying jeans that never seemed to fit me how I like.  I decided that instead of wasting my time shopping for jeans and paying a bunch of money for them I would learn to make my own.

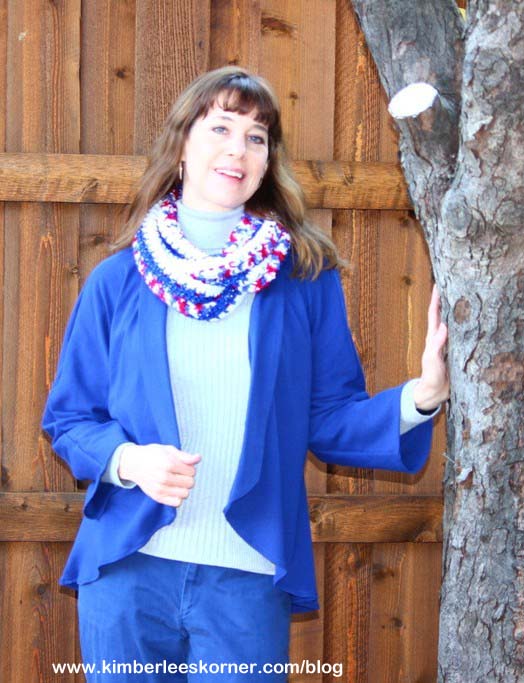
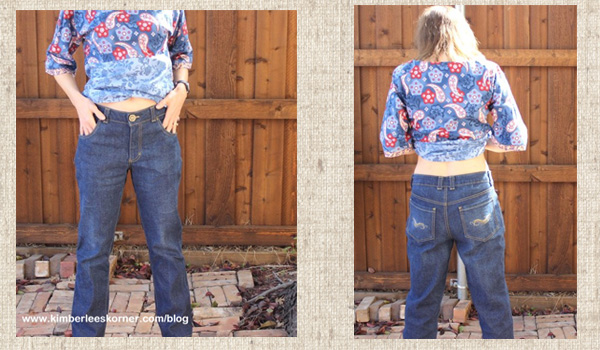
This is the first pair of jeans I made using a Kwik Sew pattern.  The pattern is number 3193 and I know as of a year ago it was still in print.  I made these jeans approximately 5 years ago and yes I still wear them.  They have become a little faded over time but they are very comfortable.

Kwik Sew jeans pattern

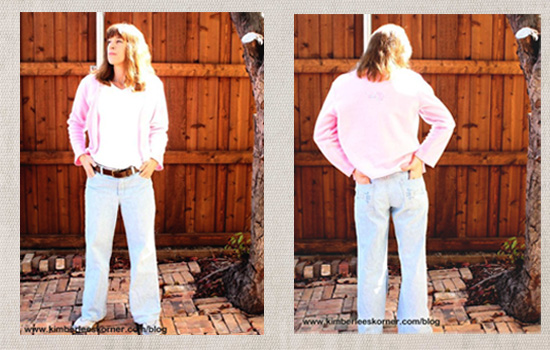
It is kind of hard to see but I embroidered the back pockets of these – I did not have good light conditions outside for these photos but wanted to show how these jeans looked.  The pattern is super easy to follow with great zipper instructions.  There are 2 versions of the jeans a wide leg, as I am wearing, and a straight leg.  I like that the waist is a littler higher on these and not such a low rise, too.  I am getting too old for those low rise jeans.

I  began making more of my own jeans a few years ago after buying the Bernina My Label pattern drafting software.  This is software that helps you design your own patterns using your measurements.  I am not sure if they still sell it but there are other software programs available that do this.  I really like it because it is a more custom fit.  It does – has – required some tweaking and learning to do things on my own.  So, all the current jeans I have made I am now using the My Label pattern which is essentially my own pattern made to fit me.

Dark Denim Jeans sewn by Kimberlee from Kimberlees Korner

Recently I have been on a major jean sewing spree.  I told my husband the other day that I was really getting a system down for making them and I can now get a pair done in about 5 or 6 days.  This of course is not working on them constantly and some days I only have time to sew for about 30 minutes and some days I have no sewing time.  The most sewing time I ever get is about a 2 hour session on the weekend.

I have taken 2 Craftsy classes that have really helped me learn a lot more about designing and sewing your own jeans.  The first class I took a couple of years ago was Online Sewing Class Jean-ius by Kenneth King.Online Sewing Class  This was a great class and I learned so much about fitting and sewing the details on the jeans like the pockets and waistband and topstitching techniques.  In this class you can actually learn how to take a pair of your favorite jeans and copy them to make your own pattern.  The other class I recently took through Craftsy was Sewing Designer Jeans with Angela Wolf.    I learned some more great sewing tips and techniques for the jeans as well as how to put a curved waistband on the jeans after taking Angela’s class.  I also learned how to distress the denim fabric in her class.   Both of these classes are wonderful for increasing your sewing knowledge and learning the skills you need to make your jean sewing a success.    You can learn more about the classes I just mentioned by clicking on the highlighted text to take you to the link to them.  If you are going to make your own jeans I would highly recommend taking both classes.

Some of the tips I have that I think are important when sewing your own jeans are:

  • Use a size 90/14 or 100/16 denim sewing machine needle
  • Take your time and sew slowly – especially when topstitching
  • Make a muslin first using inexpensive muslin just to get an idea of the fit – this way you can adjust some things without ruining your expensive denim.  You may still need to make a few minor adjustments on the denim but at least it will be less and you won’t ruin your fabric
  • Press all your seam using a hot steam iron.  This will make sewing so much easier and your seams will lay nicely.  I took a whole class on pressing once from my Sewing Guild and it is a very important step.
  • Use 2 spools of the same color thread through the needle when topstitching versus using the jeans thread they sell.  I tried using the jeans thread on my dark denim ones and my machine (an older Bernina) does not like it – it is very thick thread and requires tension adjustments.  I found it easier and less stressful to just use 2 spools of thread and a stitch length of 4 for your topstitching.
  • Sew your inner leg seams first, before the outer leg seams.  This is the opposite of what patterns usually tell you to do.  This way you can topstitch the inner leg seam easily.  Also, stitch from the center crotch point down to the hem on each side for best results when sewing this seam together.

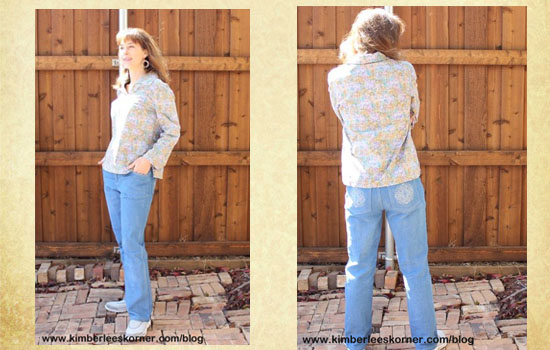
Fabric is a fun and important part of making your own jeans.  I have bought denim fabric from JoAnn that I like as seen in the pair I made 5 years ago (above) as well as the glitter denim fabric I used in this pair:Glitter Denim jeans made by Kimberlee from Kimberlees Korner

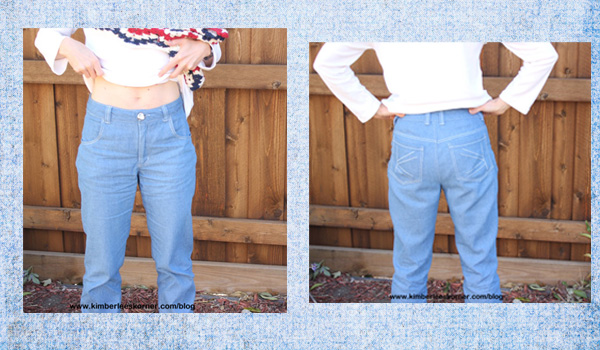
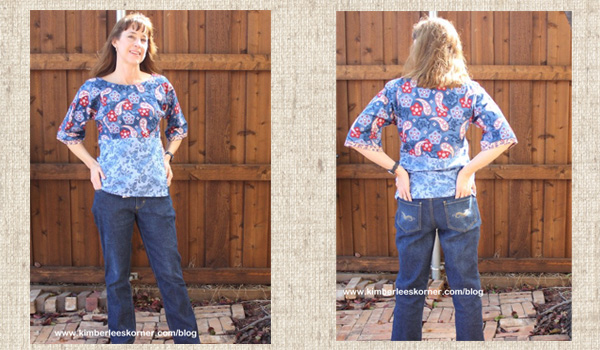
This pair was the first pair I made after taking Angela Wolf’s class.  I had this fabric in my stash and decided to use it.  It is hard to see but there is a light silver glitter in the fabric and this denim is very lightweight – no stretch.  I embroidered my own design using a K logo for Kimberlees Korner using a metallic silver thread.

I also got this fabric that I made these shorts from at JoAnn.  I have only wore these once since it is still kind of chilly here.  denim shorts front & back sewn by Kimberlee from Kimberlees Korner

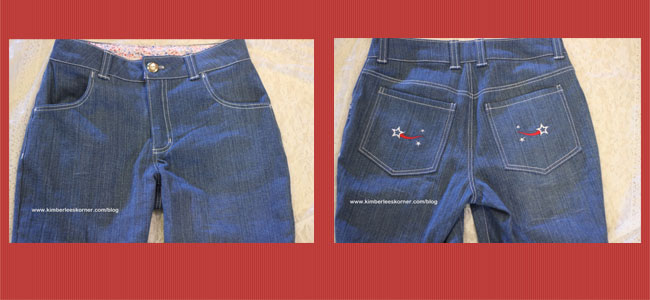
I didn’t have enough of the fabric to make the curved waistband facing so I used the fabric that I did the pocket lining with and love how this turned out.Waistband and Pocket Lining of jean shorts from Kimberlees Korner

The fabric I recently bought from  Fabric.com  is really nice quality denim and a great price, in my opinion.  They also have free shipping on orders over $35.00 and it arrived quickly.  The photos below are the jeans I made using the fabric I bought from there.

front & back dark denim jeans made by Kimberlee from Kimberlees Korner

Jeans sewn by Kimberlee from Kimberlees Korner

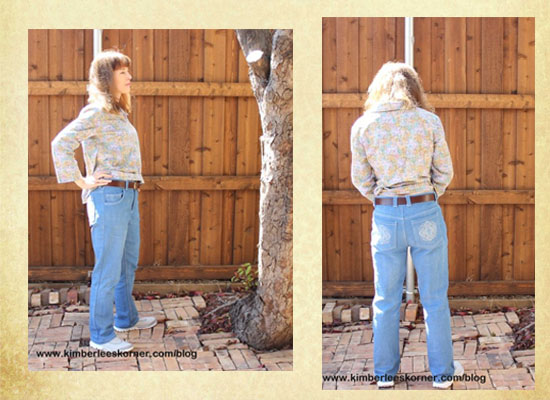
So far the above light color denim and the shorts are my two favorite pair.  They both fit how I like them – not too tight and not too low of a rise.  I really like how the curved waistband adds some extra give to the waist area, too.

side & back view of light denim jeans from Kimberlees Korner

What sewing projects are you currently working on?  Click on Leave a Reply and let me know. I am still in the jeans sewing mode and currently working on another pair of denim shorts using some more fabric I found in my stash.  I also have a tan twill fabric cut out for shorts using the jean pattern but have not started sewing those yet.

Have a great day!

Kimberlee

Sewing Project Knit Jacket

4 Comments

I recently made this knit jacket using a pattern that I also made a tunic from this past summer.  The pattern is Simplicity 1668.  It is one of those patterns considered to be sportswear as there is a whole ensemble that you can make in the pattern that includes a dress, jacket, pants, shorts and a tunic.  So far I have only sewn the jacket and the tunic. Navy Knit Jacket made by Kimberlee from Kimberlees Korner

The fabric I used for this jacket was a lightweight knit that I believe I bought from Hancock Fabrics.  The jacket is very easy to sew as it has minimal pieces.  There are no sleeves to sew as it has a dolman sleeve.  I always like that as it makes completing your project so much easier when there are no separate sleeves to sew.   The front features a shawl type of collar and that was sort of time consuming to sew as it requires interfacing and since it is curved you have to sew slowly and do some clipping to make the seams lay nicely.  I don’t think the jacket front is hard to sew just requires a little time and patience to ensure it turns out well.  You also need to press it to get a crease to make it fold back.

Front, Side & Back view of navy knit jacket from Kimberlees Korner

As you can see from the photos the jacket is a 3/4 sleeve and it also has an asymmetrical drape as the back is lower than the front.

I really like this jacket a lot and was so pleased that I had some navy pants that I made a couple of years ago that went with the jacket and It also looked nice with my Olympic Crochet Scarf that I had finished during the winter Olympics.  I think I would like to make this jacket again in the near future in a cream or white for spring or summer.  This jacket is the perfect thing to keep with you for those air conditioned places that are so chilly in the summer time.

Currently I am working on sewing some jeans and jean shorts.  I will be doing a future post on them so be sure to subscribe via bloglovin, email or RSS for updates.

Have a great day!navy knit jacket sewn by Kimberlee  Kimberlees Korner

Kimberlee

Sewing Navy Knit Top

3 Comments

This navy knit top is made from a Butterick pattern that I bought at least a year or two ago.  I am sure I got the pattern when they were on sale and had great intentions to sew it up asap but life got in the way – or other sewing projects!

Knit Top made by Kimberlee from Kimberlees Korner

I got really motivated to make this when I saw Deby from So Sew Easy post her finished versions of this top on her blog a couple of months ago.   I made a comment to her on how I also had the same pattern and she responded that it was really easy to sew.  I decided I needed to get it done!

One of the reasons I had put off making this top was while it said it was easy on the pattern it looked somewhat complicated after I had cut out the pieces.  There really are not many pieces to it – like maybe 4 or 5 – but it still looked like a challenge.  I have a lot of sewing experience and make a lot of my own clothes but I remember making this other twist front top a couple of years ago and it did not fit me correctly.   It was too low in the front and I didn’t like wearing it.

This sewing project was much more successful than my previous one.  I made the size 10 – the smallest size is an 8 and based on the measurements I went with the 10.  I did decide to adjust the lower V point up a little and I am glad I did or I think it would have been too low cut for my taste.  I think I brought that point up about an inch.  The gathered front area is very attractive and the top is comfortable to wear, too.

Navy knit top and pants sewn by Kimberlee from Kimberlees Korner

I also made some pants from the same fabric using the Bernina My Label pattern that I have for just the basic pull on pant.  They are really comfortable and the fabric has a poly blend with the cotton so they don’t get too baggy when you wear them.  I am not sure where I bought the fabric – maybe Joann’s.  I have had it in my stash for several months now.  I tend to buy fabric when it is on sale and stick with colors I like.

Back view of navy knit top sewn by Kimberlee from Kimberlees Korner

The above is the back view of the top.  Sorry it is a little wrinkled – I took the photos later in the day after I had been to church and sitting for a while.

I will definitely make this top again.  There are two other versions in the pattern.  They have the same front but one is sleeveless and the other is longer, more like a tunic, with long sleeves.  I think I will make the long sleeve tunic version next so I can wear it with some new leggings that I recently made.

Have a great day!

 photo dbaf2cd4-dd2b-49d6-8838-f9aff3fe3cbb_zpsca4b926e.jpg