Month: July 2014

Working Out Week 30 of 2014

The last full week of July has past – week 30 of the year.  It has gotten really hot here in Texas in the past week or two.  My workouts this week are below:

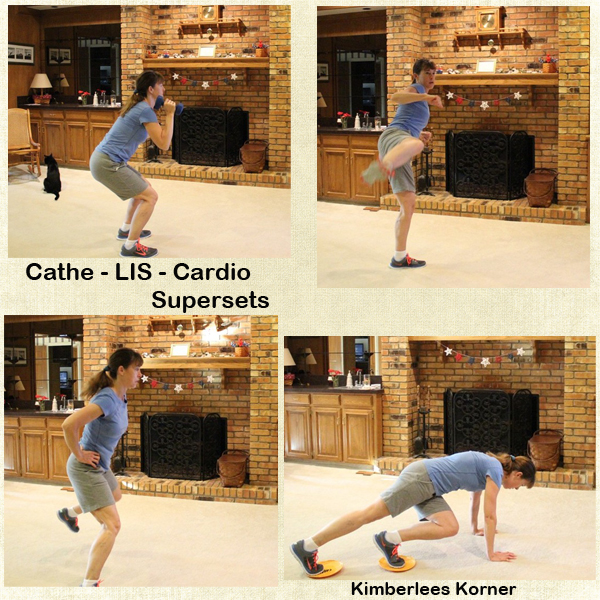
  • Monday – Cathe LIS – Total Body Trisets – Chest, Shoulders and Tri’s – 31 min.
  • Tuesday – Ride Bike + Yoga – 40 min.
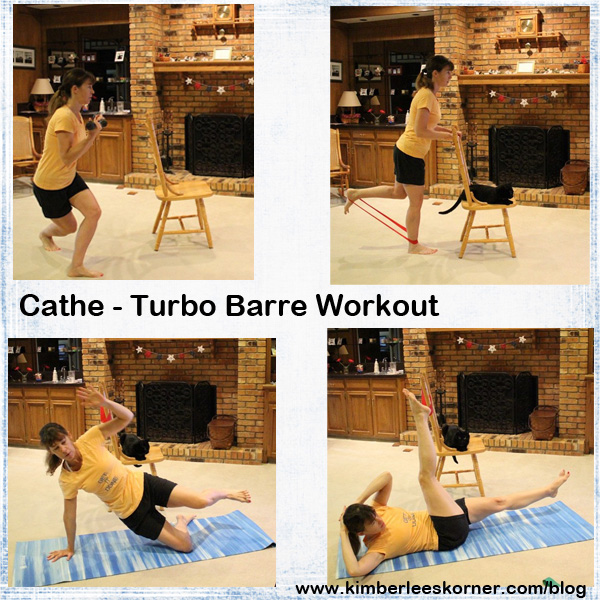
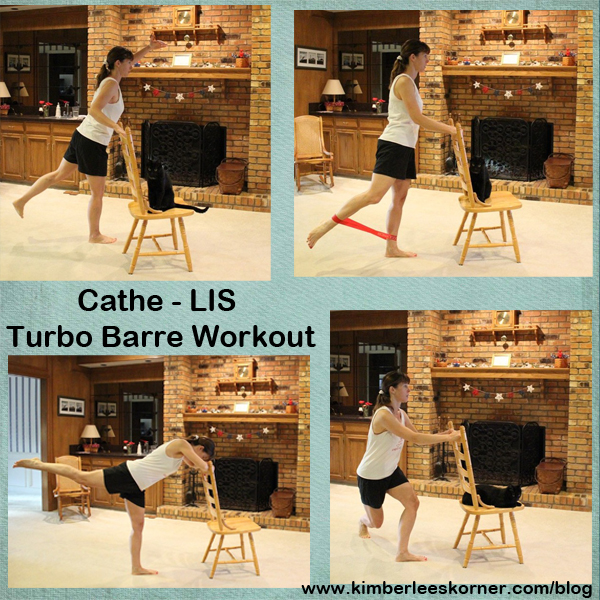
  • Wednesday – Cathe LIS – Turbo Barre – 40 min.
  • Thursday – Ride Bike + Yoga – 35 min.
  • Friday – Cathe LIS – Total Body Trisets – Back, Bi’s and Core – 34 min.
  • Saturday – Ride Bike + Yoga – 33 min.

This past week instead of doing cardio dvd’s I decided to do some weights for the upper body and also my Turbo Barre workout on Wednesday.

Cathe Total Body Trisets Upper

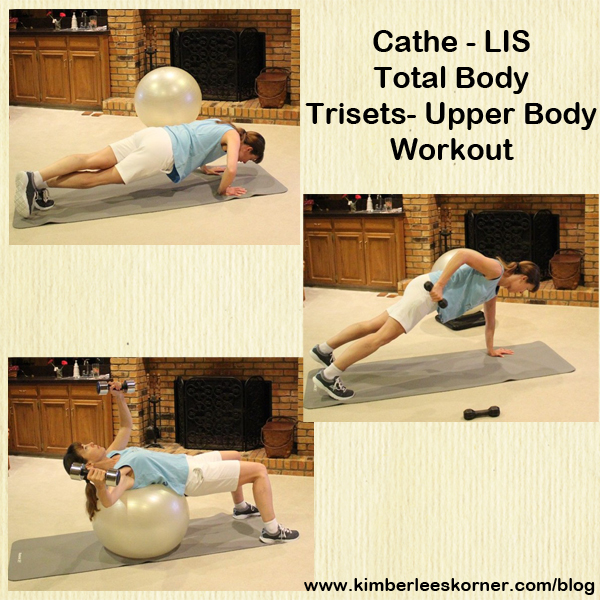
The weight training workout I used this week was the same one, from the Cathe Low Impact Series called Total Body Trisets.  The workout is actually a total body workout but I chose to just do the upper body portion of this workout on Monday and again on Friday.  This workout uses some heavier weights like 10 and 15 pound dumbbells and the exercise ball with some of the sets.  The workout consists of 3 exercises per grouping that you repeat two times before moving on to the next set.  It felt good to do some heavier weights this past week.

Cathe Turbo Barre Workout

The cat joined me again on Wednesday for the Turbo Barre workout.  (see him on the chair) This is our third Wednesday in a row of doing this workout.  I did the muscle conditioning portion with the lighter 5 pound dumbbells and then on to the floorwork and then the ab work.  I love the fun and challenging ab moves in this workout.  You can see some of them in the photos above.

On the days I was not using my dvd’s I rode my bike through the neighborhood.  I got bored with my old route so I changed it up a bit this week.  I would then come back home and do my yoga outside on the patio – it feels good to do the yoga after a bike ride.


Ball Exchange exercise

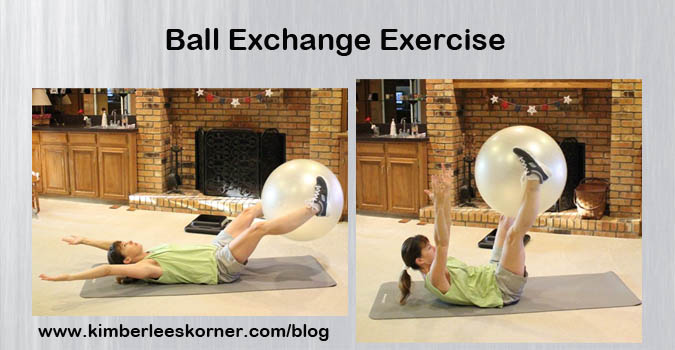
The ball exchange move is one of my favorite ab-core exercises and I did plenty of them on Friday with the Total Body Trisets dvd.  This move is where you place the ball between your lower legs, lower them down while lowering your upper body with the arms stretched overhead, then raise both your legs (while holding the ball) and your arms back up and grab the ball with your hands and lower your legs and your hands (now holding the ball) back toward the floor – you don’t actually touch the floor with your legs and arms though.  When you do about 25 or 30 of these for two rounds you really feel it.

What is one of your favorite exercise moves that you did this past week or recently – or maybe a favorite new workout?  Click on Leave a Reply to tell me about it.

Have a great weekend!
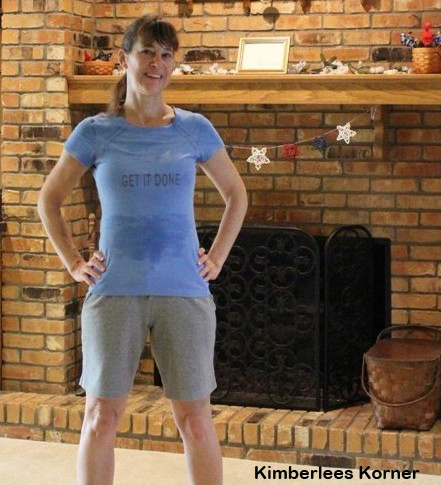
Kimberlee

Easy Sewing Pattern For Tops

9 Comments

One of my favorite sewing pattern brands are Kwik Sew patterns.  I realize they are a bit more expensive than some other pattern companies but I don’t mind paying extra for a stylish pattern that fits well and has excellent directions.

The other nice thing about their patterns is they are often classic styles.   They also come printed on nice heavy paper, not that thin tissue paper that tears easily.  All sizes are included in the pattern and I have found that if you want to sew something for yourself and then use the same pattern for someone that is a different size you can easily use this thin, see through, pattern tracing fabric – its kind of like interfacing and is usually sold near the interfacing – to trace multiple sizes.  I have also used quilters grid before to trace patterns since you can see through it.

One of my favorite Kwik Sew patterns that I bought years ago and have made many times in various fabrics and prints is pattern number 3632.  This pattern is for a top or dress that has an elastic casing at the neckline and sleeve cap to gather those areas in and create and cute and flattering top.  Kwik Sew Top made by Kimberlee


Back of White Knit Top sewn by Kimberlee

This white knit top above is one I made in the past month.  It was super quick and easy to sew.  There are only 2 pattern pieces and then you have to sew the casing for your elastic at the neck and arm area, hem the bottom and its finished.

Blue and Yellow Chevron Cotton Top sewn by Kimberlee

The blue, yellow and white chevron print top above is also made using the same pattern but with a cotton fabric.  The pattern is very versatile and I have used various types of fabrics for it.   I love how easy it is to make one of these tops – like in a couple hours or less.   I have also used stitches other than a straight stitch to sew the topstitched area – on these two tops I used a narrow zigzag stitch for the casings and the hems.

This particular pattern would be a great project for someone learning to sew.  The pattern is really easy to read and to sew.  I also noticed that Hobby Lobby is now carrying some of the Kwik Sew patterns as well as Joann and Hancocks.  In the past in my area I could only buy them at Hancocks.

What types of sewing projects do you like to do?

Have a great day!

Kimberlee

Knit White Top sewn by Kimberlee

Working Out Week 29 of 2014

7 Comments

This past week seemed to go by so fast!  I can not believe we are more than halfway through the month of July!  It has also cooled down here in Texas quite a bit the last couple of days and we got some much needed rain all day on Thursday.  July is normally really hot so it is strange to be in the low 80’s for the high temperature of the day.

This week my workouts were as follows:

  • Sunday – Walk + Swimming – 45 minutes
  • Monday – Cathe Xtrain; All Out Low Impact Hiit, Step & Disc Cardio – 25 minutes
  • Tuesday – Ride Bike + Yoga outdoors on patio – 32 minutes
  • Wednesday – Cathe LIS; Turbo Barre, Upper-Lower Muscle Endurance, Legs with Band, Planks & Abs segments – 50 minutes
  • Thursday – Walking + Yoga – 20 minutes
  • Friday – Cathe Xtrain; Supercuts – 46 minutes
  • Saturday – Ride Bike + Yoga outdoors on patio – 32 minutes

Normally I take Sunday’s off but this past Sunday I decided to go for a late morning walk and in the afternoon I swam some laps in our pool.  It was really hot that day and a great day to go swimming.

I decided to do some Cathe Friedrich Xtrain dvd’s this week.  This dvd series is a couple of years old.  There are some great cardio and weight routines in this series.

All Out Low Impact Hiit workout

Monday I did All Out Low Impact Hiit.  I only did a 25 minute premix of the step and disc cardio that day as I was having some issues with a pesky sinus headache that came on Sunday evening and carried over into Monday.  I was determined not to let it interfere with my workout schedule though.  My cat showed up at the end for the stretch – apparently he wasn’t into working out that day either.

Turbo Barre Workout

Wednesday I did the Low Impact Series from Cathe Friedrich – the Turbo Barre workout again.  I am going to try and keep including this in my schedule once a week as I really like this workout even though its kind of long.  It really seems to lengthen your whole body and strengthen and tone everything.  This week I did a couple of the segments of the workout that I didn’t do last week.  As you see the cat really likes this workout – he began it by standing on the floor behind the chair and jumping up over the back to get to the seat.  Then he continued to jump around and chase his tail for a while.  I guess that was his workout for the day.

CW Yoga For the Core

I am also continuing to enjoy the warmer weather and ride my bike or walk in the mornings.  This past week on Thursday I was going to walk again but it rained – thankfully as we really needed it.  So, I decided to get out an old workout that I bought years ago.  It is the Caribbean Workout Yoga For the Core.  The show used to be on Fit TV and they also put out dvd’s.  I think I got this on sale at Walmart.  The dvd has three 20 minute segments on it.  Both of my cats joined me that day for some yoga.

Supercuts Workout

The other Xtrain workout I did was called Supercuts.  I did the entire dvd which is 46 minutes long.  It is a fun, fast paced and challenging workout that has cardio, weights and lots of core exercises.  There are also several exercise that use the band with handles that are really great for the upper body and the core.

I made more granola this week since my one son ate most of the first batch I made last week.  You can look at my workout post from week 28 to get the link to the granola recipe.

I also read a post last week on another blog I follow called the 100lb Countdown.  The post was on smoothies and it gave me an idea to create this smoothie with carrots, orange juice and a nectarine.

Orange, Carrot, Nectarine Smoothie

I guess this smoothie came out more like a drink but I thought it had an interesting and pleasant taste.  To make this you will need the following ingredients:

  • handful baby carrots
  • 1 nectarine, cut up, pit removed, skin left on
  • 2 spoonfuls plain greek yogurt
  • 1/2 cup orange juice
  • 1/2 cup water – more if needed
  • 1/2 cup crushed ice

Place all of the above ingredients in a high powered blender like a ninja blender and pulse a few times then blend for about 1 to 2 min. on speed 8.  You could also add a little honey if you wanted it a bit sweeter.

I have found that I like nectarines in my smoothies and have used them in a couple of my green smoothies as well.  I recently read in a book I got from the library called The Juicing Diet that nectarines are good for detoxing, heart and bone health and for your skin.

I hope everyone is having a good weekend!

Kimberlee


Garter Lace Knit Shawl

7 Comments

I have finally finished my Noro Garter Lace Shawl.  I started this project last summer and had set it aside.  I got it out a couple of months ago and decided I needed to finish it since I was already a fourth of the way done.  The shawl is very pretty and I love how it turned out.

Lace Knit Shawl


Back of Noro Shawl

The shawl pattern was from the summer 2013 issue of Noro Knitting magazine.  The pattern is available on Ravelry for $5.00.  It was a fairly simple pattern to follow but in my magazine there was an error on the one row of the lace pattern.  I had figured this out on my own around the third repeat row of the lace pattern and I now notice that there is a errata statement on the Ravelry page – I guess I should have looked there sooner.   So, if you decide to knit this look at the end of the pattern page and the row correction is there – save yourself a headache.

Noro Knitting Magazine Summer 2013


The yarn I used for this was not the yarn the pattern recommended.  I used Noro Sekku yarn because I had 3 skeins of it and knew it would be enough to make this shawl.  The Sekku yarn is a blend of mainly cotton, wool, nylon and silk.  The yarn was okay to work with – not one of my favorites in the Noro yarns.  It is a really fine yarn that was like knitting with floss.   I really like the colors of the yarn though and how they look with the lace pattern.  The colorway I used was number 8 – and it only took 2 of my 3 skeins so now I will have to figure out something to make with that leftover skein.

The reason I think this shawl took me forever to finish was that it is knit on very small size 4 needles.  That needle size combined with the thin yarn I just felt like I was not getting much done.  The end part of the shawl took forever to complete a row too because you had over 300+ stitches on the needles.  I think it was taking me about 10 or 15 minutes to complete a row.

Noro Lace Triangle Shawl

This shawl is a great summer project though as the yarn is thin and mostly cotton so it is not hot or too heavy to work with when it is hot outside.  I do not like to work with heavy wool type of yarns in the summer time.

Overall I am pleased with the way this shawl turned out and look forward to being able to wear it.  It will be a great shawl to keep with me for those chilly air conditioned places.  There are also a lot of great colors in this shawl that will go with many things in my wardrobe.

What projects have you recently finished?  Click on Leave a Reply and tell me about them.

Have a great day!Lace Triangle Shawl

Kimberlee

Working Out Week 28 of 2014

1 Comment

Another week has gone by and I was able to get back into my normal routine of working out each morning now that the ceiling renovations are done and I am feeling better.

  • Monday – Cathe – LIS (Low Impact Series) Cardio Supersets – 41 min
  • Tuesday – Ride Bike + Yoga – 32 min
  • Wednesday – Cathe LIS Turbo Barre – 52 min
  • Thursday – Ride Bike Walk + Yoga – 35 min
  • Friday – Cathe LIS Afterburn – 54 min
  • Saturday – Ride Bike + Yoga – 35 min

I decided to do my Cathe Friedrich Low Impact Series workouts since I was still only about 70% better at the beginning of the week.  The LIS workouts are still challenging but not as hard or intense as some of her other workouts.  Cathe Supersets Workout


After completion of Cardio Supersets

As you can see by the workout photos above and the post workout photo of all the sweat that the low impact workout does not mean easy.  These workouts are still challenging but less intense and not so hard on the joints – a lot less jumping but it still gets your heart rate up.

On the days in between doing LIS I rode my bike and came home from riding to do a little outdoor yoga on the back patio.  I went out on Tuesday to a very flat tire on my bike so I pumped it up, rode anyhow and kept checking behind me to make sure it was holding air.  When I went out to ride on Thursday the tire was completely flat again so I decided to walk instead and not risk riding on the bad tire.  I discovered we had another tube to replace it so my husband fixed it for me Friday night and I was able to ride again on Saturday.  I did enjoy walking for a change though on Thursday.  It is nice to have variety – keeps me from getting bored of exercising.

Cathe Turbo Barre Workout

On Wednesday the LIS workout I chose to do was the Turbo Barre workout.  I have not done this workout is quite a while and really like it.  The workout is done in bare feet and uses minimal equipment – just a chair, or a barre if you have one, some light dumbbells and a loop band – and your cat on your chair!  My cat loves to sit on the chair during this workout.  It is over 50 minutes so I think he left for a few to go eat his food – then he was back.  This workout offers total body conditioning with a primary focus on the legs, hips and butt.  I have decided to try and incorporate this in my weekly routine at least once a week for the next month to see the results.  I like how it lengthens and defines the lower body.

Cathe Afterburn Workout

Afterburn was the other Cathe LIS workout I used this week.  It is a total body cardio and conditioning workout that offers a lot of variety using the slide and glide discs (that my cat loves), some dumbbells and dixie cups as markers or props for the workout.  Again it is low impact but not easy and you will sweat a lot.

I also made a new granola recipe this week.  It is one I found on another blog a couple of months ago and had pinned it to one of my pinterest boards.  It is a white chocolate cranberry granola.  I changed the recipe a bit to have a little less brown sugar and used oil in place of the butter.  One of my son’s loves it and he is usually kind of picky.  He saw me putting in the coconut and didn’t think he would like it but he said it smelled really good so he tried it and had two small bowls when it was still warm from the oven.

White Chocolate Cranberry Granola with blueberries

The photo above of the granola is with some fresh blueberries added to it and some soy milk.  That was my breakfast this morning.   My son didn’t want the dried cranberries in his so I am just storing the granola and adding in what I want as I eat it.   This is really good if you warm the granola a little bit and then add a few of the white chocolate chips and they sort of melt onto the granola.  It would also be good with dark chocolate chips, I think.  I will probably try that out next.

I hope everyone has had a great week.  Tell me about your workouts or any new recipes you have tried by clicking on Leave a Reply.  Also, for future post and updates you can follow my blog via bloglovin, email or RSS – all icon are in the right sidebar.

Have a great day!

Kimberlee

Categories: Exercise Food Recipes

Sewing Simple Chevron Top

2 Comments

This simple blue chevron top is a sewing project I finished a couple of months ago.  I had intended to share it sooner but things have gotten in the way of my plans which is I guess how life goes for everyone at times.  I have wore the top several times already and love how simple it was to sew and how comfortable it is to wear.  Also, it looks good with skirts, shorts or jeans.

Blue Chevron Top

The pattern I used for this top was from the Bernina My Label software – which is pattern drafting software I have that drafts patterns by your measurements.  I have mentioned it before and use it quite a bit.  This top is actually not one of the patterns in the software – I used the tunic pattern to design this simple cap sleeve top.  It is only two pattern pieces – a front and back – and I make a bias neckband facing which I am going to share with you below on how to do this.

The fabric I used was a 100% cotton fabric that I think I ordered from fabric.com.  The one thing about making clothing with the chevron prints is that you want to have a little extra fabric to match the chevron pattern as close a possible to look uniform.  Also, you want to make a top that does not have a lot of complicated darts or seams that will make the print look strange.

Blue Chevron Top sewing project

The neckline of this top is sewn with a bias strip of fabric for the facing.  A lot of patterns come with a facing that is curved but I often find they are kind of wide and do not always lay well.  I have found that using the bias facing technique works much better – especially with this style of top.  Below is a little tutorial on how to make a bias neckline facing.

  • Step 1 – cut a fabric strip on the bias that is 1 1/4 inch or 1 1/2 inch wide and a little longer than the length around your neckline.  For this top I did 1 1/4 inch wide.   Note:  the bias is the 45 degree diagonal grain of the fabric – most quilting rulers have the angles marked and you can use that as a cutting guide.Bias fabric strip for neckline
  • Step 2 – after you have your strip cut finish off one of the long raw edges with a serger or a zigzag stitch
  • Step 3 – then pin the other raw edge with right sides together to your neckline starting at the center back of neck- overlap the ends a little  (what I usually do is just have an extra long strip and after I am done pinning it to the neckline I cut it where I need to)
  • Step 4 – sew the strip to the neckline edge using a 1/2 in seam allowance

Sewing bias strip to neckline for facing


  • Step 5 – Clip the curved neckline edges close to stitching line, with a steam iron press bias strip out with seam pressed toward the bias strip

Bias Neckline Facing

  • Step 6 – Understitch the facing just inside the neckline seam on the bias strip – you can use the inner toe of your presser foot as a guideUnderstitch bias facing
  • Step 7 – Press the facing to the inside of the top and topstitch the facing down from the right side of the top – I usually use a 3/8 inch seam or the outer edge of my presser foot as a guide while stitching around the neckline – press again after you complete your topstitching

I hope you enjoyed this tutorial and are getting lots of sewing projects done this summer.  I would love to hear about what you are working on – click on Leave a Reply to tell me about your current projects and crafts.  Also, to receive future blog updates and tutorials follow my blog via email subscription, RSS feed or bloglovin.  All icons are in the right sidebar.

Have a great week!

Kimberlee


Working Out Week 27 of 2014

Well, this past week I got in a minimal amount of workouts compared to my normal schedule.  The reason being one;  ceilings still being redone the beginning of the week, and two;  I came down with some type of respiratory virus as of last Sunday and was not feeling too great.

The workouts I managed to get in were:

  • Monday – Ride Bike 2 miles to store and yoga in the evening – 30 minutes
  • Tuesday – no workout
  • Wednesday – Ride Bike + yoga-stretching – 30 minutes
  • Thursday – Yoga – 15 minutes
  • Friday – Ride Bike  couldn’t ride bike as planned – felt terrible!
  • Saturday – Yoga – 20 minutes

Monday and Tuesday they were still working on our ceilings but I did feel okay enough on Monday to ride my bike to the store and do a little yoga in the evening in our bedroom (living room was still a mess with plastic).

Wednesday I actually thought I was feeling better – rode my bike in the early morning and did a little yoga-stretch when I got back from that.  Then, I got busy with the task of getting my house back together since they were done with the ceilings.  I washed walls, counters and baseboards of dust.  I then got out the carpet cleaner and cleaned the dining room and living room carpets.  They had covered them but I just wanted everything really clean after all the work they did.  The ceilings look so much better and nice and clean – see photo of before and after below.

Before After ceilings redone in dining room


I also had laundry to catch up on since they worked in the laundry room, and I couldn’t do  laundry while they were working, so I did about four loads on Wednesday.  Well, I guess I over did it Wednesday and relapsed into this virus – or it just hadn’t shown it’s full ugly self yet.  I did not feel very good Thursday and even worse on Friday, the 4th of July.  I rested a lot on Friday and feel somewhat better today.  I managed to wake up and felt like doing a little yoga.  Between the house being under construction of sorts and my virus I feel like I have lost a week of time.   Even my husband commented on how disruptive the ceiling remodel had been.  We would like to do the upper level of our house – our bedrooms – but I don’t know if I can go through another week of displacement and mess again.

I will say again though how much better our ceilings look and even my kids commented on how it seems like the ceilings look higher with that popcorn texture gone.  I am enjoying looking up in my living room when I am on the floor working out and seeing the popcorn removed and the brighter, freshly painted ceiling.  Below is the photo of my living room ceiling aka my workout room in the mornings.

Living Room Ceiling after popcorn texture removed

I am hoping to start my week off next week with a workout schedule of alternating cardio one day and yoga the next.  I think if I take it easy today and tomorrow I will feel like myself again and hopefully be over this virus.  So far no one else in my family has gotten it and I hope it stays that way.

I hope everyone is having a great 4th of July weekend!

Kimberlee

Patriotic Projects

In this previous month I worked on a few patriotic projects and wanted to share them on my blog.  I love the colors red, white and blue and usually have them decorating my home for the months of May through August.  The colors just seem to fit my summer mood and go with the holidays of Memorial Day, 4th of July and Labor Day.

The first project was a star garland that I made.  It was super quick and easy.  I was at Pier 1 back before Memorial Day and found these cool grapevine looking colored stars.  I used some of my red, white and blue yarn and strung them to make a mantel garland.

Stars Garland

The next project I made was a wreath for my front door.  I was at Michaels back in May and saw this tied fabric garland and decided I could make my own and use up some of my fabric scraps.  I then used the fabric garland on a wire wreath that I first covered in burlap ribbon.  I had a few of those stars leftover from my garland project and took some jute twine and tied them to the wreath.

Patriotic Wreath

Below are the photos of the steps to make the wreath.  I used a glue gun to secure the burlap after wrapping it onto the wire wreath and I also put a little glue on the fabric garland after wrapping it around.  To make the fabric garland I used jute twine and just cut 4 to 5 inch pieces of fabric about a half inch wide and tied it to the jute.  It was a great way to use up some leftover fabric in my stash.

Twine Fabric Scrap Garland

Step to make RWB wreath

The last project I made were fabric coasters made from 1 1/2 inch wide strips of fabric.  This is another great way to use up some of your stash.  To make these coasters you will need:

  • a sewing machine
  • 1/4 inch presser foot
  • thread to match project
  • 1 1/2 inch strips of fabric
  • 2 1/2 inch strips of fabric for binding edges
  • 6 inch squares of fabric for backing
  • 6 inch squares of warm and natural cotton batting
  • rotary cutter
  • quilters ruler

The first step is to lay your  6 inch square batting on top of the wrong side of the 6 inch square of fabric. coasters step 1

Then you will lay your first strip of fabric wrong side on batting and right side up – then place your 2nd strip on top of that strip right sides together and sew using a 1/4 inch seam – it is helpful to have a 1/4 inch foot for this step.

coasters step 2

After sewing the strips together onto the batting and fabric backing you will press them and continue to sew strips in this manner covering both sides of batting.  After a final pressing use a ruler and rotary cutter to square off all your edges.  You will have a piece that looks like the photo below – front and back views.  This called quilt as you go strip piecing.

front and back view of strip coasters

The final step is to attach the binding.  For this I used a 2 1/2 inch wide strip pressed in half and sewed it to the wrong side of the coaster with the raw edges even.  Since there were no curves in this coaster I did not use a bias edge binding, just a straight strip.  You can probably google how to make and attach quilt binding for a better explanation of how to do this.

coaster sewing bindingAfter sewing the binding to the wrong side you press it over the raw edge to the right side of your coaster.  You may want to clip the corners a little.  I like to pin it in place before sewing.  Also, you will need to miter the corners by folding them in and pressing them in place.  I then sewed around the folded edge of the binding using a narrow zigzag stitch.  Photos below are of the finished coaster.

Patriotic Coasters

Patriotic Strip Coasters

I like to use these coasters outside on my patio and in my kitchen and living room.   They are super simple and quick to make if you have all of the supplies on hand – they make a good housewarming gift, too.   You can also use this same process to make a matching potholder by using a larger square of batting and backing fabric – like 8 or 9 inches.  For potholders you may want to use the thermal fleece type of batting so they are more heat resistant and even use 2 layers.  I have also used 2 layers in the coasters if you want them to be thicker.  If you decide to use 2 layers you may want to use a walking foot to sew the strips down so they don’t shift.

I hope you enjoyed reading about my projects and get inspired to make something patriotic for the summer season.  If you have any projects you have currently made I would love to hear about them – click on Leave A Reply and tell me about them.

Have a great day!

Kimberlee