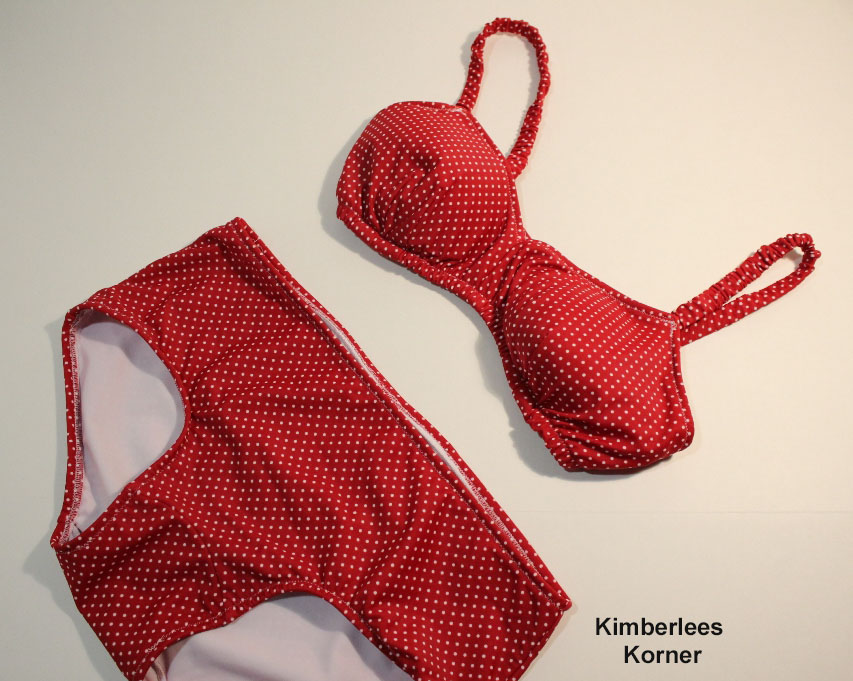
I recently finished sewing this red polka dot bathing suit. This is one of the many sewing projects I wanted to complete this summer.
The pattern I used to make this bathing suit is a vintage pattern that I bought last summer from an Etsy seller. If you go on Etsy and type in the search “bathing suit pattern” you can find lots of sellers that have patterns. It seems like it is hard to find a pattern in the store these days – I guess it is not popular to sew your own bathing suit anymore. I actually prefer to sew my own bathing suit as I can get the fit the way I want it. I will admit sometimes you have to make the pattern a couple of times before it is exactly how you want it but the result is worth it – a good fit and a bathing suit that will last for several years, most likely.
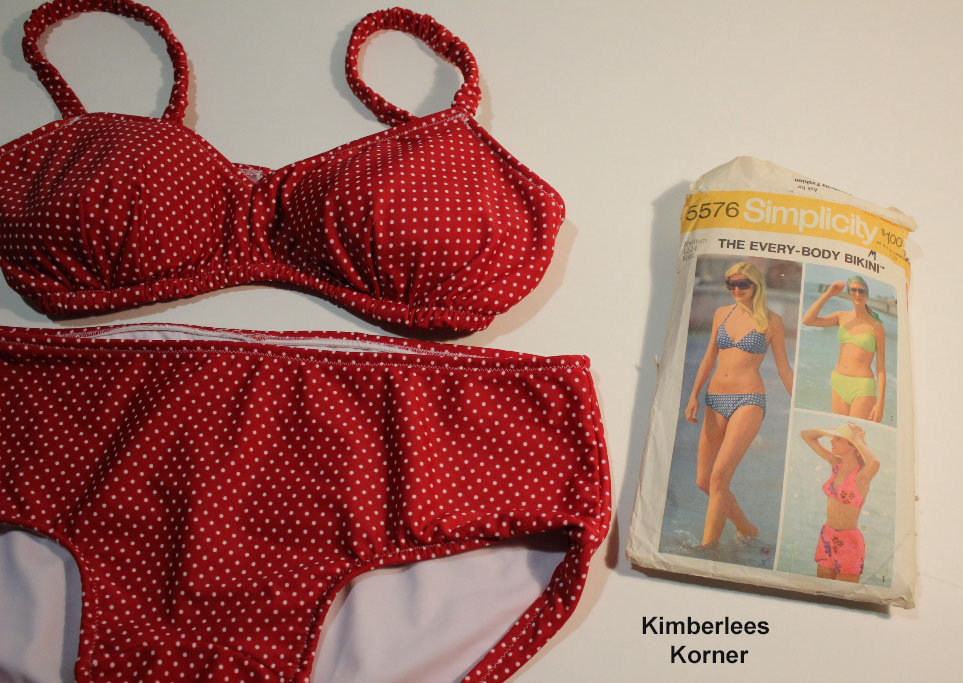
The pattern was made back in 1973 according to the pattern information. As you can see it was only a dollar back then. I think I paid around $6 or $8 for it on Etsy. I have made version 2, in the right hand corner, three times now. I made one last summer and had to make a few adjustments to it and I made two this summer. I recently finished a turquoise bathing suit in addition to the red polka dot bathing suit.
The fabric I bought for this bathing suit was from Spandex World. I also bought it last year at the end of summer so it was on clearance. The fabric I used for the lining was panty spandex from Sew Sassy. I think it only cost me about $15 to $20 to make this red polka dot bathing suit and that includes the elastic and back closure.
Some tips for sewing your own bathing suit:
Use decent quality swimwear fabric and purchase a little extra in case you need to make another top or bottom with adjustments to your pattern
Be familiar with sewing on stretchy fabrics that have spandex or lycra in them
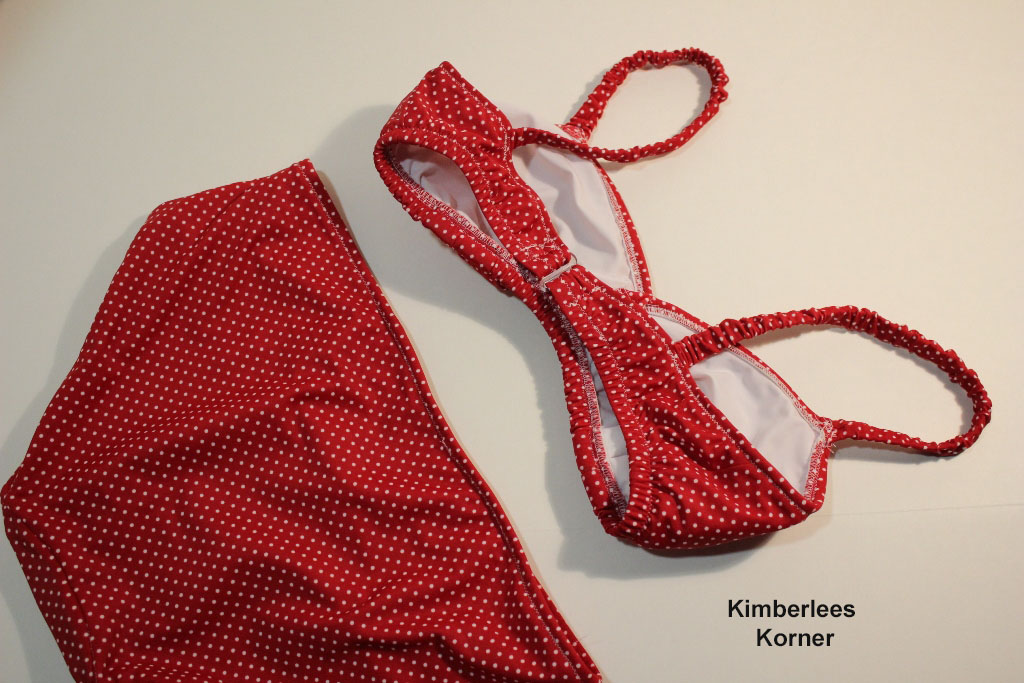
Line the top and the bottom for best results – you can use swimwear lining or panty spandex
Use a stretch sewing machine needle size 75/11
Use a narrow zigzag stitch for topstitching the elastic as it will stretch more
Places to order supplies for making your own bathing suit:
Spandex World – lots of swimwear fabric at reasonable prices
Etsy – for swimwear fabric and bathing suit patterns, also the back closures
Sew Sassy – good quality elastic that is reasonably priced, plastic back closures, swimwear lining and thin foam cup inserts for the top
What sewing projects have you been working on lately? Let me know in the comments.
I have been kind of absent from posting lately. One of the reasons is my new sewing obsession – I have learned how to sew my own bras. I have spent half my summer sewing bras (when not doing other things) and having a lot of fun learning something new as I make each one.
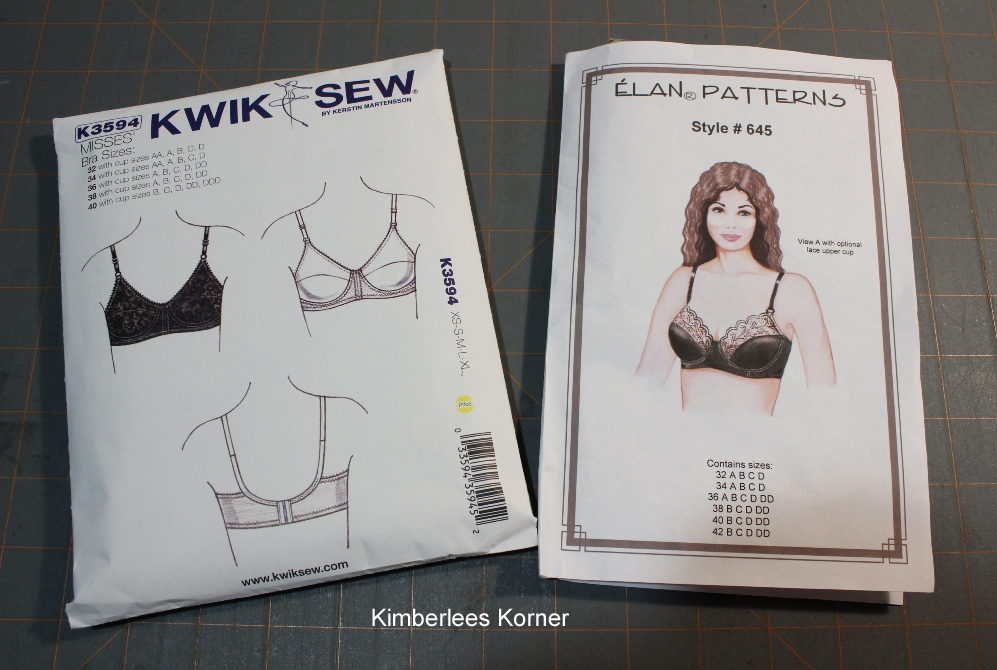
I actually got interested in making my own undergarments last summer. I started making my own underwear after getting so fed up with the ones you buy either not fitting well or falling apart after six months of use or just wearing out quickly. I don’t care if I bought expensive, high quality underwear or the less expensive kind that come in a package it seemed they did not hold up well. Anyhow – I got a couple of patterns last year from some Etsy sellers – one for a Stretch and Sew underwear set and the other a Kwik Sew pattern – which I believe the Kwik Sew one I got at Hancocks as it is still a current pattern – or was a year ago.
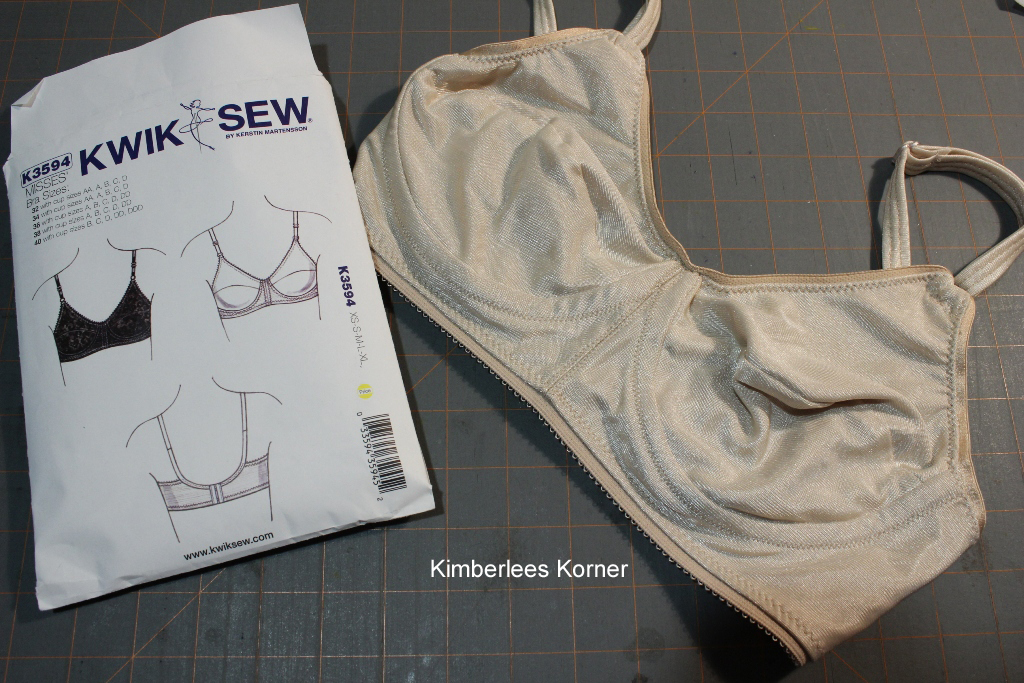
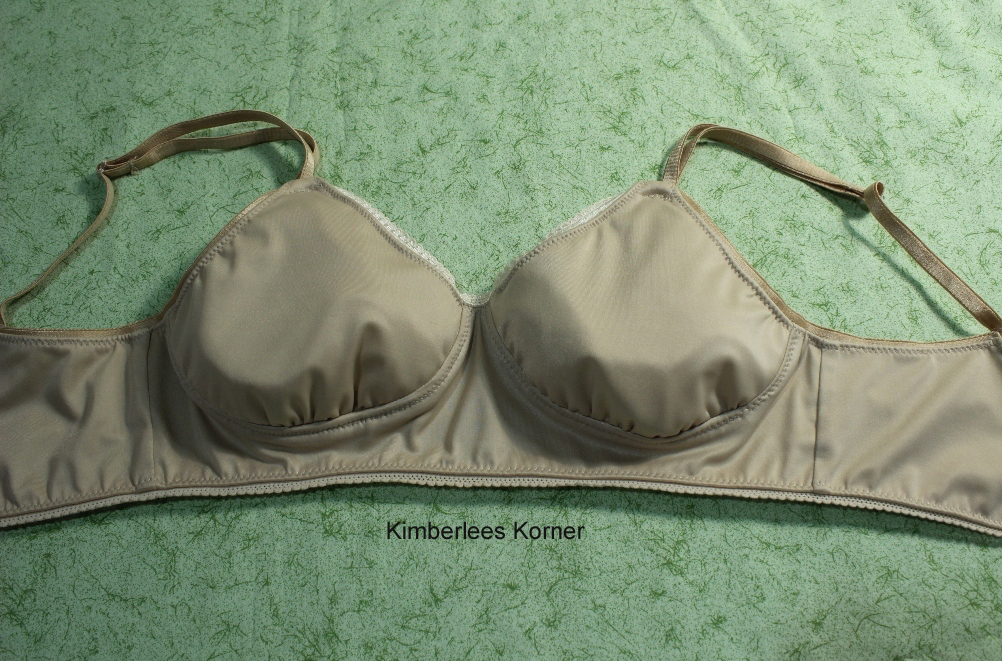
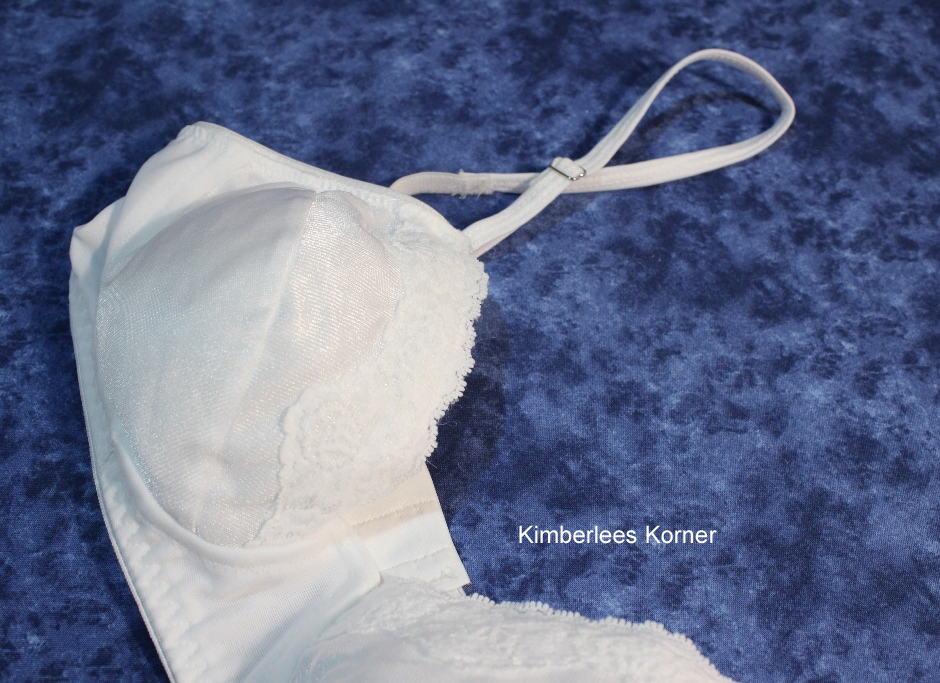
Well, I am happy to say that after a year ago of making my own underwear they are still in good shape after repeated washing. I also bought a bra pattern that was from Kwik Sew, #3594, and decided I would make my own bras as well. I guess I got cold feet on actually sewing them after cutting out the pattern last summer and set it aside. I then noticed Craftsy had a class on bra sewing and construction and decided to take it. Craftsy has great online classes that you can watch at your convenience and watch over and over once you buy them. Anyhow – after taking the bra class then watching some of it I got brave enough to sew the bra and it actually turned out okay. Not great but okay for the first one. It is slightly too large in the cup but I can wear it for working out in or walking or doing yoga so at least I am able to use it. Below is a photo of my first bra.
The bra above is made from nylon tricot fabric, lingerie spandex, bra elastic, bra slides and rings which were all bought from Sew Sassy. Sew Sassy is an online store that specializes in lingerie and swimwear supplies and they have great prices and fast shipping. You can also purchase bra patterns there. I bought an Elan bra pattern there that I have also made and really like the fit.
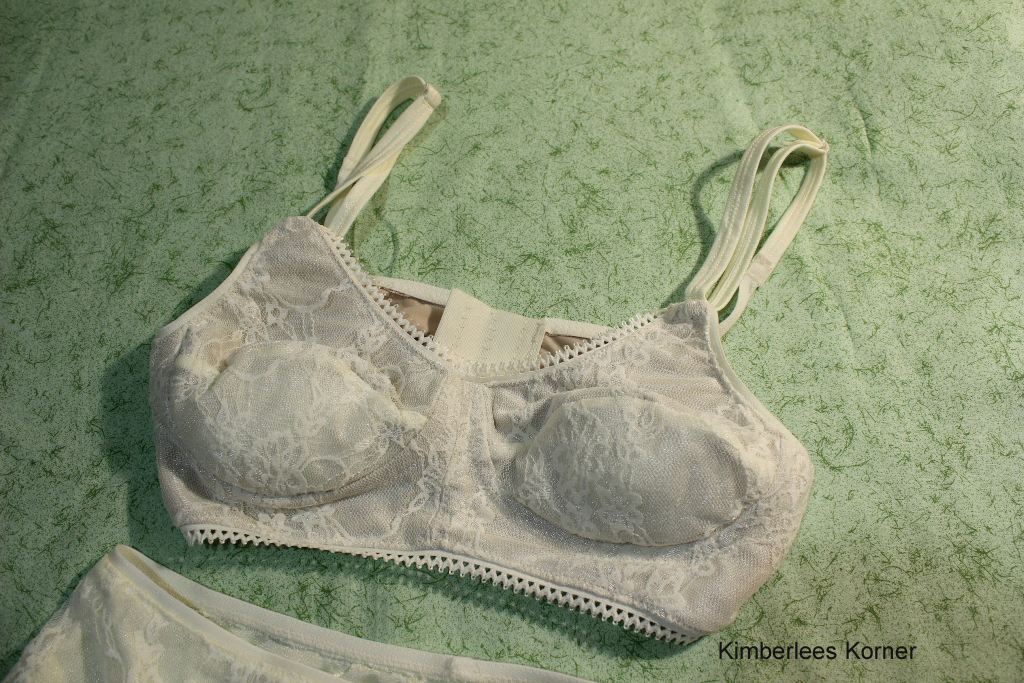
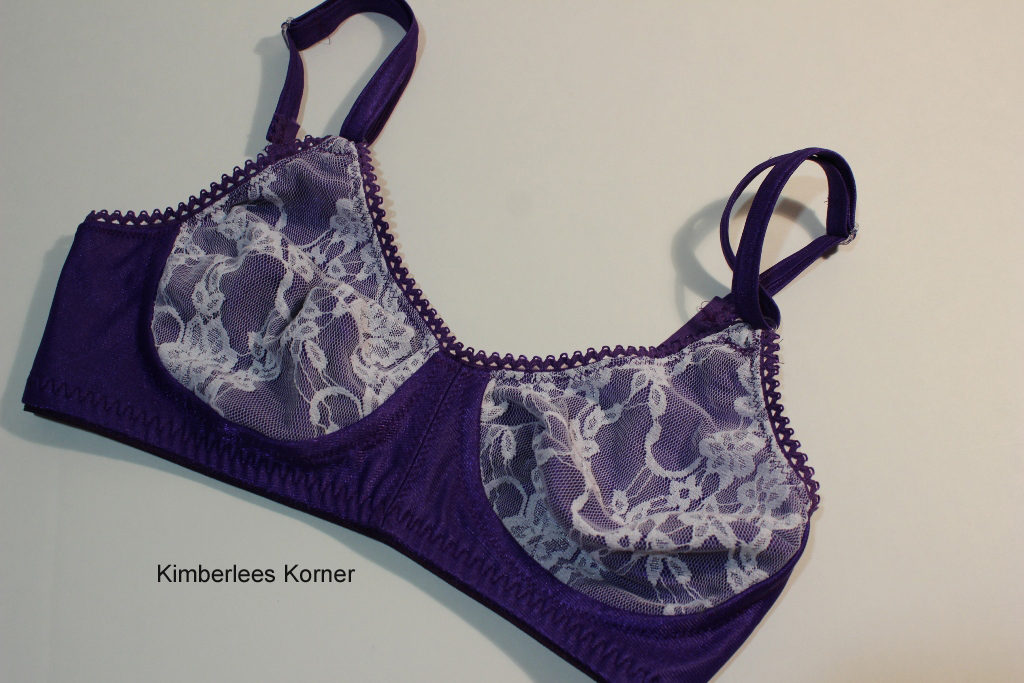
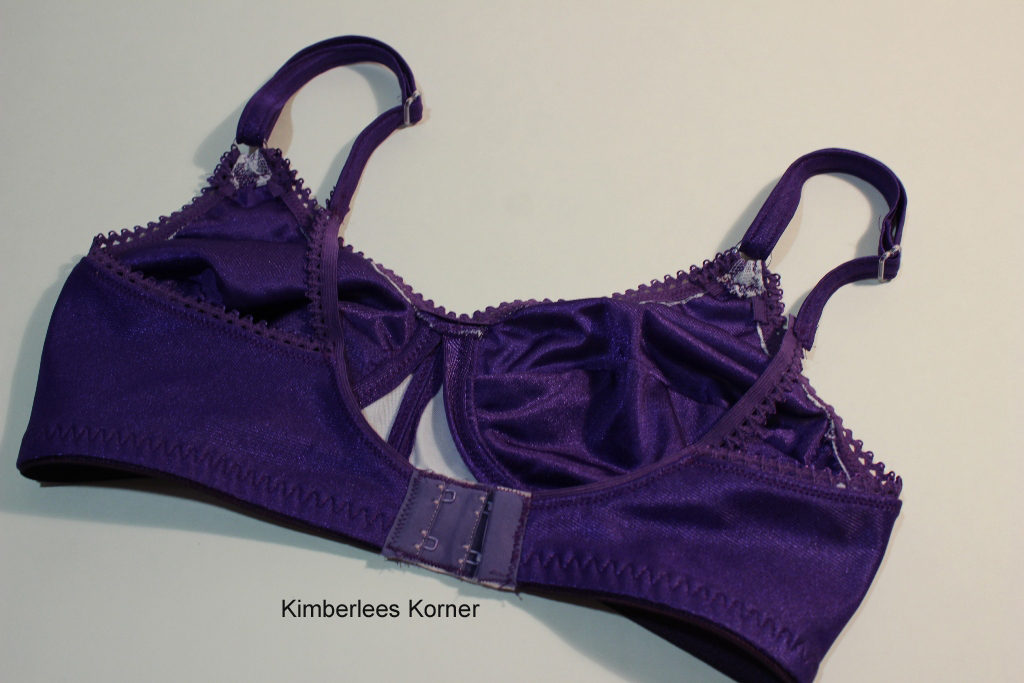
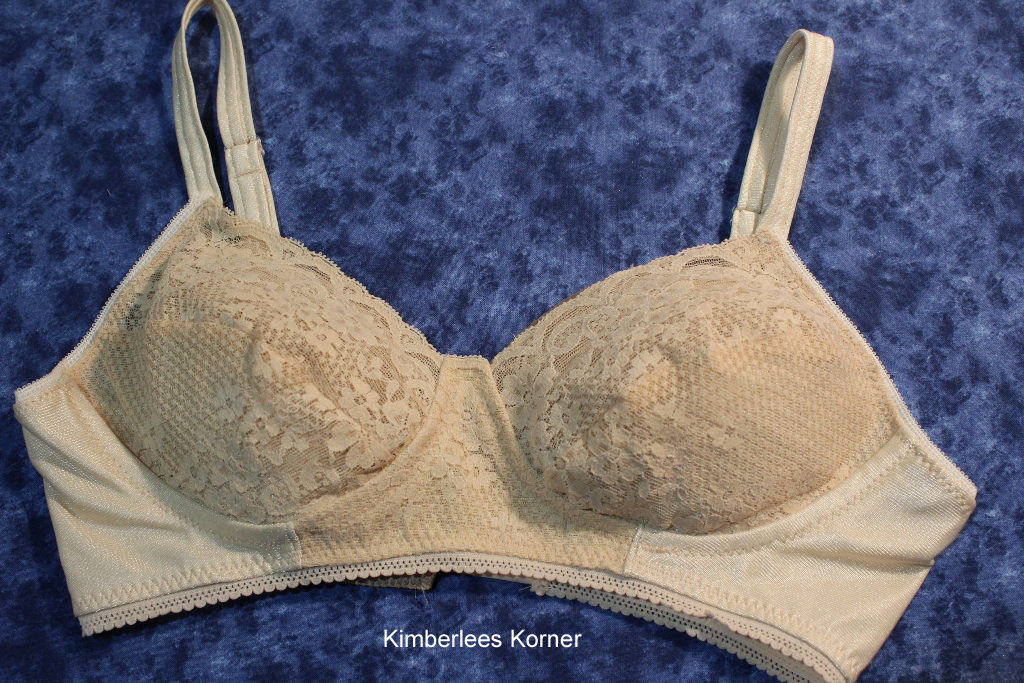
The bra above is my second or third try at sewing the Kwik Sew pattern and this time I made it with a lace overlay. I had bought the lace last year so I had it available. I also made some matching panties but I didn’t get a good photo of them – you can see a little bit of them in the lower left of the photo. The lace is a stretch lace which is sewn over the tricot fabric.
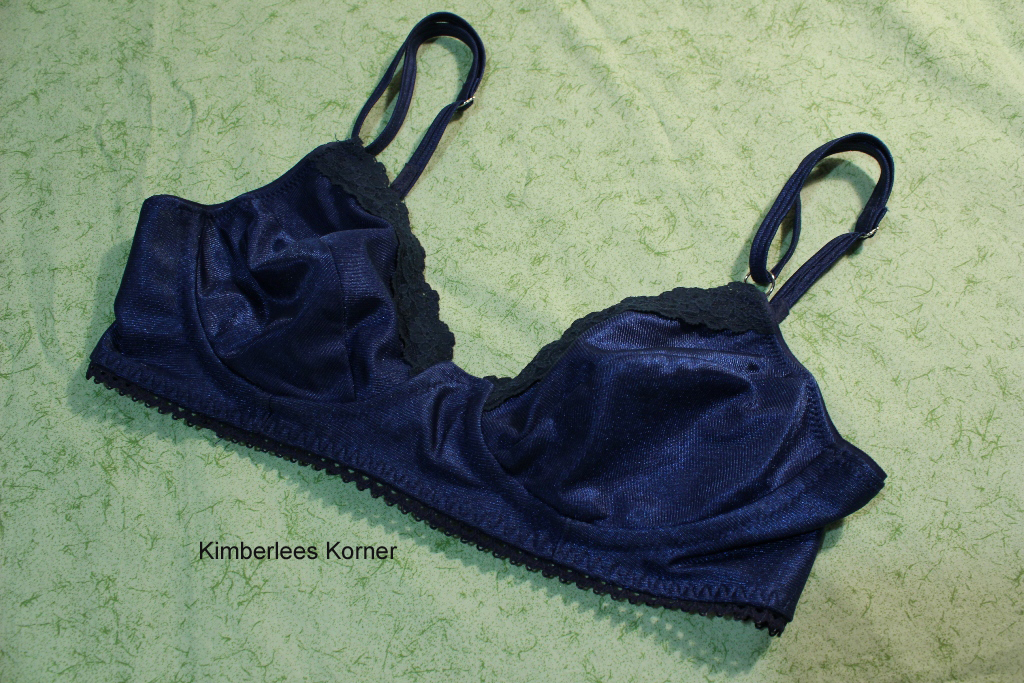
The navy blue bra above is made with the Elan bra pattern #645. This was my second attempt with this pattern. I had to make a couple of minor fit adjustments from the first one I made and now I am happy with the fit and the style of this pattern. The navy bra is made with navy power net fabric for a lining in the band and with a navy tricot fabric over the top and for the cups. The lace trim was an elastic type of trim I bought last year for my underwear making and decided to trim the upper cup with it and it worked out well. The power net fabric, rings and slides from this bra were bought from an Etsy seller called Tailor Made Shoppe. She has lots of bra making supplies and ships quickly. I have ordered from her two or three times now.
The bra in the above photo is made from the Jalie bra pattern. They are an online store and the pattern can be downloaded. I like this pattern more for a T-shirt style bra. I have made about 3 of them in different colors. The one above is my second attempt and it fits well. I will say that when you try a new pattern there will be some fitting issues to deal with. That is why it is best to kind of do a rough draft with the first one and not really be too concerned with you best sewing – just on getting one made to see how it fits and where you need to adjust it. In the Craftsy class there are lots of tips and instruction for how to adjust fitting issues which helped me in using all three of the patterns.
So, I am sure some are wondering why make your own bra? Well, one thing for me is I wanted and now have bras that fit well and fit right. I think for years I have been wearing ill fitting bras. The other is I am trying to get away from underwire bras and the patterns I have shown you above do not have to be made with an underwire. Also, the last one is cost. The materials you buy to make a bra are considerably less than going to buy one. I can also cut out and sew one in about 3 hours or less and it would probably take that long to drive to a store, try many on and then buy them and drive back home.
Here are some photos of some of the other bras I have been making this summer:
Purple and white lace bra made from Kwik Sew patternBack of purple and white lace bra
The above purple lace bra is one of my favorites. I had to dye the bra closure as I could not find a purple one that matched to buy. You can dye some of the fabrics and elastics to match if you use the vinegar dye bath method and Rit Dye. I have had fun learning to dye things as well during this sewing project.
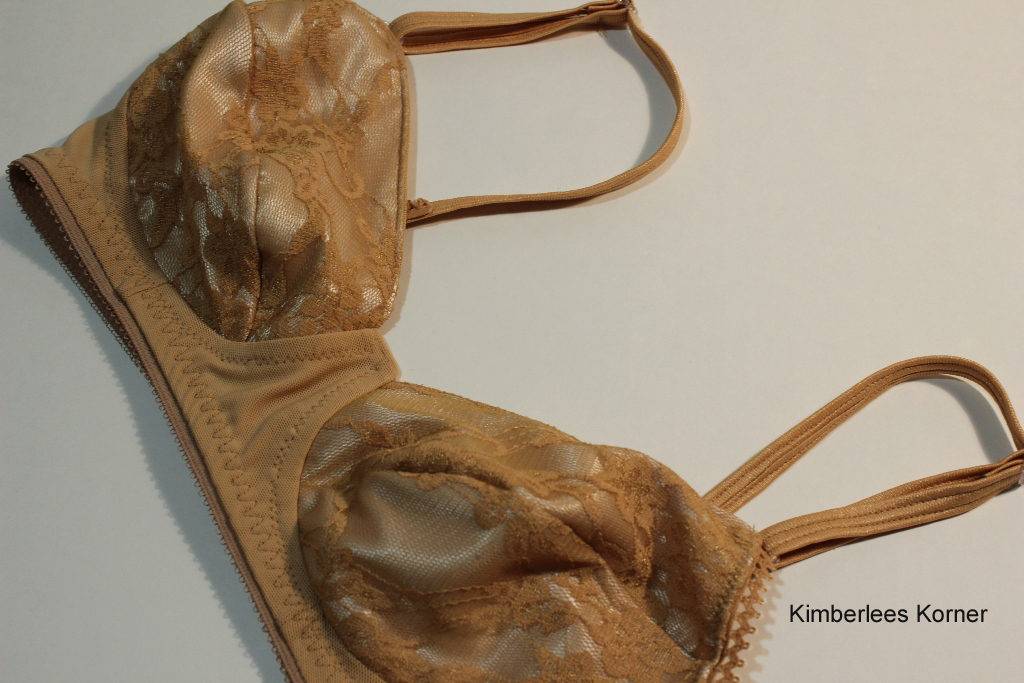
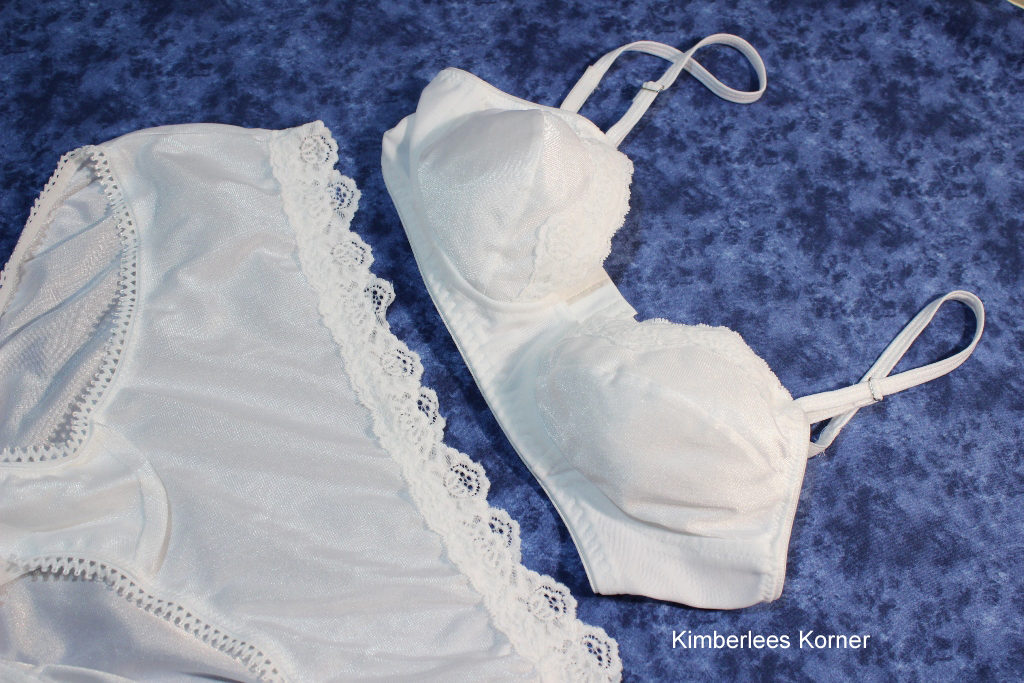
Bronze lace bra with lace, fabric and elastic dyed to match power net on bandWhite bra with lace trim and matching pantiesClose up of lace trim on upper bra edgeBeige lace bra with partial lace front band
The above photo is my most recently sewn bra project. I learned a lot more about sewing the lace bras in the second Craftsy class called Sewing Bras – Foam, Lace and Beyond. I am currently enrolled in that class and watching it when I have time to learn new things about bra making. I have not tried the foam cups yet but that is next on my list of bra patterns to try. Currently I am obsessed with lace.
To learn more about Craftsy and the bra class or other classes they offer you can click on the link in the sidebar to the right to take you to Craftsy.com or click on the highlighted text. So far this bra making class is one of the better ones I have taken there – along with the jeans sewing class I took a couple of years ago.
What have you been working on lately? I would love to hear about it in the comments.
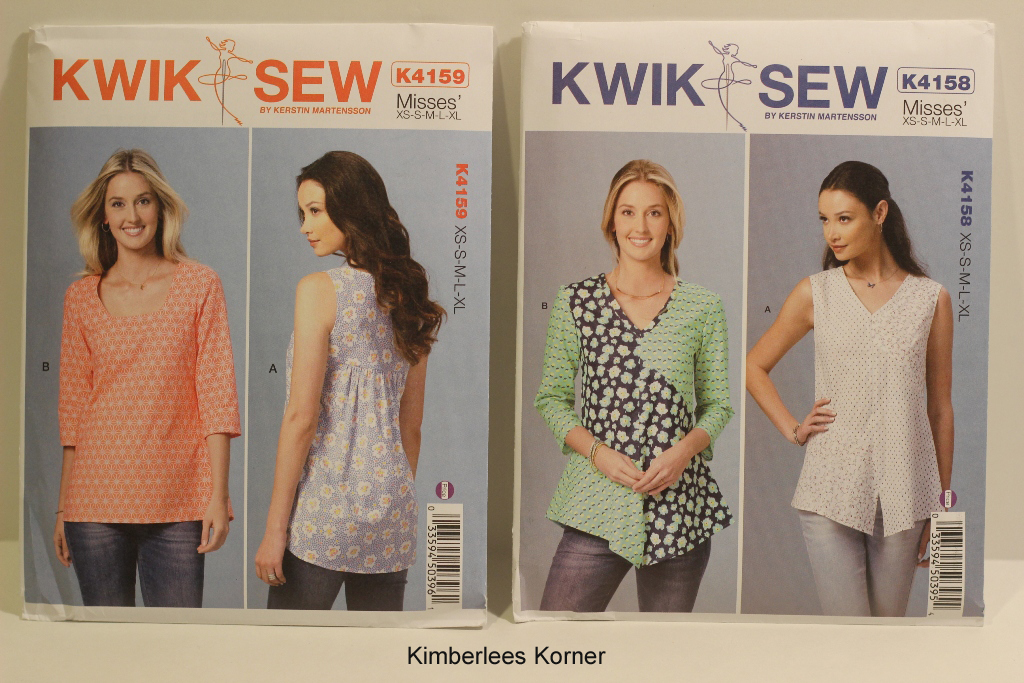
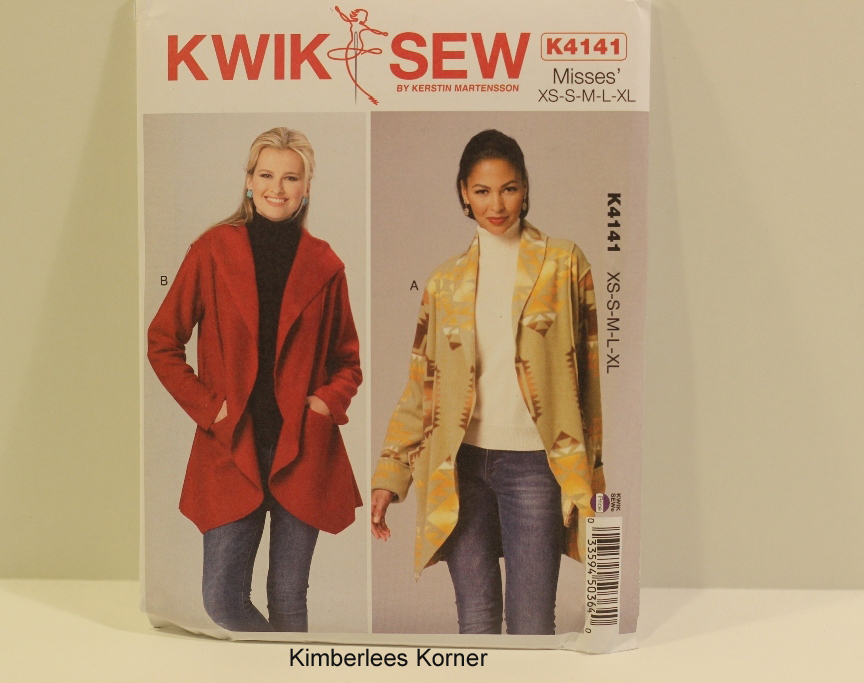
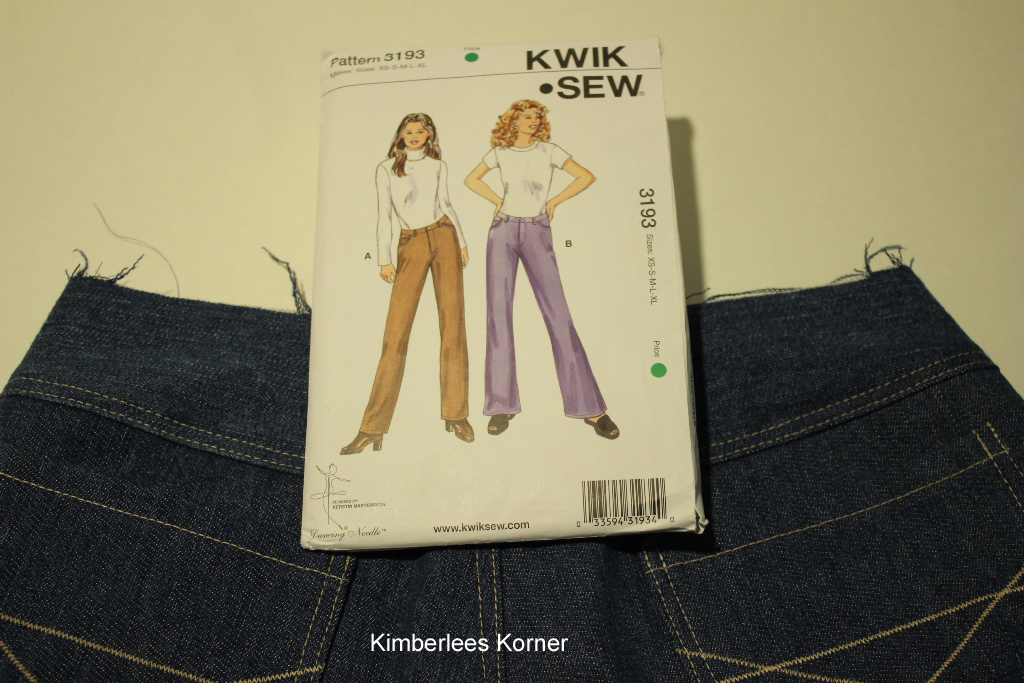
Last week I bought some new Kwik Sew patterns during the Presidents Day sale at Hancock Fabrics. Kwik Sew patterns are one of my favorite pattern companies. The patterns are well designed and they have excellent instructions with them. They also offer a lot of beginning type of sewing patterns for the new seamstress that have easy to follow directions.
The Kwik Sew patterns are a bit more expensive than other pattern companies which is one of the reasons I buy them on sale when Hancocks has them for $6.99. In my opinion they are worth it though. They come with a slightly heavier pattern paper and you can easily trace it using pattern drafting paper or interfacing so you can use multiple sizes in the one pattern. This is great if you sew for others and need more than one size.
I am looking forward to making the tops, as seen in the top photo above, for spring and summer. The jacket pattern in the second photo is something I hope to complete in the next couple of weeks. I found a nice french terry fabric in a beige heather color to use for that pattern. There are two versions of the pattern – one with a hood and one without. I think I am going to make the hooded version.
Currently I am finishing sewing another pair of jeans using the Kwik Sew jeans pattern I have had for many years. This is one of the greatest patterns for jeans and I love the fit and the easy to follow directions. I think this is the fifth or sixth pair of jeans I have made in the last five years. I prefer to sew my own jeans that way I can get the fit the way I want them. The process of sewing jeans really isn’t that hard if you do a little here and a little there. I can usually get a pair made in about a week just sewing an hour or two a day on them.
I don’t think Kwik Sew sells the jeans pattern anymore in their current line of patterns but you can find sellers on etsy that sell vintage or out of print patterns for reasonable prices. I also recommend the Craftsy class Sewing Designer Jeans with Angela Wolf. I took this class a couple of years ago through Craftsy and loved it. It really teaches you how to make your jeans look professional and lots of tips for getting the fit right.
What kinds of projects are you currently working on? Let me know in the comments.
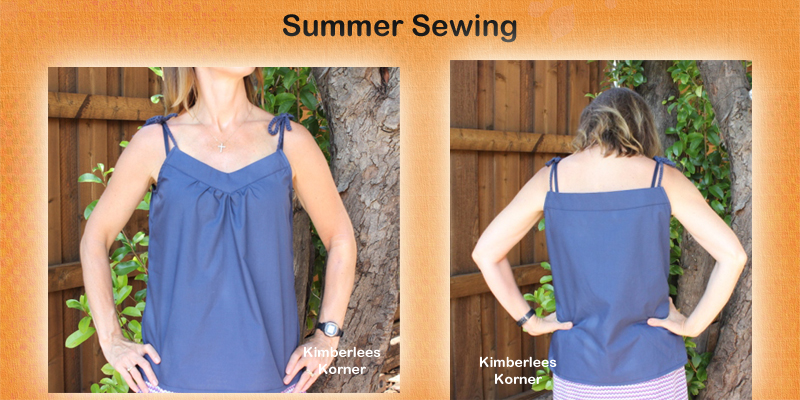
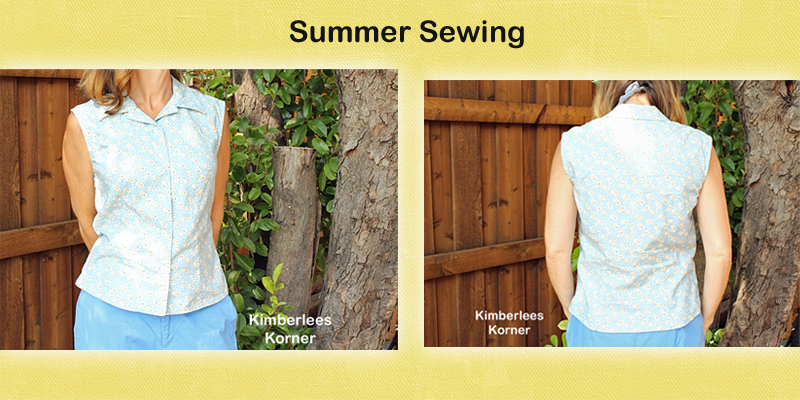
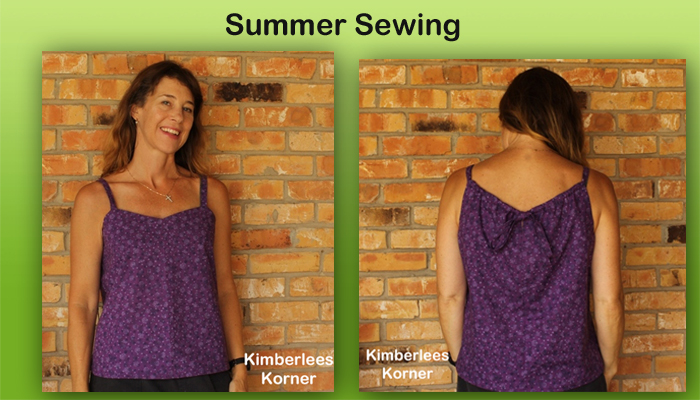
Recently I have taken a little break from blogging. One of the reasons being that I was gone for 10 days in July on a family vacation. I have also been focusing on some other things during my break from blogging and one of them is sewing some new things for summer. This summer I have made a couple of bathing suits, some lingerie (posts to come on that later) and some new summer tops. In addition to sewing I have been doing a lot of crocheting and developing some new patterns.
One of the reasons I love to sew is that I enjoy being able to make something the way I want it to fit. Another reason I prefer to sew my own clothing over buying it is because I can make something that will last a lot longer and wear better than many things you buy at the store. I have some shirts in my wardrobe that I made probably 8 or 10 years ago that are classic styles that I still wear and they are still in good condition. I don’t know if I have many articles of clothing that I have bought that I can say that about.
The above top is one I made about a month ago and have already wore it several times. It is perfect for our hot Texas weather in July and August. This top is made from a pattern I have had since 2010. The pattern is New Look 6965 and it has four or five different tops in the same pattern. I have made a couple of the other versions in the pattern in the past. This particular top features a tie shoulder strap that was suppose to be made with ribbon. I decided to use my crochet skills and crochet the straps since I had the perfect color of navy blue cotton yarn to match the fabric.
The next top I made after the navy one was this light blue floral print button down shirt with a collar. It is hard to see the tiny floral print on the fabric in the lighting I was in in the above photos. I think I have had the fabric for four or five years and the pattern is very old – a classic from my pattern stash McCalls 2094 from 1999. I like the style of this top with the front and back darts and the button front. I have a couple of pairs of shorts and a couple of skirts it will go with so lots of options for wearing this shirt. I even discovered a crochet headband I made years ago that is the same color blue.
The third top I made was this purple print one. This is another fabric I have had in my stash for years. This top was made using a newer pattern that I purchased on sale at Hancocks a few weeks ago. The pattern is McCalls 6967 and included in the pattern with this cute little top is a couple of dresses and a skirt. This was a really simple pattern to sew and I will probably go through my stash and make another one – it only takes one yard of fabric and a couple of hours to make this top.
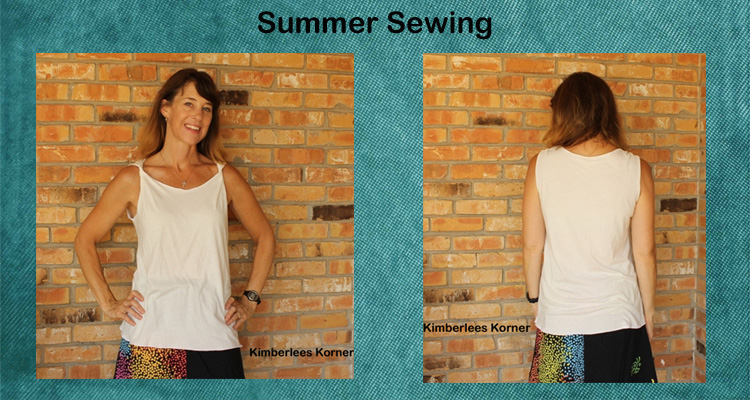
The last top I recently finished sewing was this simple knit twisted shoulder top. This pattern was actually my own creation using a pattern from My Label pattern software and figuring out how to do the twisted shoulder. The whole top is made with a serger and super simple. In my etsy shop I offer a tutorial on how to make a top like this using an old t shirt. This particular one I actually used fabric and a pattern drafted to my measurements.
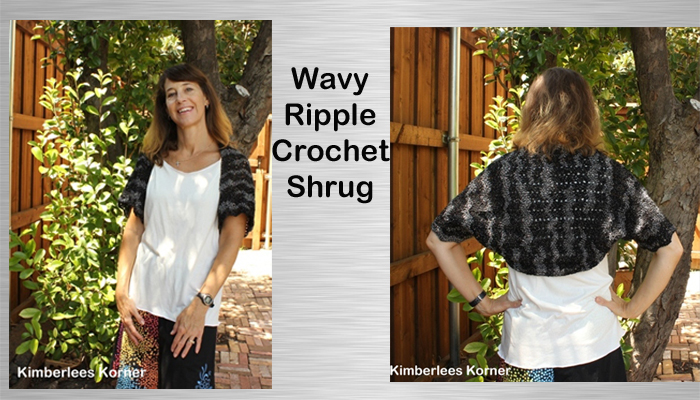
The other thing I finished in the past week was this crochet shrug – which I thought looked good with my twisted tank top and a skirt that I made a few years ago. The shrug is one I started a year ago and put it aside to work on other things. I decided it was time to get it finished and completed it. I love the way it turned out and wonder why I waited to long to get it done. This shrug is crocheted using Patons Glam yarn and is black and glitter sliver. The pattern features a ripple and pretty scalloped sleeve. I will be offering the pattern in my etsy shop very soon as well as on craftsy and ravelry.
School is starting here soon for my boys and we have been busy with the back to school yearly things that go with that. Even though there is another month or more left of summer it kind of feels like summer is ending once the kids start school – I am hoping that means the heat will end as well but I have a feeling it will be another month or more before that happens.
I hope everyone is enjoying their summer and staying cool.
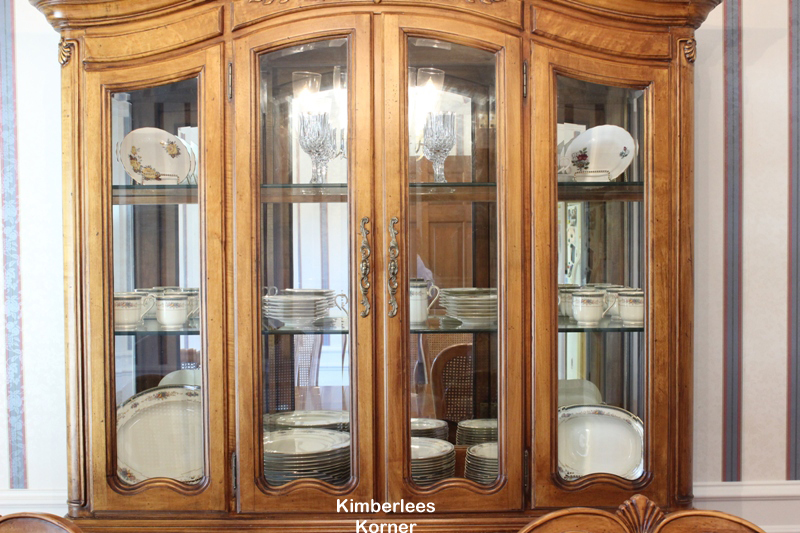
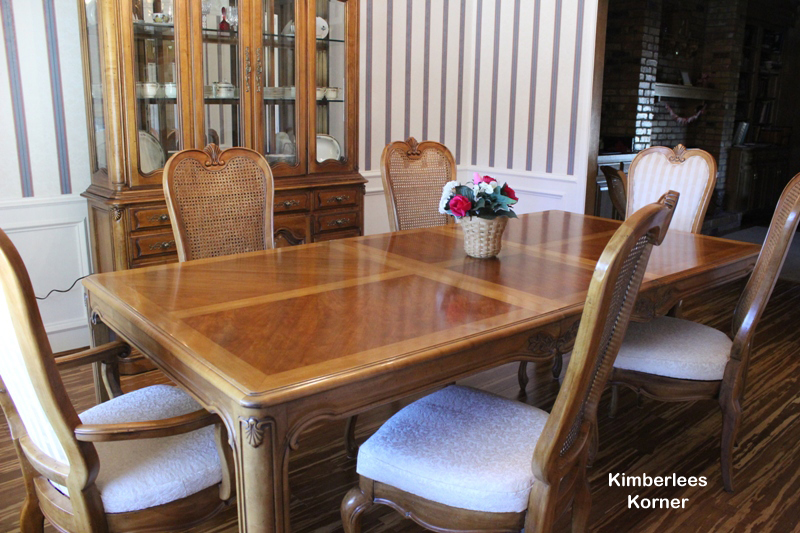
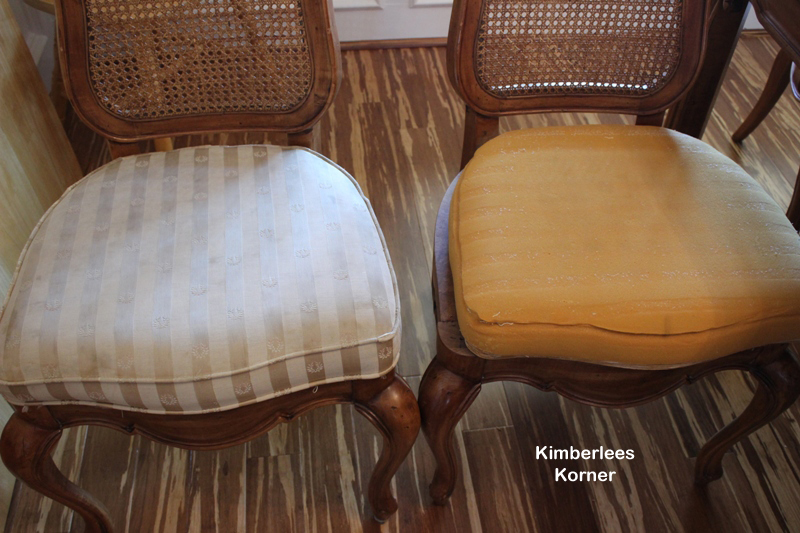
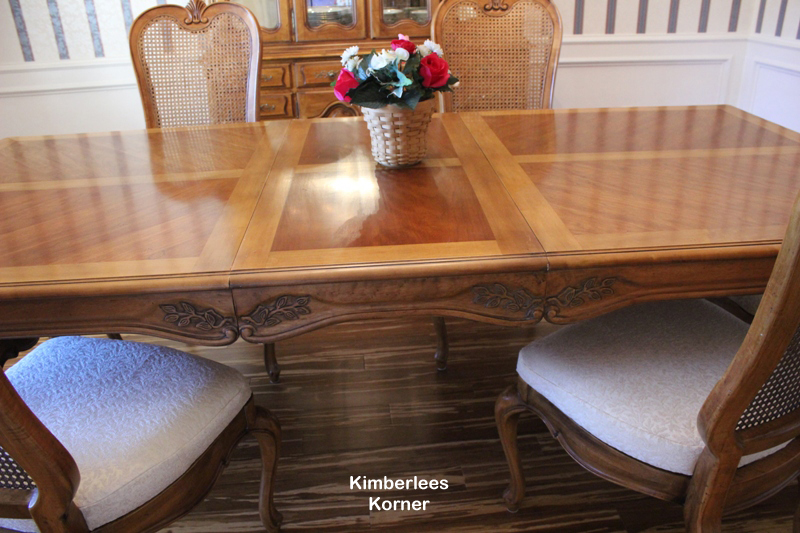
We recently bought a new-used dining room table and china cabinet from a really great consignment store in Plano, Texas – B & B Furniture Consignment. The table and china cabinet were in good shape for their age but the chairs were another story. The wood on the chairs was fine but the seat covers not so good. They were pretty dirty and worn on the edges. The price on the whole set was less than $1200.00 so we decided to get it and I decided to learn to upholster chairs!
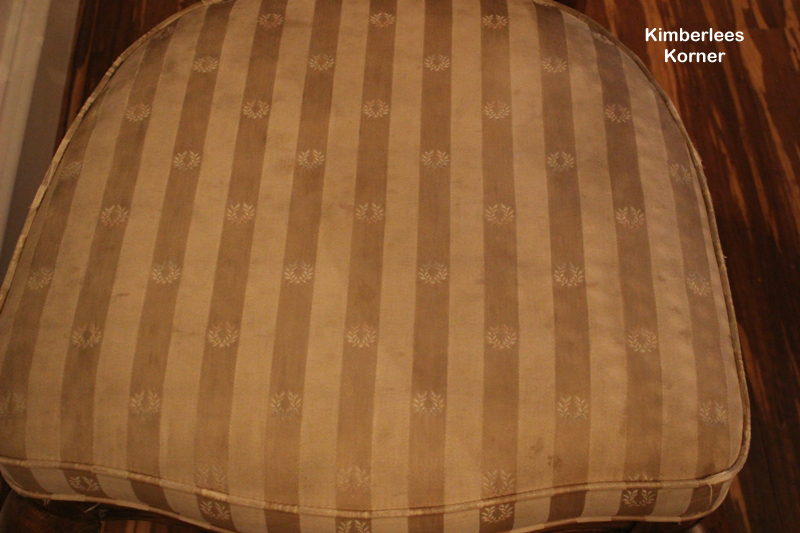
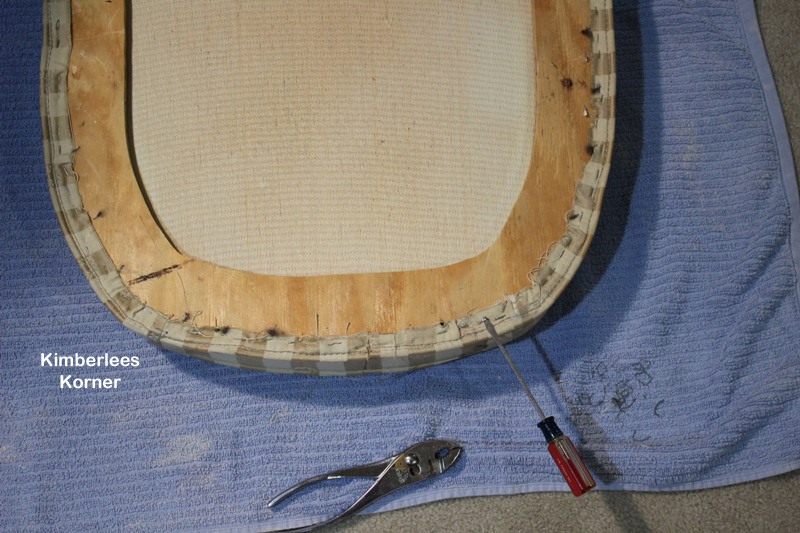
Below is a photo of one of the chairs before I recovered it and after I cleaned them twice. They were worse and I forgot to take a before photo of that.
The first thing I did was clean all six chairs twice – once by hand and second time with my Bissell using the furniture attachment and some Young Living Purification oil, blue dawn and vinegar in the machine. They were so bad I didn’t want them in the house without cleaning them – plus I knew I would have to work with them when I went to recover them.
The next thing I did was research pinerest to see how to recover dining room chairs. I found lots of great info on various blogs and websites and decided I could do this.
The next thing I did, the day after buying the set, was go to the fabric store and get some home dec fabric. I had to remove one of the seat covers and take it with me to find something to coordinate since two of the chairs have a fabric back and I did not want to try to tackle recovering that part – it looks kind of difficult.
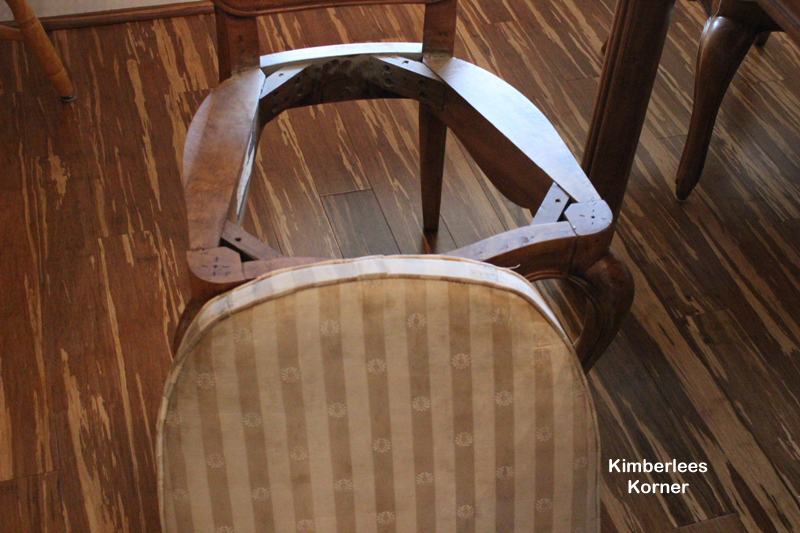
Removing the old seat was really easy – you just find the four screws on the bottom that hold the seat on and remove them.
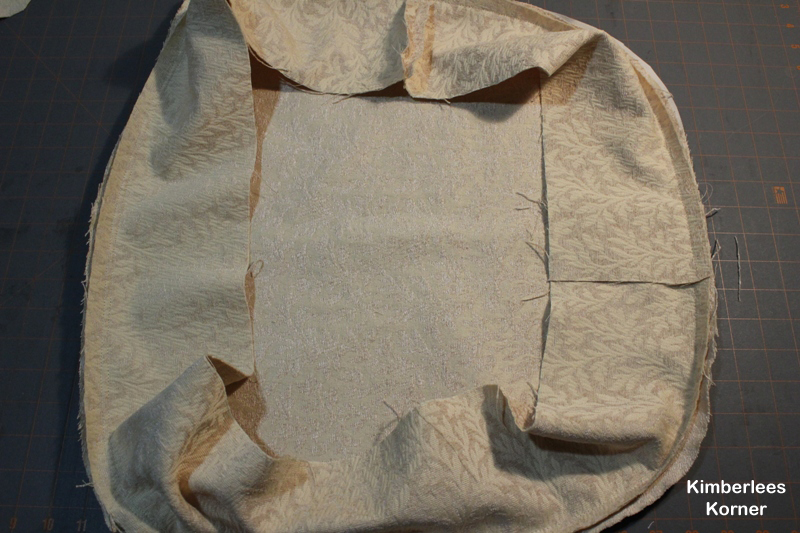
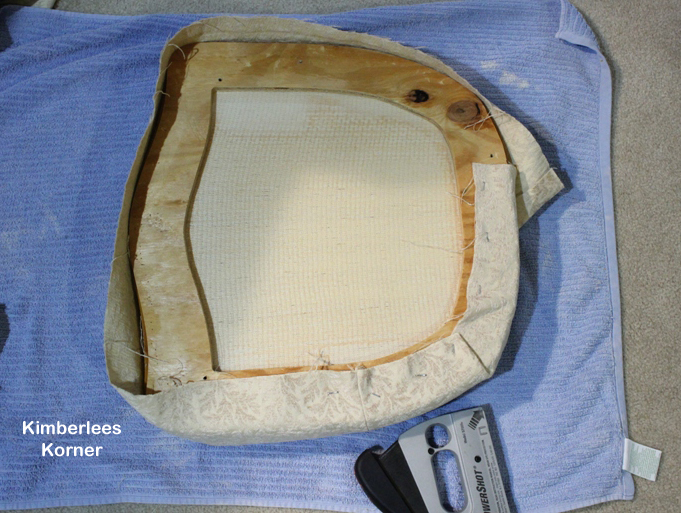
After finding the fabric I used the seat cover I had removed to make a template-pattern. I then measured the side gussets and calculated how to cut those. For my template I added 1/2 inch seam allowance and then cut the gusset strips 4 1/2 inches wide by the width of the fabric which was 54 inches. You need to sew two strips together to make the strip long enough to go around the seat part and cut some of the excess off. The existing gussets were less than 4 1/2 inches but I decided to make mine wider to wrap around to the bottom to have more of an edge to staple on. Also, I decided to line the top seat part with muslin so I cut muslin templates as well. The foam on the chairs was in good shape other than the discoloration so I didn’t have to replace that.
Sewing the covers was super easy and fast – probably took me about an hour. Removing all the old seat covers was another story – that took about an hour per chair. For that part I used a flat head screw driver, to pry the staples up, and some pliers, to pull the staples out. Basically I worked on one chair at a time so it took me about five days to do all six chairs – in between cooking, cleaning, laundry, carpool, band events in the evening and general life!
After removing all the old staples you can slide the old cover off. Then slip on the new sewn cover and get it fitted onto the the chair pad and then begin to staple with the staple gun. My one son even did a few staples on one chair – he thought it looked like fun for a few minutes. Actually stapling the new cover back on was a lot more fun and easier than getting that old one off. I did this on the floor with an old towel laid down – I also did a couple of them on my sewing table – basically you need a hard firm surface to be behind the chair pad as you drive the new staples in. As you can see on the corners you have to fold the fabric in to get it to be smooth on the sides and the top front piece.
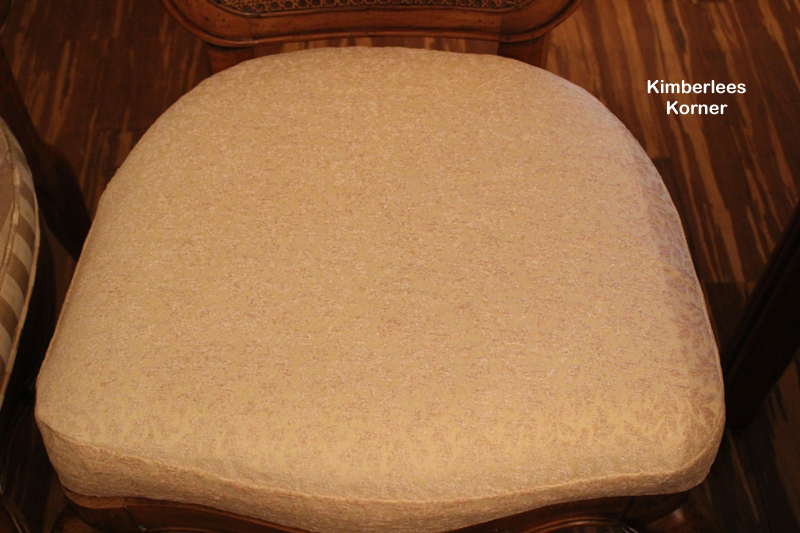
Overall I am pleased with how they turned out and how our dining room now looks. The other table we had was over 20 years old. We bought it when we first got married and it was more of a kitchen type table not really for a formal dining room.
So, now that I have accomplished recovering dining room chairs I am contemplating reupholstering a chair and ottoman we have in our living room. If I decide to conquer it I will share it here on the blog so be sure to check back or follow me.
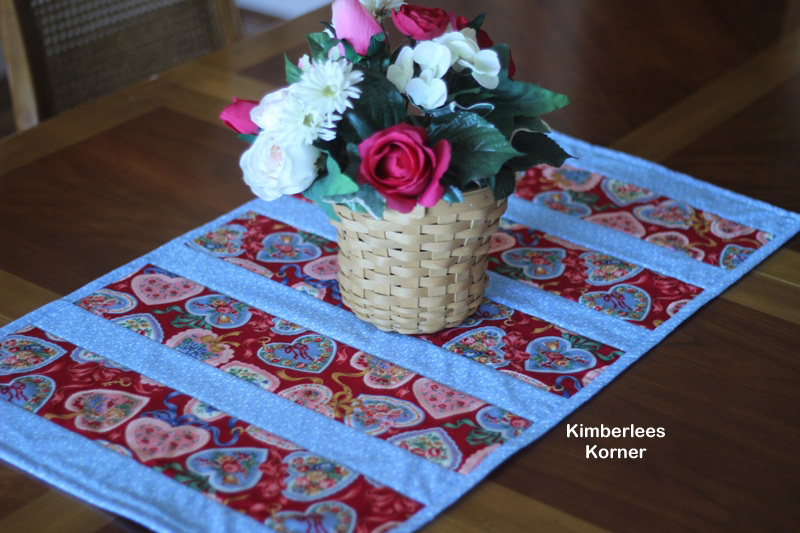
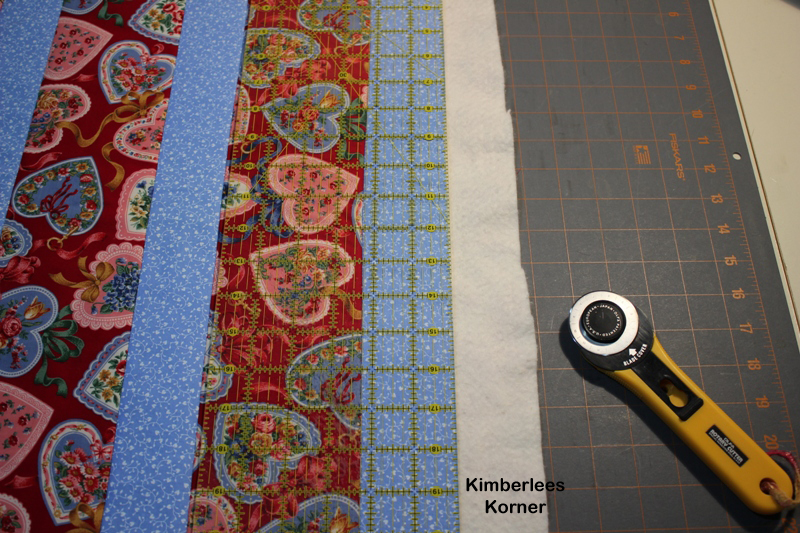
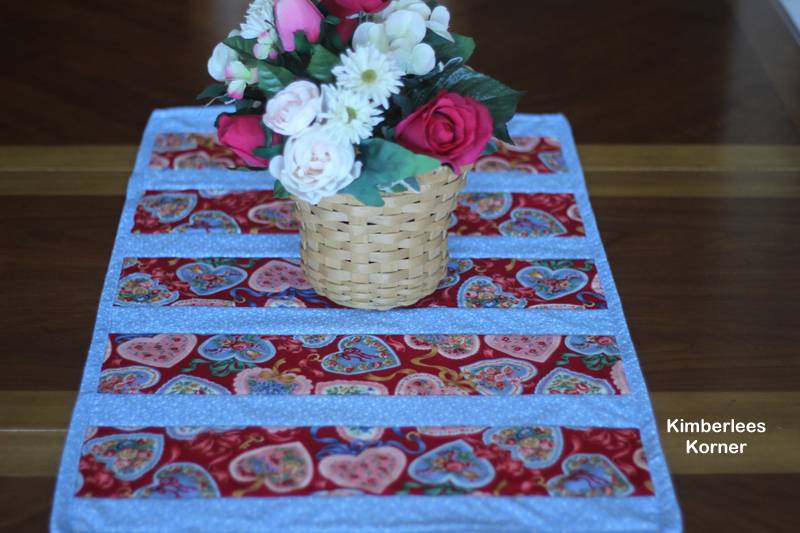
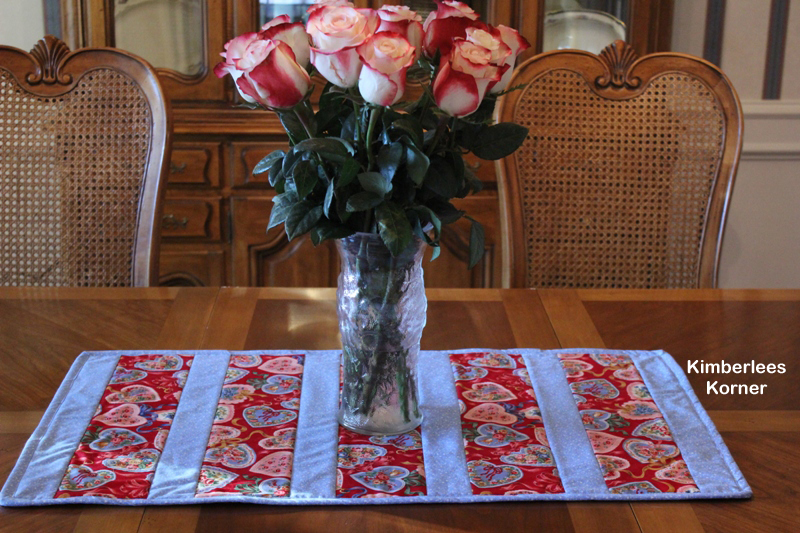
Sewing a quilt as you go table runner is a very easy project that can be made in just a few hours. I recently made this little table runner to go on our new-used dining room table that we bought a couple of weeks ago at B & B Consignment Store in Plano, TX.
This project was made using fabrics from my stash that I have probably had for at least five years (or more). At least I was able to use up some fabric, create something I like and I didn’t have to buy anything to make it since I had everything. The piece of batting I used for the quilt was actually a scrap piece I had laying around.
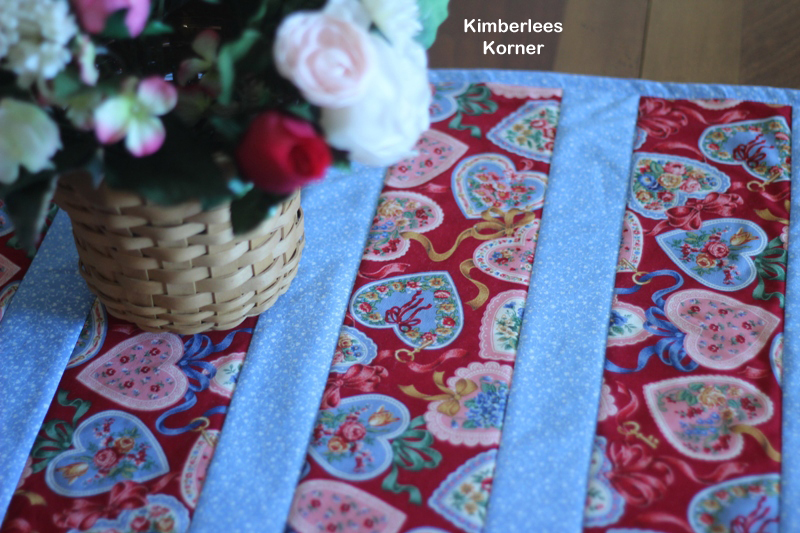
My runner measures 32 inches long by 18 inches wide but you can really customize a project like this to be whatever size you want. Basically you cut your base-backing fabric and your batting a little larger than your actual finished size and then you cut it once you are through sewing on the strips and before doing your binding.
To make this particular size you need about a yard of one cotton fabric and half a yard of a coordinating print for the contrasting strips and the binding. Basically what I did was cut the heart fabric I had 4 1/2 inches wide because I wanted the print, which was kind of large, to show up and then I cut the contrasting fabric 2 1/2 inches wide for the strips as well as the binding.
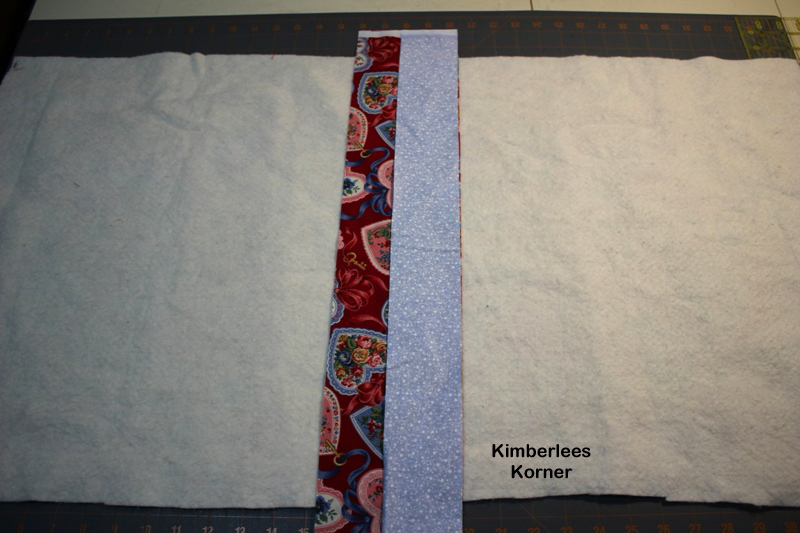
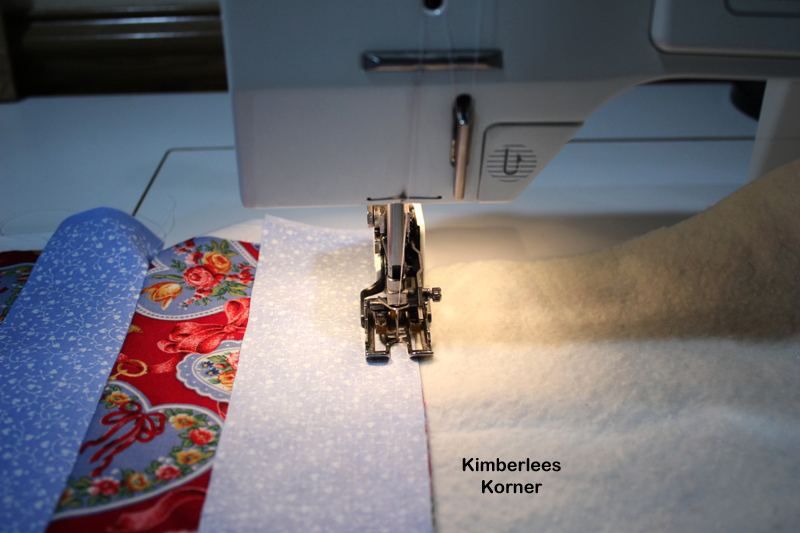
You then begin by laying your fabric backing piece down with the wrong side facing up then lay the batting on top of that. Then find your center point and center one of the 4 1/2 inch strips there and lay a 2 1/2 inch strip on top of that and sew it with a 1/4 inch seam – I use a walking foot which I recommend so the pieces do not shift.
I just continued to alternate my 4 1/2 inch and 2 1/2 inch strips until I got to the one end then I did the same to the other end – ending with a 2 1/2 inch strip on each end. NOTE: After you sew each strip you will need to press them open so the right sides are facing up before sewing the next strip.
Then when both ends are done you will trim the excess batting and backing. It is best to do this with a rotary cutter and a quilt ruler.
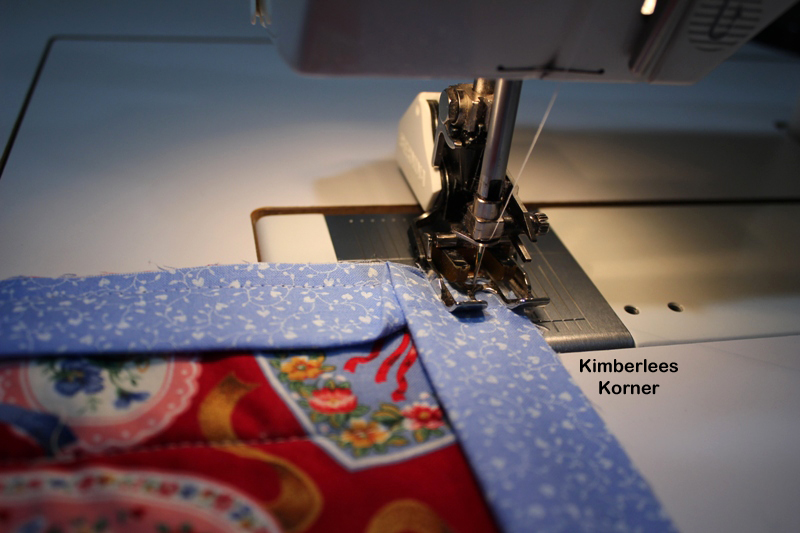
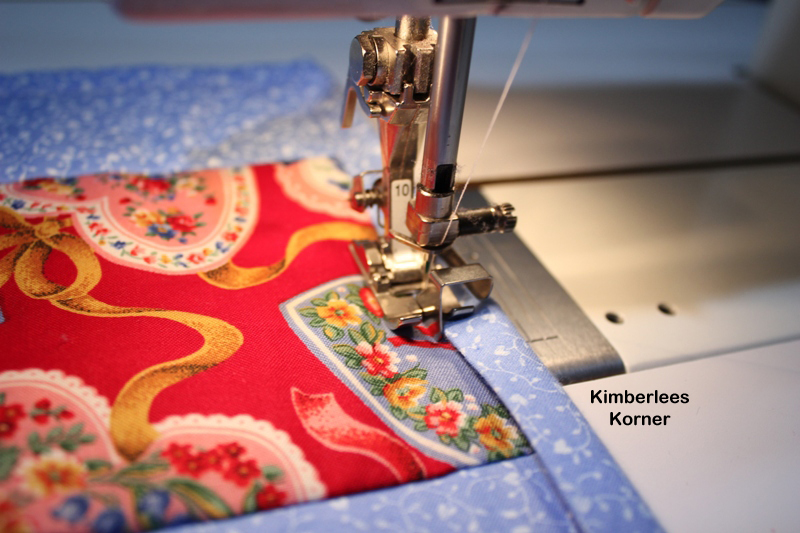
After this step you are ready to bind the quilt. I used three 2 1/2 inch strips sewn together to make a very long strip – I then pressed it in half to be 1 1/4 inch with the wrong sides together. I like to sew my binding on to the wrong side and then wrap it around, press it and sew it to the right side but everyone has a different method for this it seems.
Mitering the corners when sewing on the binding is always a challenge for me. I have studied books on it and just try and do the best I can. I figure this is for me so I don’t have to have it totally perfect. Once the binding is sewn all the way around I then press it to the front side of the quilt, pin the corners and topstitch it down using my number 10 edge stitch foot and the needle in the far right position. You could also use a regular presser foot with possibly the inner toe of the foot as a guide.
I then press the quilt one more time and it is done.
This table runner is super easy to make and can be made with any type of fabric combination – not just Valentine’s Day like mine. It is also a great stash buster project if you have some fabrics laying around, like I did, that you want to use up.
I will be offering the pdf pattern with step by step instructions and photos on how to sew this in my etsy shop and on craftsy in the near future. I wanted to share it here first on my blog since I got it done a few days ago and today is Valentine’s Day.
Happy Valentines Day!
-Kimberlee
P.S. I will also be doing a post in the next month on the new table we bought at the consignment store and how I recovered the chair seats so follow my blog to receive updates.
One of my favorite sewing pattern brands are Kwik Sew patterns. I realize they are a bit more expensive than some other pattern companies but I don’t mind paying extra for a stylish pattern that fits well and has excellent directions.
The other nice thing about their patterns is they are often classic styles. They also come printed on nice heavy paper, not that thin tissue paper that tears easily. All sizes are included in the pattern and I have found that if you want to sew something for yourself and then use the same pattern for someone that is a different size you can easily use this thin, see through, pattern tracing fabric – its kind of like interfacing and is usually sold near the interfacing – to trace multiple sizes. I have also used quilters grid before to trace patterns since you can see through it.
One of my favorite Kwik Sew patterns that I bought years ago and have made many times in various fabrics and prints is pattern number 3632. This pattern is for a top or dress that has an elastic casing at the neckline and sleeve cap to gather those areas in and create and cute and flattering top.
This white knit top above is one I made in the past month. It was super quick and easy to sew. There are only 2 pattern pieces and then you have to sew the casing for your elastic at the neck and arm area, hem the bottom and its finished.
The blue, yellow and white chevron print top above is also made using the same pattern but with a cotton fabric. The pattern is very versatile and I have used various types of fabrics for it. I love how easy it is to make one of these tops – like in a couple hours or less. I have also used stitches other than a straight stitch to sew the topstitched area – on these two tops I used a narrow zigzag stitch for the casings and the hems.
This particular pattern would be a great project for someone learning to sew. The pattern is really easy to read and to sew. I also noticed that Hobby Lobby is now carrying some of the Kwik Sew patterns as well as Joann and Hancocks. In the past in my area I could only buy them at Hancocks.
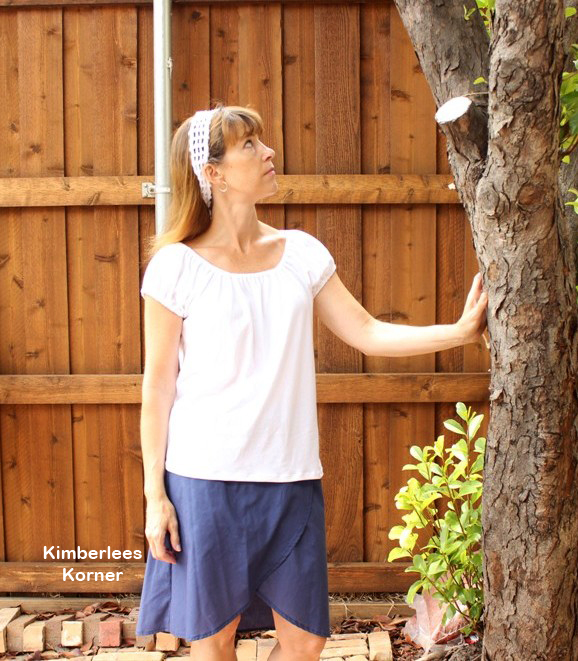
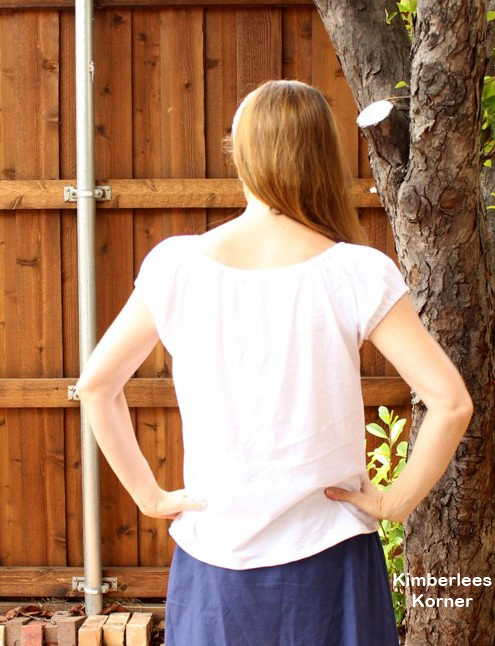
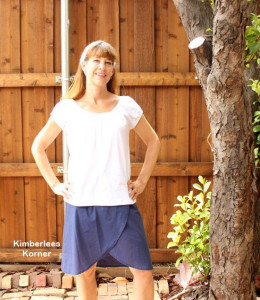
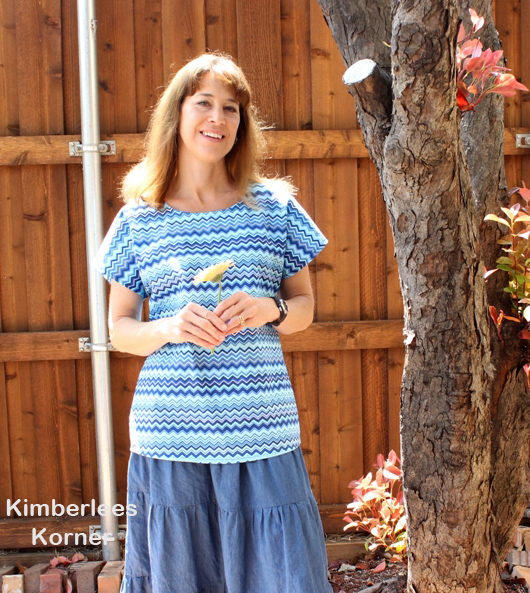
This simple blue chevron top is a sewing project I finished a couple of months ago. I had intended to share it sooner but things have gotten in the way of my plans which is I guess how life goes for everyone at times. I have wore the top several times already and love how simple it was to sew and how comfortable it is to wear. Also, it looks good with skirts, shorts or jeans.
The pattern I used for this top was from the Bernina My Label software – which is pattern drafting software I have that drafts patterns by your measurements. I have mentioned it before and use it quite a bit. This top is actually not one of the patterns in the software – I used the tunic pattern to design this simple cap sleeve top. It is only two pattern pieces – a front and back – and I make a bias neckband facing which I am going to share with you below on how to do this.
The fabric I used was a 100% cotton fabric that I think I ordered from fabric.com. The one thing about making clothing with the chevron prints is that you want to have a little extra fabric to match the chevron pattern as close a possible to look uniform. Also, you want to make a top that does not have a lot of complicated darts or seams that will make the print look strange.
The neckline of this top is sewn with a bias strip of fabric for the facing. A lot of patterns come with a facing that is curved but I often find they are kind of wide and do not always lay well. I have found that using the bias facing technique works much better – especially with this style of top. Below is a little tutorial on how to make a bias neckline facing.
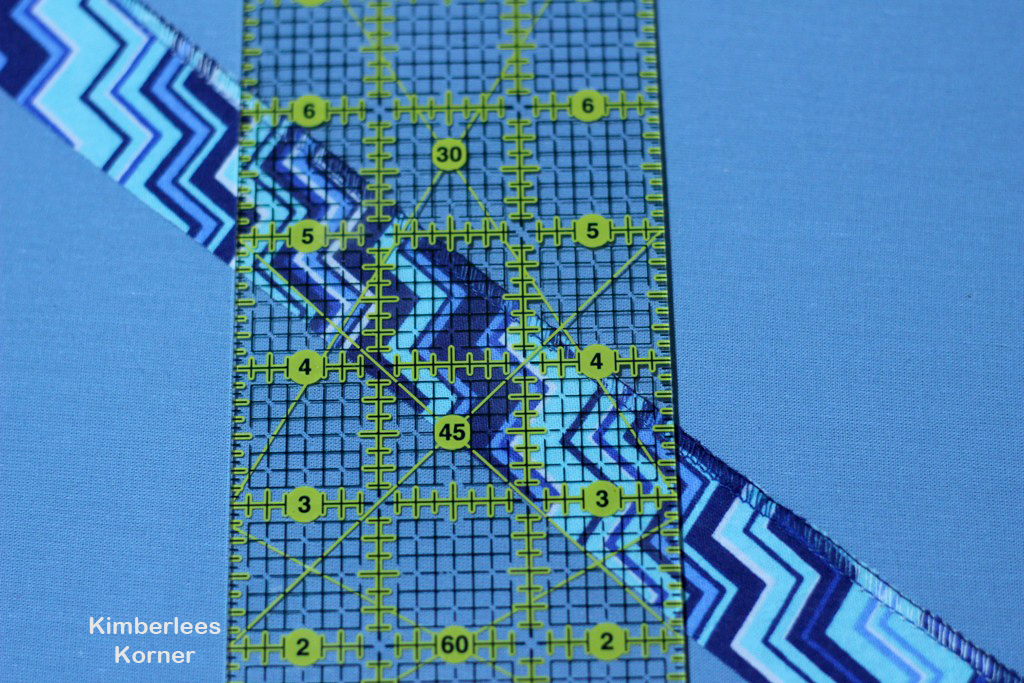
Step 1 – cut a fabric strip on the bias that is 1 1/4 inch or 1 1/2 inch wide and a little longer than the length around your neckline. For this top I did 1 1/4 inch wide. Note: the bias is the 45 degree diagonal grain of the fabric – most quilting rulers have the angles marked and you can use that as a cutting guide.
Step 2 – after you have your strip cut finish off one of the long raw edges with a serger or a zigzag stitch
Step 3 – then pin the other raw edge with right sides together to your neckline starting at the center back of neck- overlap the ends a little (what I usually do is just have an extra long strip and after I am done pinning it to the neckline I cut it where I need to)
Step 4 – sew the strip to the neckline edge using a 1/2 in seam allowance
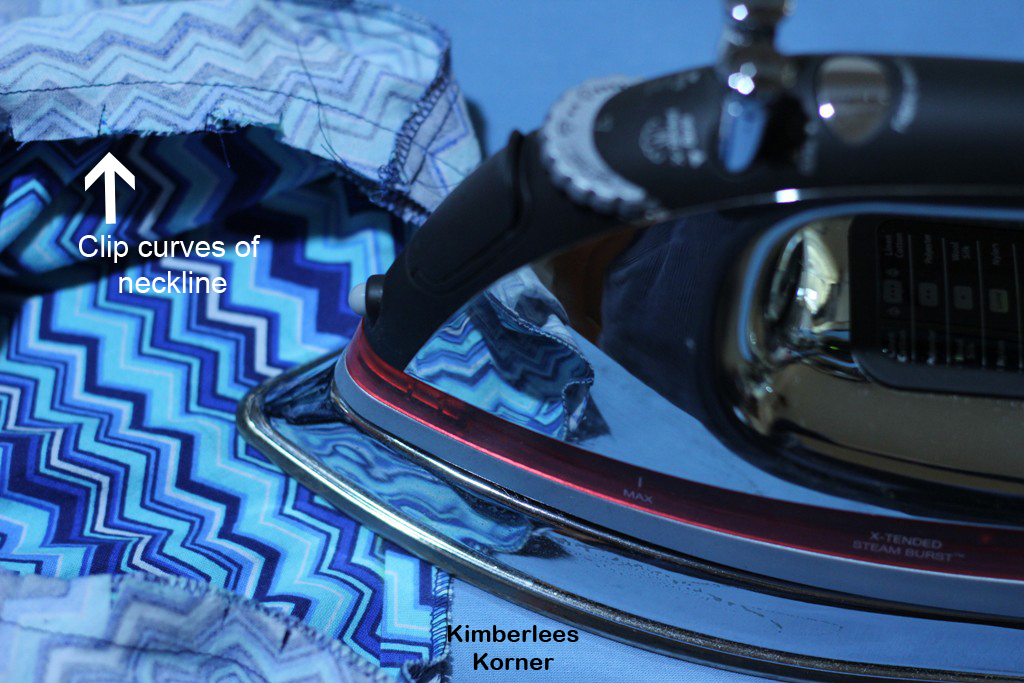
Step 5 – Clip the curved neckline edges close to stitching line, with a steam iron press bias strip out with seam pressed toward the bias strip
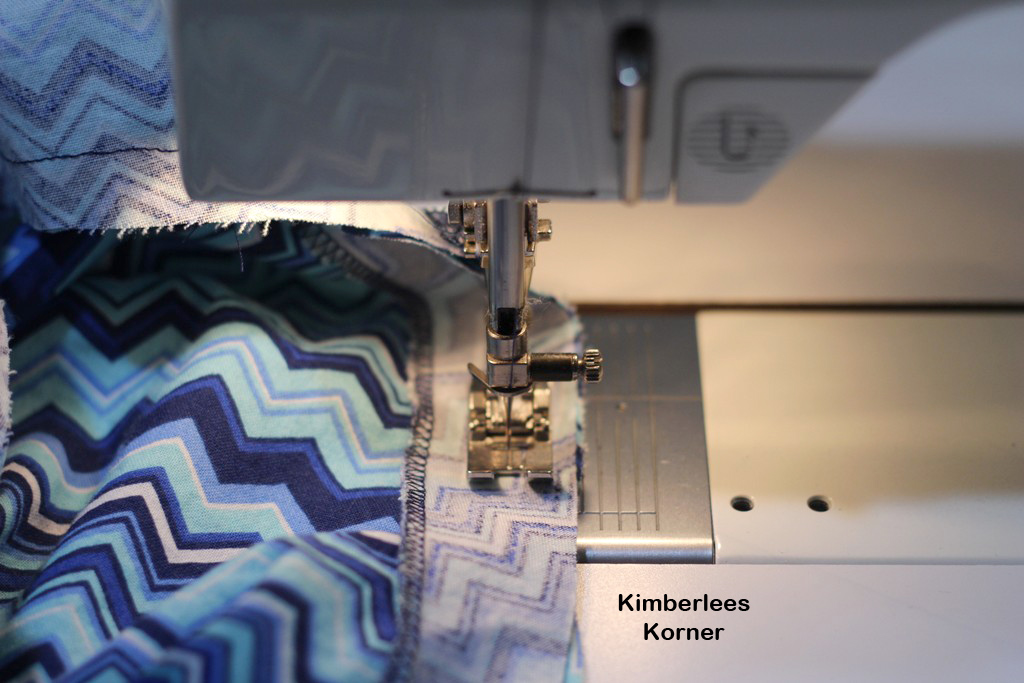
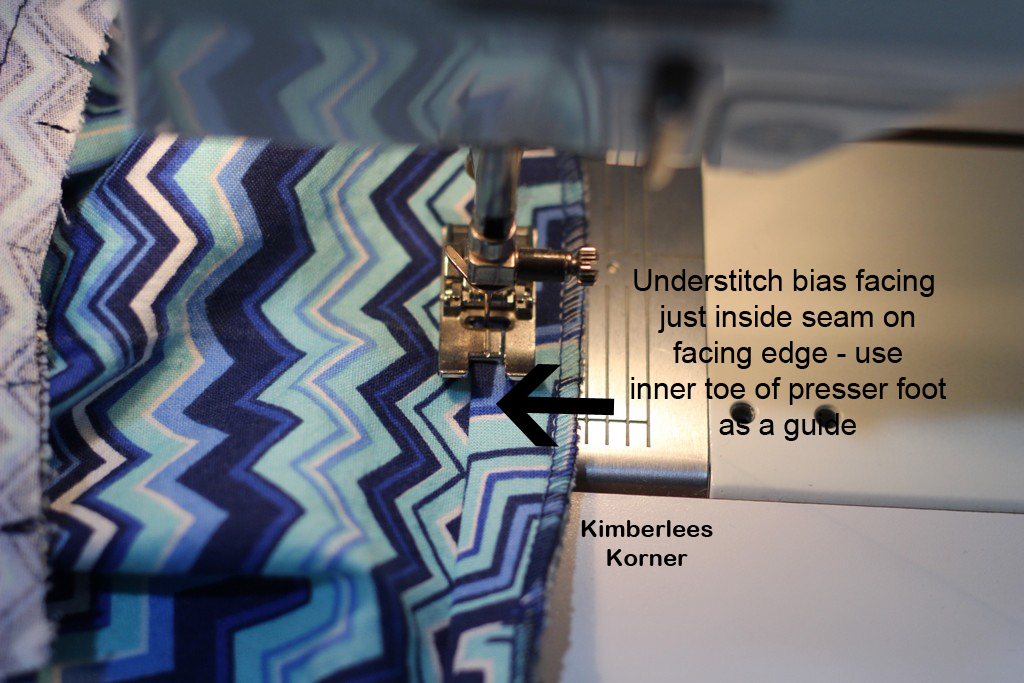
Step 6 – Understitch the facing just inside the neckline seam on the bias strip – you can use the inner toe of your presser foot as a guide
Step 7 – Press the facing to the inside of the top and topstitch the facing down from the right side of the top – I usually use a 3/8 inch seam or the outer edge of my presser foot as a guide while stitching around the neckline – press again after you complete your topstitching
I hope you enjoyed this tutorial and are getting lots of sewing projects done this summer. I would love to hear about what you are working on – click on Leave a Reply to tell me about your current projects and crafts. Also, to receive future blog updates and tutorials follow my blog via email subscription, RSS feed or bloglovin. All icons are in the right sidebar.
In this previous month I worked on a few patriotic projects and wanted to share them on my blog. I love the colors red, white and blue and usually have them decorating my home for the months of May through August. The colors just seem to fit my summer mood and go with the holidays of Memorial Day, 4th of July and Labor Day.
The first project was a star garland that I made. It was super quick and easy. I was at Pier 1 back before Memorial Day and found these cool grapevine looking colored stars. I used some of my red, white and blue yarn and strung them to make a mantel garland.
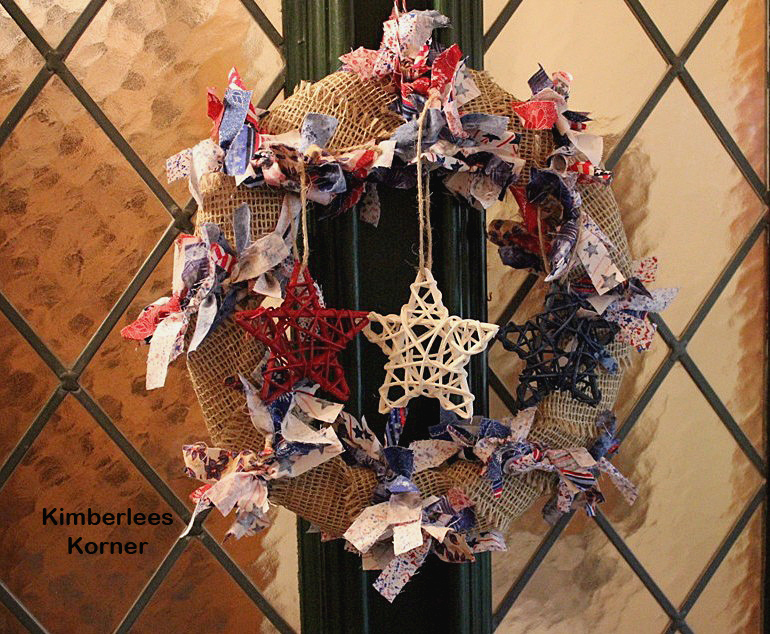
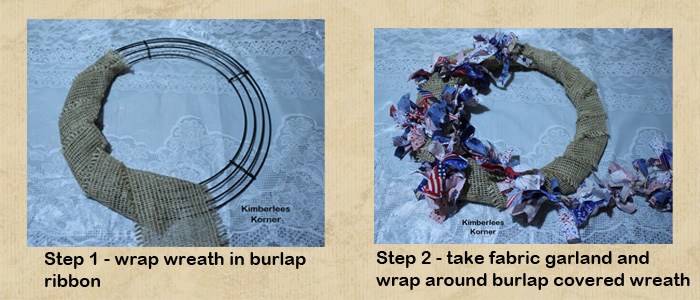
The next project I made was a wreath for my front door. I was at Michaels back in May and saw this tied fabric garland and decided I could make my own and use up some of my fabric scraps. I then used the fabric garland on a wire wreath that I first covered in burlap ribbon. I had a few of those stars leftover from my garland project and took some jute twine and tied them to the wreath.
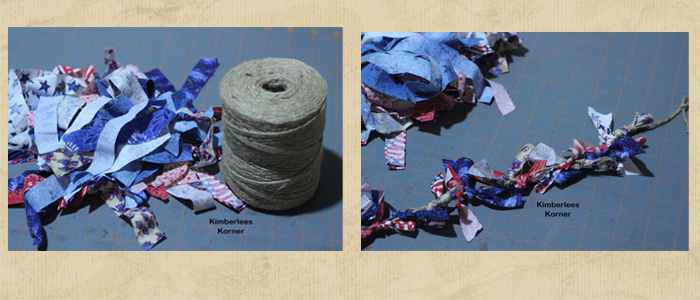
Below are the photos of the steps to make the wreath. I used a glue gun to secure the burlap after wrapping it onto the wire wreath and I also put a little glue on the fabric garland after wrapping it around. To make the fabric garland I used jute twine and just cut 4 to 5 inch pieces of fabric about a half inch wide and tied it to the jute. It was a great way to use up some leftover fabric in my stash.
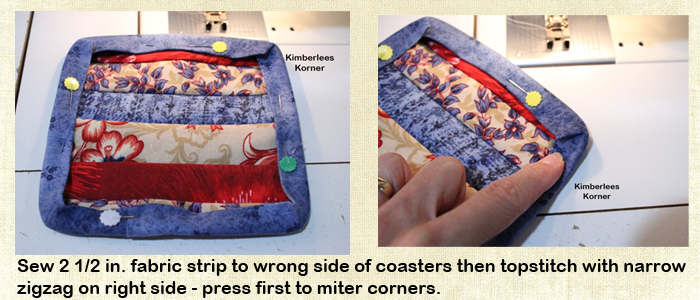
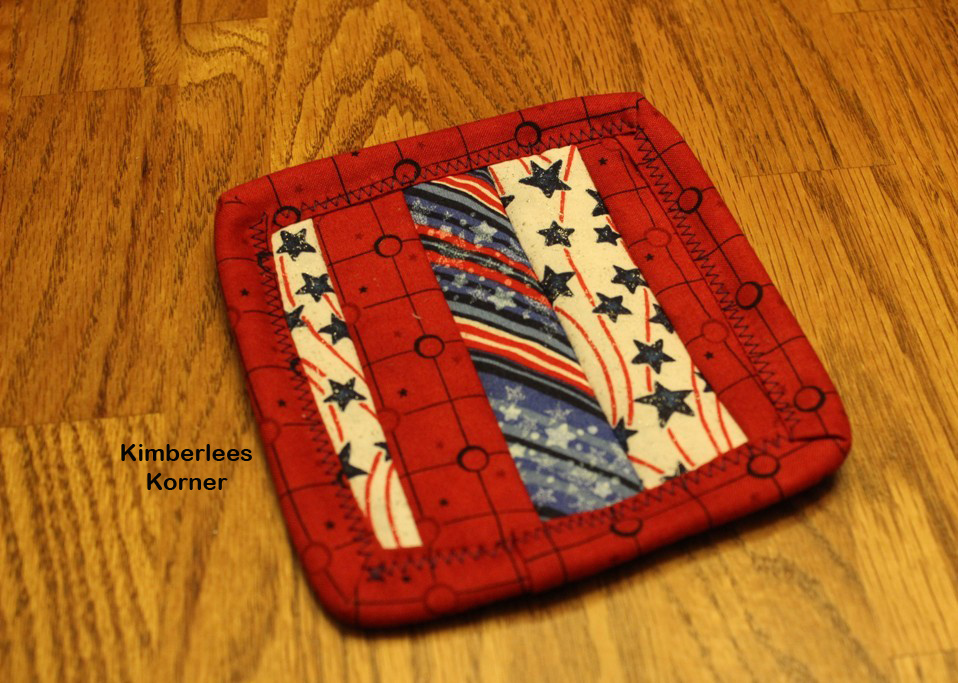
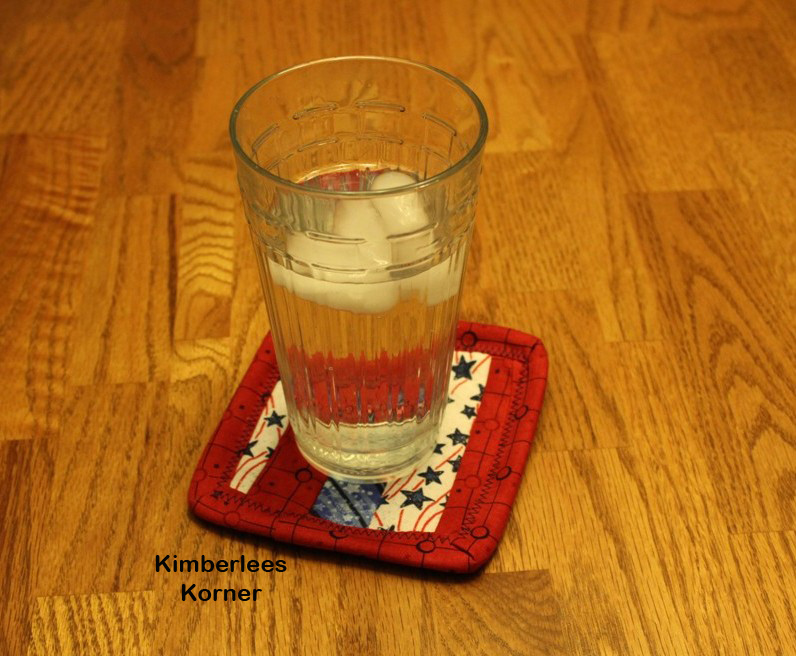
The last project I made were fabric coasters made from 1 1/2 inch wide strips of fabric. This is another great way to use up some of your stash. To make these coasters you will need:
a sewing machine
1/4 inch presser foot
thread to match project
1 1/2 inch strips of fabric
2 1/2 inch strips of fabric for binding edges
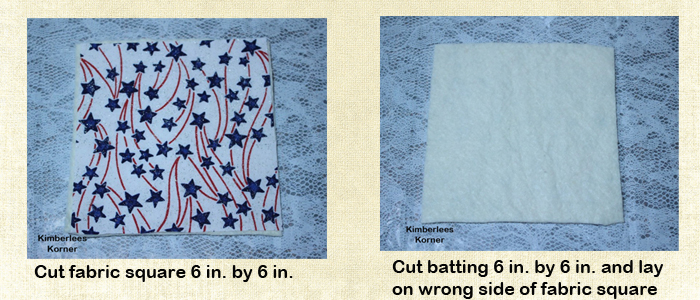
6 inch squares of fabric for backing
6 inch squares of warm and natural cotton batting
rotary cutter
quilters ruler
The first step is to lay your 6 inch square batting on top of the wrong side of the 6 inch square of fabric.
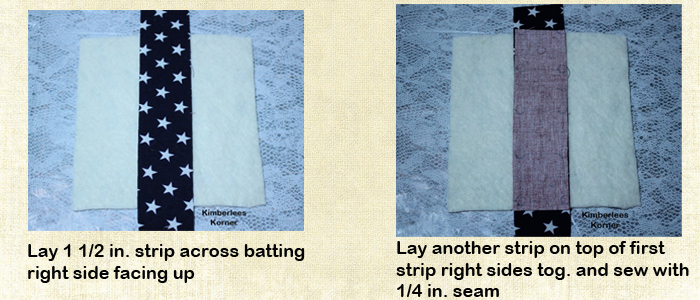
Then you will lay your first strip of fabric wrong side on batting and right side up – then place your 2nd strip on top of that strip right sides together and sew using a 1/4 inch seam – it is helpful to have a 1/4 inch foot for this step.
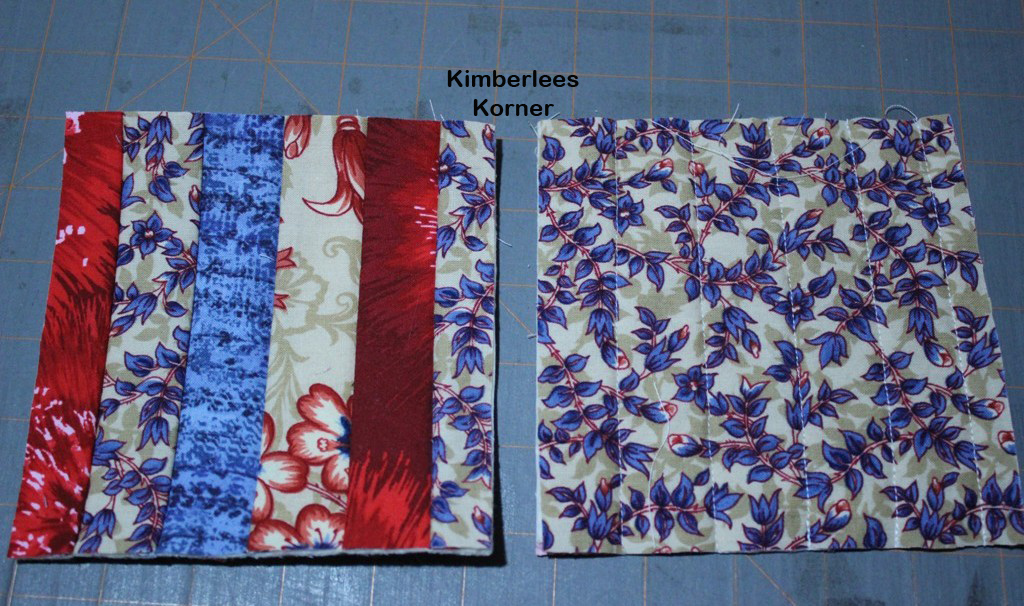
After sewing the strips together onto the batting and fabric backing you will press them and continue to sew strips in this manner covering both sides of batting. After a final pressing use a ruler and rotary cutter to square off all your edges. You will have a piece that looks like the photo below – front and back views. This called quilt as you go strip piecing.
The final step is to attach the binding. For this I used a 2 1/2 inch wide strip pressed in half and sewed it to the wrong side of the coaster with the raw edges even. Since there were no curves in this coaster I did not use a bias edge binding, just a straight strip. You can probably google how to make and attach quilt binding for a better explanation of how to do this.
After sewing the binding to the wrong side you press it over the raw edge to the right side of your coaster. You may want to clip the corners a little. I like to pin it in place before sewing. Also, you will need to miter the corners by folding them in and pressing them in place. I then sewed around the folded edge of the binding using a narrow zigzag stitch. Photos below are of the finished coaster.
I like to use these coasters outside on my patio and in my kitchen and living room. They are super simple and quick to make if you have all of the supplies on hand – they make a good housewarming gift, too. You can also use this same process to make a matching potholder by using a larger square of batting and backing fabric – like 8 or 9 inches. For potholders you may want to use the thermal fleece type of batting so they are more heat resistant and even use 2 layers. I have also used 2 layers in the coasters if you want them to be thicker. If you decide to use 2 layers you may want to use a walking foot to sew the strips down so they don’t shift.
I hope you enjoyed reading about my projects and get inspired to make something patriotic for the summer season. If you have any projects you have currently made I would love to hear about them – click on Leave A Reply and tell me about them.
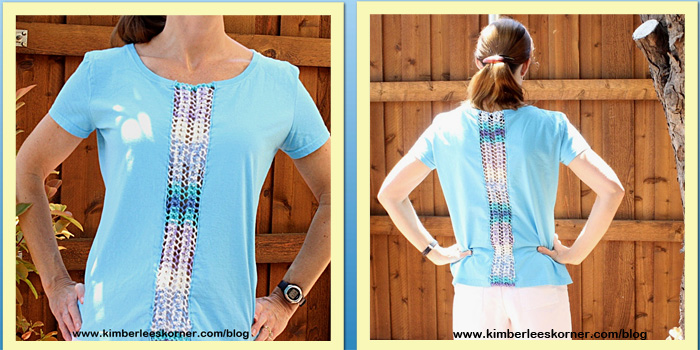
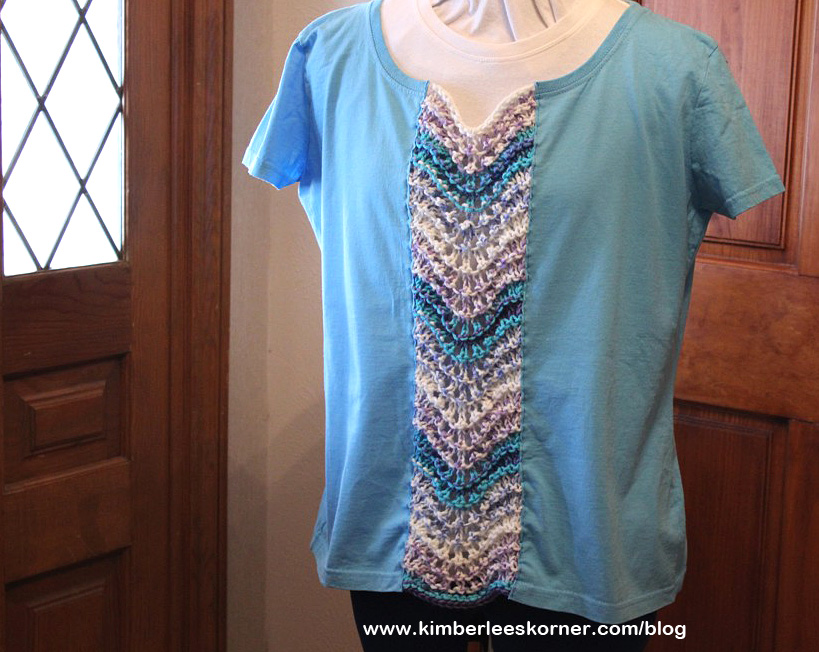
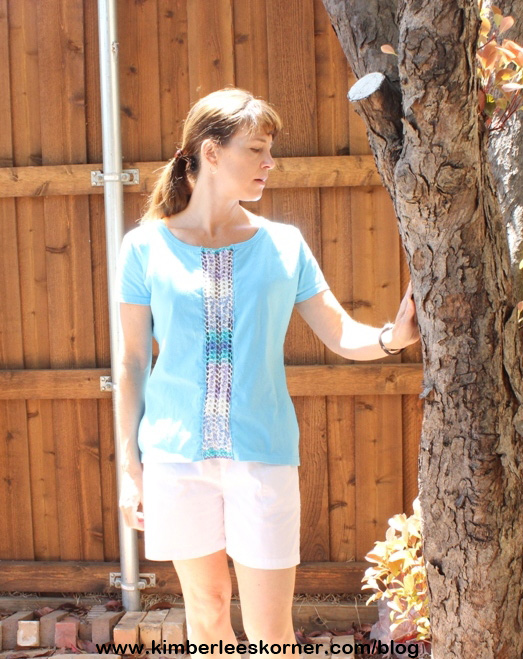
This is another project where I have combined my love of sewing and knitting. I made my first top like this with a long sleeve shirt back in February. You can click on the highlighted text to take you to that project.
Originally I had this project planned to share in March. Well, I actually had it done but did not like the end result with the particular lace panel of feather and fan stitch that I used. I like how it had the scallop in the front but the shirt seemed too loose. So, I ripped that out and started over.
Photo of first project that I didn’t like – with the feather and fan panel
I went back to the knitting stitch I had used for my red top and just made it a little more narrow as this blue top seemed to be a bit more loose fitting than the red one.
Below is the tutorial on how to make this top:
To make this you will need to know how to knit and how to use a sewing machine.
Supplies needed:
Size US 8 knitting needles (I used straight ones)
Worsted weight yarn that is washable – I used Hobby Lobby I Love this Yarn
T-shirt that is a little too snug or one size too small for you
Fabric scissors
Sewing machine
Sewing thread to match shirt
Step 1: Using your fabric scissors cut up the center front and center back of shirt – use a tape measure or ruler to determine center
Step 2: Knit lace panels using the following stitch on size US 8 needles:
Cast on 12 stitches – knit the first row
Row 1: *k2tog, yo, k 2; rep from * across to end
Repeat row 1 for pattern knitting one panel for the front and one for the back according to how long those sections are. When panel is almost the measured length knit last row then bind off.
Abbreviations: k – knit k2tog – knit 2 together yo – yarn over rep – repeat
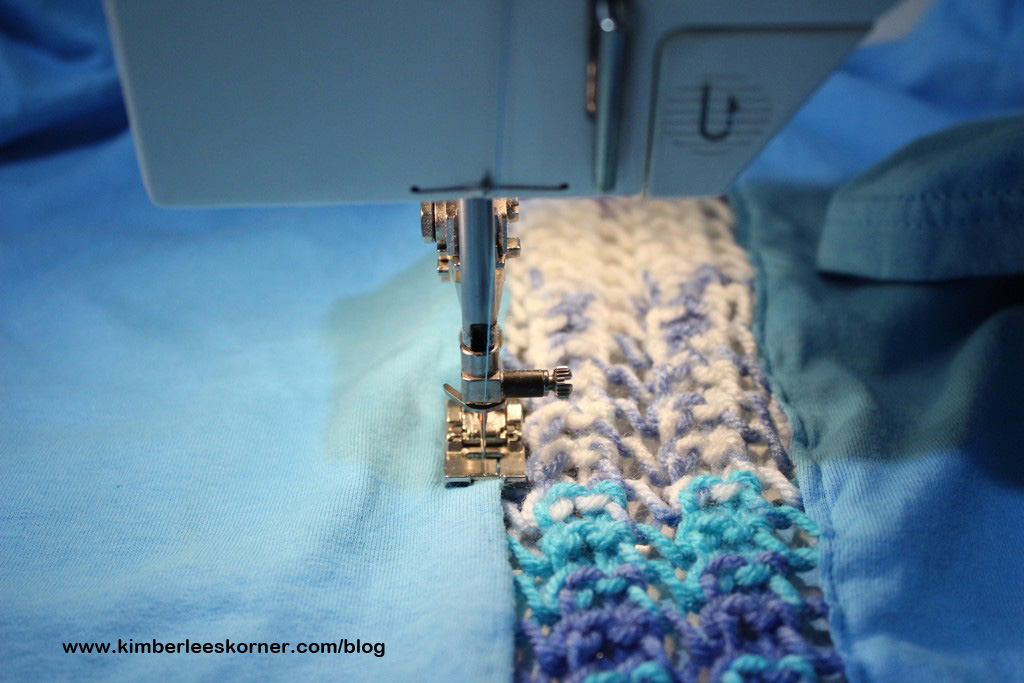
Step 3: Pin knit panels to shirt with fabric on the top of the lace knit panel. Sew using a straight stitch and a stitch length of 2.5 – back stitch at beginning and end one or two times to lock stitches. Use the inner toe edge of your presser foot as a seam guide for fabric edge. Repeat this process a total of four times to attach panels to shirt.
Step 4: Weave in tail ends of yarn and your top is done. Enjoy wearing it!
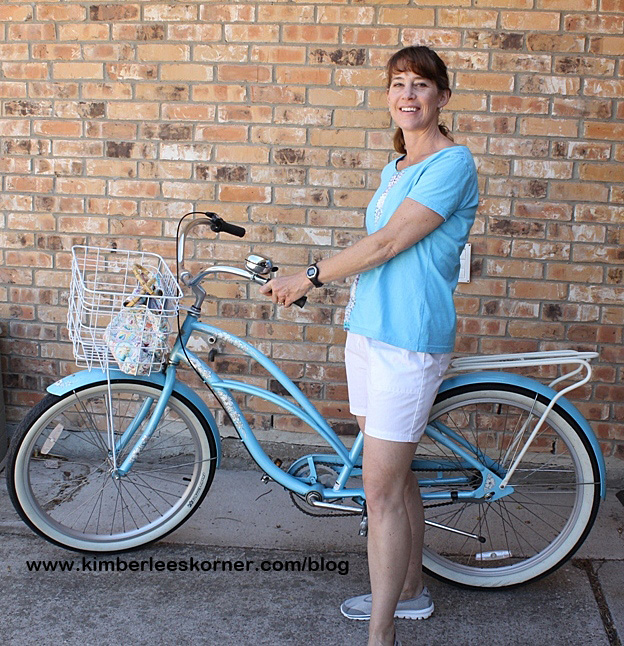
I really like how this top turned out and have already wore mine a couple of times. I found out the other day as I went to ride my bike that it matched my bike so I took a picture.
I have had this Electra 3 speed bicycle for about five years now. It was a combined Mothers Day and birthday gift. I love this bike and enjoy riding it around our neighborhood for exercise and to the store. I actually rode it to Walmart today to get a few groceries. It is hard to see but even the tire print has flowers for the treads. Now that gas is going up again I am planning on riding it to the store more frequently.
I hope you enjoyed this tutorial and have fun making a shirt if you decide to try it. It is really a very easy project and comes together quickly.