Tag: sewing project

Bathing Suit Bottom Redo

6 Comments

One of my recent sewing projects has been to replace the worn out elastic in some bathing suit bottoms.  To be honest with you they were wore out last year but I neglected to fix them then.  I decided I needed to get them done this year as I really like the bathing suit and the top was still in good shape – so are the bottoms except for the elastic.

Ripping elastic from bathing suit bottoms

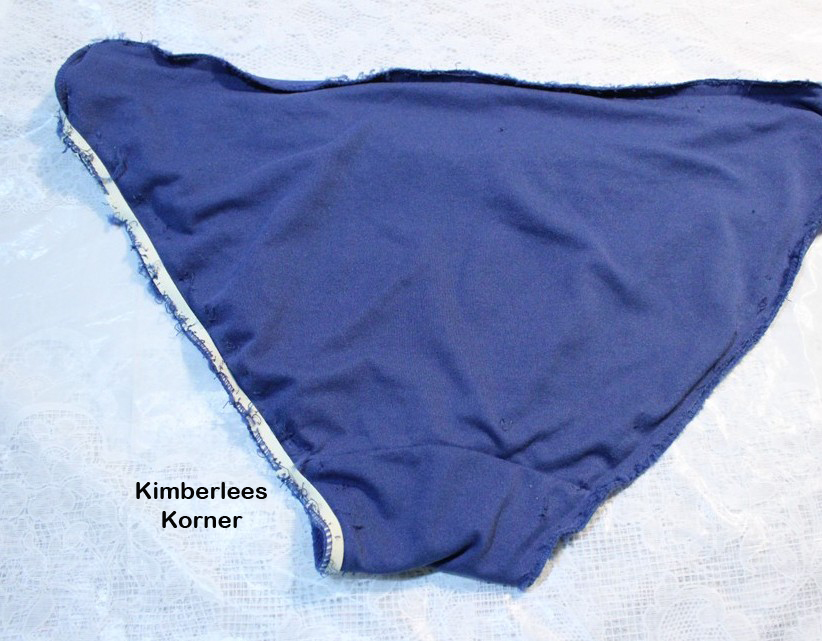
The above photo is of the bottoms with 2/3 of the elastic removed.  Let me tell you that removing the topstitching and then the serged edge that attaches the elastic is a lot of work!  I think it probably took me 3 or 4 hours total time (I didn’t do it all at once, it was too boring) to rip all of it out.

Once I had the elastic all removed the process was a lot faster and only took about 20 or 30 minutes to put in the new elastic.  I used a Kwik Sew pattern, pattern 3238 which is a bathing suit pattern I have made before, for the elastic length for the waistband and the legs.  I knew that those bottoms fit me well and the elastic measurements would be right.

Sewing elastic to bathing suit with serger

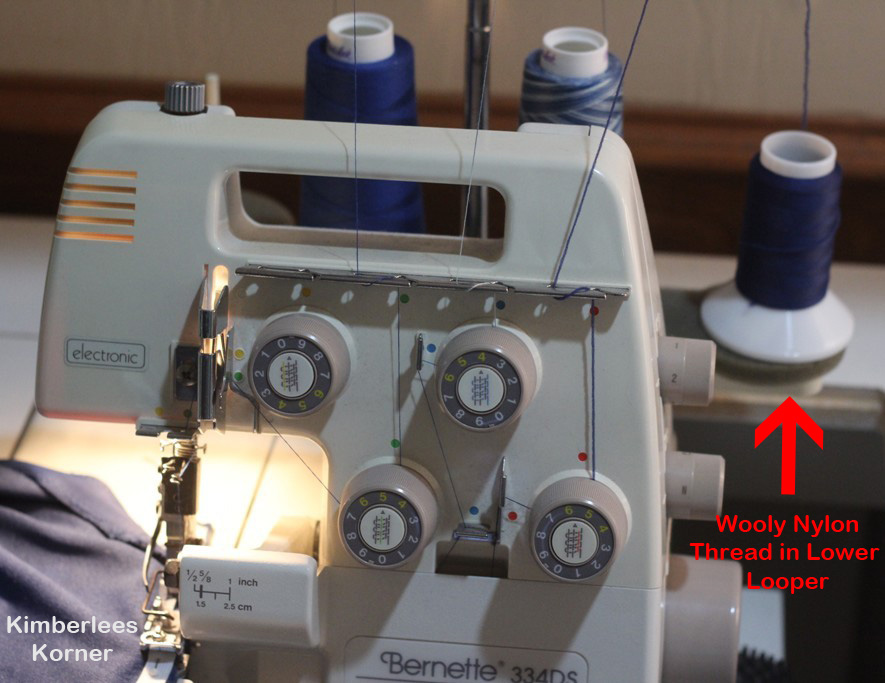
After cutting the elastic to the measurements I used my serger to attach it to the edges of the waistband and leg openings.  I first divided the elastic in half and then divided the bottoms fabric in half and marked it so I would know where and how much to stretch the elastic as I sewed.  I also used wooly nylon thread in the lower looper as that part will be next to my skin and the wooly nylon is a lot softer and provides a lot more coverage and stretch than a regular polyester or cotton thread.

Sewing elastic down with sewing machine and narrow zigzag stitch

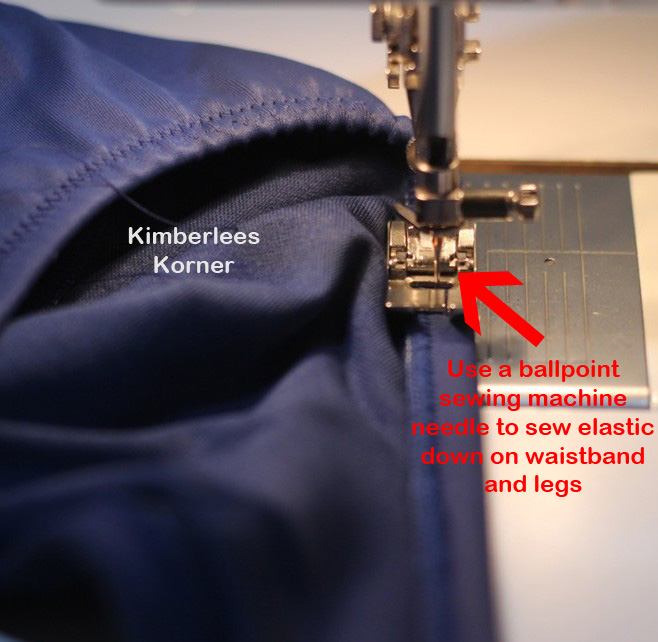
After attaching the elastic with the serger I then took it to my regular sewing machine and turned the elastic over and stitched it down using a narrow zigzag stitch of a 2 width and a 2 length to topstitch the elastic in place.  I also used a ballpoint needle as it sews knits and over elastic better than a universal needle.

Elastic replace in bathing suit bottoms

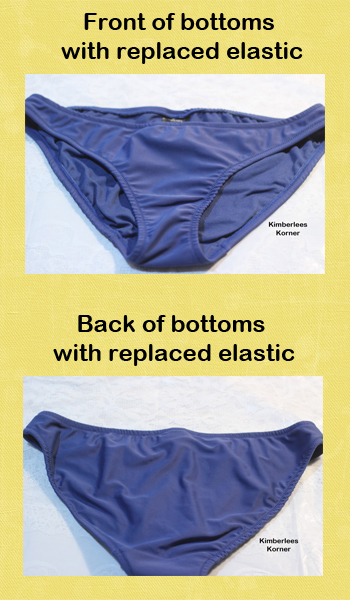
The photo above is of the front and back of the bottoms after replacing the elastic.  I even remembered to sew the tag back in the back – not that I couldn’t figure out which was the back but I was glad I remembered.

Bathing Suit with elastic replaced in bottoms


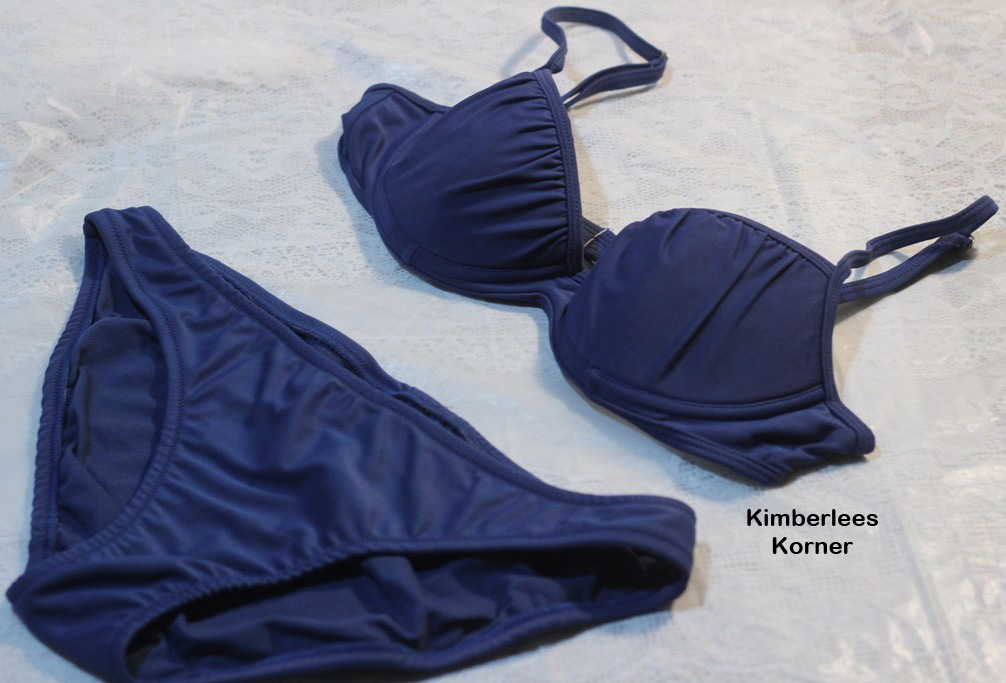
Well, here is my new-old bathing suit.  I tried the bottoms on and they fit much better now and are not all loose.  It took a while (like a few weeks) for me to complete this project as it was a real pain to rip out that old disintegrating elastic.   It was so bad it would just crumble in some spots but I still had to rip out all of the old serging holding it in so I could replace it and not have all of the bulk.  The top for some reason does not, and I hope won’t any time soon, have this same problem and as you can see the bathing suit is still in pretty good shape for being several years old.  I am glad I was able to recycle it and not have to just get rid of it.

The weather here is still hot and will be for at least another month or more so I will be able to wear my “new” bathing suit when we swim in our pool.  My advice to anyone attempting to do an elastic replacement in a bathing suit is to be patient and just keep at the ripping of the stitches and eventually when you get to the sewing part it is super fast and easy.

Have a great day!

Kimberlee


Sewing Tiered Skirts

2 Comments

Recently I have made a couple of new skirts.  After my jeans sewing marathon I switched to making skirts.  I love sewing skirts because they are easy and fun to make and go together very quickly, in my opinion.  They are also comfortable and fun to wear – especially in the spring and summer months.  Sometimes I think wearing a skirt is actually a lot cooler than wearing shorts in the hot Texas climate I live in.

Last week I wore a skirt four days out of seven.  My husband refers to it as being “dressed up” but I look at it as being cool and comfortably dressed and ready to go somewhere if the occasion arises.

Long Tiered Denim Skirt made by Kimberlees Korner


The long tiered skirt above is made from a lightweight denim that I bought at Joann a while ago.  I actually finished this one right before Easter weekend and was able to wear it to church with my Nymphalidea Shawl that I knitted and did a post about back in April.  I love this skirt and have so many things that it goes with since I love the color blue.  It is really comfortable to wear and looks great with boots or sandals.  The pattern I used to make this was New Look 6565 and it is super easy.  I think it takes longer to cut out the pieces you need than to actually sew it.

Short Denim Ruffle Skirt  Kimberlees Korner

The short denim skirt in the above photo is made using the same New Look pattern, 6565.  I just finished sewing this skirt a couple of weeks ago and have worn it a couple of times.  I did some stitching detail with a white thread and a zigzag stitch for the lower hems but it is hard to see.  These photos were a challenge to get since it was so windy that day – actually that whole week was windy.  I really wanted to get a photo with my roses in the background, though.

Black Tiered Skirt  Kimberlees Korner

The black skirt above was sewn using the same version of the pattern as the long denim one.  I made this one back in the fall and have worn it a lot since then.  For this skirt I used a lightweight broadcloth fabric and I like how easy it is to wear and wash – no wrinkles other than the gathered areas which is fine and the look I want.

These skirts are really simple to make as long as you are familiar with how to gather fabric.  Below is a little step by step photo on the process I use to gather – it is the old school way and it works just fine every time for me.

Gathering Steps for Tiered Skirts  Kimberlees Korner

To make these skirts you really just need a regular sewing machine but I would recommend finishing off all of your seams with a zigzag stitch or some type of overcast stitch your machine might have so that the seams do not fray.  I have a serger so I serged all of my seams.  If you have a sewing machine and a couple of hours time you can make this type of skirt.

What sewing projects are you currently working on?  (or any type of projects)  I usually have a sewing project, knitting project and a crochet project going at all times.  That way if I get bored or frustrated with one thing I can go to another.

Have a great day!

Kimberlee

Short Sleeve Top with Knitted Lace Panel

10 Comments

This is another project where I have combined my love of sewing and knitting.  I made my first top like this with a long sleeve shirt back in February.  You can click on the highlighted text to take you to that project.

Sewing and Knitting project from Kimberlees Korner

Originally I had this project planned to share in March.  Well, I actually had it done but did not like the end result with the particular lace panel of feather and fan stitch that I used.  I like how it had the scallop in the front but the shirt seemed too loose.  So, I ripped that out and started over.

Original project designed with feather and fan  Kimberlees Korner
Photo of first project that I didn’t like – with the feather and fan panel

I went back to the knitting stitch I had used for my red top and just made it a little more narrow as this blue top seemed to be a bit more loose fitting than the red one.

Below is the tutorial on how to make this top:

To make this you will need to know how to knit and how to use a sewing machine.

Supplies needed:

  • Size US 8 knitting needles (I used straight ones)
  • Worsted weight yarn that is washable – I used Hobby Lobby I Love this Yarn
  • T-shirt that is a little too snug or one size too small for you
  • Fabric scissors
  • Sewing machine
  • Sewing thread to match shirt

Step 1:  Using your fabric scissors cut up the center front and center back of shirt – use a tape measure or ruler to determine center

Step 2:  Knit lace panels using the following stitch on size US 8 needles:

Cast on 12 stitches – knit the first row

Row 1:  *k2tog, yo, k 2;  rep from * across to end

Repeat row 1 for pattern knitting one panel for the front and one for the back according to how long those sections are.  When panel is almost the measured length knit last row then bind off.

Abbreviations:  k – knit        k2tog – knit 2 together      yo – yarn over      rep – repeat

Step 3:  Pin knit panels to shirt with fabric on the top of the lace knit panel.  Sew using a straight stitch and a stitch length of 2.5  – back stitch at beginning and end one or two times to lock stitches.  Use the inner toe edge of your presser foot as a seam guide for fabric edge. Repeat this process a total of four times to attach panels to shirt.

sewing top to lace knit panel  Kimberlees Korner

Step 4:  Weave in tail ends of yarn and your top is done.  Enjoy wearing it!

I really like how this top turned out and have already wore mine a couple of times.  I found out the other day as I went to ride my bike that it matched my bike so I took a picture.

blue top project matches my bike  Kimberlees Korner


I have had this Electra 3 speed bicycle for about five years now.  It was a combined Mothers Day and birthday gift.  I love this bike and enjoy riding it around our neighborhood for exercise and to the store.  I actually rode it to Walmart today to get a few groceries.  It is hard to see but even the tire print has flowers for the treads.   Now that gas is going up again I am planning on riding it to the store more frequently.

I hope you enjoyed this tutorial and have fun making a shirt if you decide to try it.  It is really a very easy project and comes together quickly.

Have a great day!

Kimberleesewing and knitting project from Kimberlees Korner

Denim Purse Made From Jeans

9 Comments

Sewing bags and purses is one of my favorite types of sewing projects.  Recently I made this purse using old jeans – a pair of mine, a pair of my husbands and a pair of one of my sons – to create this fun purse that has a zipper closure and is fully lined.  I really like how this turned out and have been using it daily as my purse for at least a month now.  This was actually a project I had started back in the fall and finally got around to finishing it.  I don’t know why I waited so long as I am very pleased with how it turned out.

denim purse made with old jeans from Kimberlees Korner

This purse is approximately 13 inches wide at the top, 10 inches wide at the bottom and 10 1/2  inches tall.  It has a nice size outer pocket on the one side and I just did an embroidered letter for my name on the other side.  The pocket is perfect for my keys or for my cellphone.

Below is the information on how I made this if you are interested in creating your own.  One of the things I like about using the jeans and upcycling is that each time you make something it looks different because of using various colors and weights of denim.

Supplies for project:

  • 3 pairs of jeans in different shades of denim
  • cotton fabric for lining – approx. 1/2 yard
  • 1 denim zipper at least 20 inches long or longer
  • thread for sewing the bag and decorative thread for embroidery design and topstitching if desired
  • denim sewing machine needles – size 90 or 100
  1. Cut 6 pieces of denim from jeans 13 inches long by 6 inches wide for outer bag (I cut 2 of these size pieces from each of the pairs of jeans)
  2. Cut 1 piece of denim for outer pocket 12 inches long by 6 inches wide – fold this in half to be 6 x 6 and press, topstitch the folded edge as desired
  3. Sew pocket to one of the denim panels using for the center by measuring  2 1/2 inches from one  end and draw chalk line – place the raw edges of the pocket on this line and sew using the edge of presser foot as a seam guide – press pocket up to enclose raw edge and topstitch lower edge of pocket using a decorative thread if desired or just your regular thread
  4. Embroider design or monogram on other center panel if you are doing this step – use a tear away backing to ensure quality embroidery
  5. Sew 3 panels together along 13 inch length to create one side of bag and repeat the process to create the other side of the bag – use 1/2 inch seam.    Make sure you have your pocket upright on the one center panel and catch the sides of the pocket in the stitching.  After sewing the panels together press them and then go back and topstitch them on the outer right and left sides of the panel
  6. Cut 4 strips of denim 26 inches long by 3 inches wide – you will use 2 for the straps and 2 for the zipper casing
  7. Cut 2 pieces from cotton fabric for lining approx. 16 1/2 inches wide by 13 inches long or by laying your denim panels that are sewn together over the cotton fabric and cutting that size – set aside for now
  8. For zipper casings – fold in and press 1/2 inch on each long end of strips and 1/2 on each short end  –  enclose zipper in 2 casing strips using a zipper foot and sewing close to zipper teeth  note – fabric is on either side of zipper tape, make sure you are catching the fabric on the lower side as you sew  Set this aside for now
  9. For straps – fold in 1/2 inch on ends of the other 2 strips and press – fold strips in half lengthwise and stitch with a 3/8 inch seam with right sides together  –  turn strips right side out and press – topstitch each side of strip – set these aside for now
  10. Bag and Lining –  Place each bag outer side right sides together with bag lining and sew around each side and top using a 1/2 inch seam allowance – leave lower portion open for turning right side out.  Do this for both sides, clip corners and turn right side out and press
  11. Place sewn zipper casing (centering zipper casing as it will be longer than your bag sections) on top of each bag top portion with denim side facing up – topstitch down each zipper casing attaching bag to zipper casing piecePlace Zipper Casing on top of bag section  Kimberlees KornerSewing Zipper casing to bag  Kimberlees Korner
  12. Open zipper – do not forget to do this! – Place bag sections right sides together and sew around bag sides and bottom – zig zag or serge bottom raw edges of bag.  To box corners match lower bottom seam to side seam and measure in 2 inches from corner and sew – turn bag right side out – tucking long zipper tails into bag – this makes a nice sturdy area to hold or pinch when zipping the bag open and closedSewing Bag together  Kimberlees Korner
  13. Place straps on bag 1/2 inch from zipper casing edge and 1/2 inch from panel seam – use a narrow zig zag or bar tack type of stitch to sew down on ends of straps that are folded in 1/2 inch

That’s it – your bag is all done and ready to use.  You could also choose to put pockets on the inside of the bag but I never use them since I use my purse organizer.

inside view of chevron lining denim purse  Kimberlees Korner

The fabric that I used for the lining is a fun chevron fabric that I got at Fabric.com.  I also got the same fabric in a different color way and made a top from that.  I think I have enough of the fabric left from my bag lining to make another top or maybe a short skirt.  I am putting the link to their site if you are interested in ordering anything from them – they offer free shipping on orders over $35.00 and have really great fabrics for reasonable prices.

Orders of $35 & up Ships Free.

I am currently working on sewing some skirts and tops for spring and summer.  What projects are you working on?  Click on Leave a Reply and tell me about them.

KimberleeDenim Recycled Jeans Purse from Kimberlees Korner


Sewing Jeans

11 Comments

Sewing your own jeans is a lot easier than you think.  About 5 years ago I made my first pair of jeans because I was fed up with buying jeans that never seemed to fit me how I like.  I decided that instead of wasting my time shopping for jeans and paying a bunch of money for them I would learn to make my own.

This is the first pair of jeans I made using a Kwik Sew pattern.  The pattern is number 3193 and I know as of a year ago it was still in print.  I made these jeans approximately 5 years ago and yes I still wear them.  They have become a little faded over time but they are very comfortable.

Kwik Sew jeans pattern

It is kind of hard to see but I embroidered the back pockets of these – I did not have good light conditions outside for these photos but wanted to show how these jeans looked.  The pattern is super easy to follow with great zipper instructions.  There are 2 versions of the jeans a wide leg, as I am wearing, and a straight leg.  I like that the waist is a littler higher on these and not such a low rise, too.  I am getting too old for those low rise jeans.

I  began making more of my own jeans a few years ago after buying the Bernina My Label pattern drafting software.  This is software that helps you design your own patterns using your measurements.  I am not sure if they still sell it but there are other software programs available that do this.  I really like it because it is a more custom fit.  It does – has – required some tweaking and learning to do things on my own.  So, all the current jeans I have made I am now using the My Label pattern which is essentially my own pattern made to fit me.

Dark Denim Jeans sewn by Kimberlee from Kimberlees Korner

Recently I have been on a major jean sewing spree.  I told my husband the other day that I was really getting a system down for making them and I can now get a pair done in about 5 or 6 days.  This of course is not working on them constantly and some days I only have time to sew for about 30 minutes and some days I have no sewing time.  The most sewing time I ever get is about a 2 hour session on the weekend.

I have taken 2 Craftsy classes that have really helped me learn a lot more about designing and sewing your own jeans.  The first class I took a couple of years ago was Online Sewing Class Jean-ius by Kenneth King.Online Sewing Class  This was a great class and I learned so much about fitting and sewing the details on the jeans like the pockets and waistband and topstitching techniques.  In this class you can actually learn how to take a pair of your favorite jeans and copy them to make your own pattern.  The other class I recently took through Craftsy was Sewing Designer Jeans with Angela Wolf.    I learned some more great sewing tips and techniques for the jeans as well as how to put a curved waistband on the jeans after taking Angela’s class.  I also learned how to distress the denim fabric in her class.   Both of these classes are wonderful for increasing your sewing knowledge and learning the skills you need to make your jean sewing a success.    You can learn more about the classes I just mentioned by clicking on the highlighted text to take you to the link to them.  If you are going to make your own jeans I would highly recommend taking both classes.

Some of the tips I have that I think are important when sewing your own jeans are:

  • Use a size 90/14 or 100/16 denim sewing machine needle
  • Take your time and sew slowly – especially when topstitching
  • Make a muslin first using inexpensive muslin just to get an idea of the fit – this way you can adjust some things without ruining your expensive denim.  You may still need to make a few minor adjustments on the denim but at least it will be less and you won’t ruin your fabric
  • Press all your seam using a hot steam iron.  This will make sewing so much easier and your seams will lay nicely.  I took a whole class on pressing once from my Sewing Guild and it is a very important step.
  • Use 2 spools of the same color thread through the needle when topstitching versus using the jeans thread they sell.  I tried using the jeans thread on my dark denim ones and my machine (an older Bernina) does not like it – it is very thick thread and requires tension adjustments.  I found it easier and less stressful to just use 2 spools of thread and a stitch length of 4 for your topstitching.
  • Sew your inner leg seams first, before the outer leg seams.  This is the opposite of what patterns usually tell you to do.  This way you can topstitch the inner leg seam easily.  Also, stitch from the center crotch point down to the hem on each side for best results when sewing this seam together.

Fabric is a fun and important part of making your own jeans.  I have bought denim fabric from JoAnn that I like as seen in the pair I made 5 years ago (above) as well as the glitter denim fabric I used in this pair:Glitter Denim jeans made by Kimberlee from Kimberlees Korner

This pair was the first pair I made after taking Angela Wolf’s class.  I had this fabric in my stash and decided to use it.  It is hard to see but there is a light silver glitter in the fabric and this denim is very lightweight – no stretch.  I embroidered my own design using a K logo for Kimberlees Korner using a metallic silver thread.

I also got this fabric that I made these shorts from at JoAnn.  I have only wore these once since it is still kind of chilly here.  denim shorts front & back sewn by Kimberlee from Kimberlees Korner

I didn’t have enough of the fabric to make the curved waistband facing so I used the fabric that I did the pocket lining with and love how this turned out.Waistband and Pocket Lining of jean shorts from Kimberlees Korner

The fabric I recently bought from  Fabric.com  is really nice quality denim and a great price, in my opinion.  They also have free shipping on orders over $35.00 and it arrived quickly.  The photos below are the jeans I made using the fabric I bought from there.

front & back dark denim jeans made by Kimberlee from Kimberlees Korner

Jeans sewn by Kimberlee from Kimberlees Korner

So far the above light color denim and the shorts are my two favorite pair.  They both fit how I like them – not too tight and not too low of a rise.  I really like how the curved waistband adds some extra give to the waist area, too.

side & back view of light denim jeans from Kimberlees Korner

What sewing projects are you currently working on?  Click on Leave a Reply and let me know. I am still in the jeans sewing mode and currently working on another pair of denim shorts using some more fabric I found in my stash.  I also have a tan twill fabric cut out for shorts using the jean pattern but have not started sewing those yet.

Have a great day!

Kimberlee

Sewing Project Knit Jacket

4 Comments

I recently made this knit jacket using a pattern that I also made a tunic from this past summer.  The pattern is Simplicity 1668.  It is one of those patterns considered to be sportswear as there is a whole ensemble that you can make in the pattern that includes a dress, jacket, pants, shorts and a tunic.  So far I have only sewn the jacket and the tunic. Navy Knit Jacket made by Kimberlee from Kimberlees Korner

The fabric I used for this jacket was a lightweight knit that I believe I bought from Hancock Fabrics.  The jacket is very easy to sew as it has minimal pieces.  There are no sleeves to sew as it has a dolman sleeve.  I always like that as it makes completing your project so much easier when there are no separate sleeves to sew.   The front features a shawl type of collar and that was sort of time consuming to sew as it requires interfacing and since it is curved you have to sew slowly and do some clipping to make the seams lay nicely.  I don’t think the jacket front is hard to sew just requires a little time and patience to ensure it turns out well.  You also need to press it to get a crease to make it fold back.

Front, Side & Back view of navy knit jacket from Kimberlees Korner

As you can see from the photos the jacket is a 3/4 sleeve and it also has an asymmetrical drape as the back is lower than the front.

I really like this jacket a lot and was so pleased that I had some navy pants that I made a couple of years ago that went with the jacket and It also looked nice with my Olympic Crochet Scarf that I had finished during the winter Olympics.  I think I would like to make this jacket again in the near future in a cream or white for spring or summer.  This jacket is the perfect thing to keep with you for those air conditioned places that are so chilly in the summer time.

Currently I am working on sewing some jeans and jean shorts.  I will be doing a future post on them so be sure to subscribe via bloglovin, email or RSS for updates.

Have a great day!navy knit jacket sewn by Kimberlee  Kimberlees Korner

Kimberlee

Top with Knit Lace Panel

9 Comments

I recently designed this new shirt that has a lace knit panel insert on the front and back.  The idea for creating this was for two reasons.  One, this shirt was a little too small (tight) for me and Two, I really like this easy to knit lace stitch that I had recently used to create another project.Top with Knit Lace Panels from Kimberlees Korner

To make this you will need to know how to knit and how to use a sewing machine.

Supplies needed:

  • Size US 8 knitting needles
  • Worsted weight yarn that is washable – I used Hobby Lobby I Love this Yarn
  • T-shirt that is a little too snug or one size too small for you
  • Fabric scissors
  • Sewing machine
  • Sewing thread to match shirt

Step 1:  Using your fabric scissors cut up the center front and center back of shirt – use a tape measure or ruler to determine the center point.Cut shirt apart center front and back  Kimberlees Korner

Step 2:  Knit your lace panels

Cast on 16 sts – knit the first row

Row 1:  *k2tog, yo, k2; rep from * across

Rep Row 1 for pattern – measure your front cut center line of shirt and when your knitted piece is close to that length knit 1 more row, then bind off.

Make another panel for the back following the same pattern above – note that the back section will be longer so you will need to measure that and knit this panel a little longer.Pin Lace panel to shirt placing shirt on top and panel on bottom  Kimberlees Korner

Step 3:  When both your panels are knitted you will then pin them to the shirt front and back and using your sewing machine and a stitch length of approx. 3 stitch the shirt and panel together with the shirt laying on top of the panel – use the inner edge of you presser foot (see below)  as a guide for a seam allowance.  You will have to stitch down each side of the panel so you will stitch 4 different times.   Weave in the ends of the yarn when you are done – or you could do it before but I did mine at the end.Sewing knit panels to shirt using your sewing machine and straight stitch  Kimberlees Korner

That’s it – all done.   Super simple and fun to wear.  The top can be worn as is or with a camisole or tank top underneath.  I have a tank top under mine that I found at Old Navy and it was the perfect red to match the shirt.   Top with Knit Lace Panel Kimberlees Korner

I am currently working on a short sleeve version for spring using a different lace stitch and I will be sharing that on my blog in March – so be sure to follow me via bloglovin, email or RSS feed for future updates.

Have a great day!

Kimberlee

Sewing Leggings

2 Comments

Leggings seem to be coming back around again.  Maybe they have been around and I am just slow to noticing.  I decided that I would make my own leggings because they seemed pretty simple to make – and they really are.  The way I made mine there are only 3 seams then a waistband casing for your elastic and then the hem.

Brown Leggings made by kimberlee  www.kimberleeskorner.com/blog


Brown Leggings made by kimberlee  www.kimberleeskorner.com/blog


I chose to make mine with a little more ease in them than those you buy.  I really don’t like super tight things on my legs.  I like the way these fit me and they are comfortable to wear.  That is one of the things I love about sewing my own clothes – I can make things the way I want.

I did not really use a pattern to make these.  I consulted pinterest first on how to sew leggings and found a couple of good blogs with this info.  You can look at my Sewing board on pinterest to see these pins-blogs.  This helped me figure out how to use an existing pattern for just some basic pants and turn it into a leggings pattern.  What I did was take my measurements and then using the My Label pattern I have for pants, I butted the front and back pieces together on the outer sides and then adjusted the size per my measurements, making sure I added in approx. 1/2 inch for a seam allowance.  I then took some pattern drafting interfacing, I by this at Joann, and laid it over the two pieces and traced around to make a pattern for the leggings.  This way there is no outer seam only an inner seam and the front and back crotch seam.

Sewing these is so fast and easy!  You just sew with right sides together your inner leg seams and then sew the crotch seam.  Then, turn over your casing for your elastic waistband – I use 1 1/4 or 1 1/2 inch elastic so the casing is fairly wide.  You also turn up 1 inch for your hem on the legs.  You are done!  So simple.  I have serger so sewing these is super fast but you could also use a regular sewing machine and a zigzag stitch.  I sometimes use a twin needle for the hems but this time I chose to use a narrow zigzag to sew the hem and the casing.  I think this gives it a little better stretch.

To make leggings you will need some fabric that is stretchy with a little bit of spandex or lycra in it.  I think mine was from Joann and called Ponte Roma Sew Classic knits.  The gray ones I made below that I use to workouts in are the Sweatshirt Performance fabric from Joann.  Both fabrics have a little lycra or spandex and retain their stretch after hours of wear.

Gray leggings for working out made by kimberlee www.kimberleeskorner.com/blog

I have made four pair of leggings now and have some camel color fabric to make one more pair.  Two of the pair I use as my workout pants in the morning.

I have lots of other sewing projects and ideas for 2014.  Please follow my blog via bloglovin or RSS to receive future updates.  I hope everyone has a Happy New Year!

 photo dbaf2cd4-dd2b-49d6-8838-f9aff3fe3cbb_zpsca4b926e.jpg

Fun with Fleece and Yarn

3 Comments

Recently I made these fleece hats for us to take a family photo in this year.  The hat idea came from one of my twin sons when I made his Halloween costume.  He was Toonlink – a video game character -and needed this long pointy hat.   His twin brother liked it so well he wanted one in his favorite color yellow.  I decided it would be fun to make all 5 of us one each in a different color for a photo.   Well, the idea was all good but getting 3 teenage boys to wear them and have their photo taken was another issue.  So, we just took a family photo without the hats.  Below is me wearing my hat.

Fleece Blue Hat  www.kimberleeskorner.com/blog

When I went to Joann Fabrics to buy the fleece I got carried away – as I usually do when buying fabric – and bought extra with some other ideas in mind.  So I got busy with my one idea and here is the result – a fleece scarf with yarn ruffle trim.

Fleece Blue Scarf with Yarn Ruffle trim  www.kimberleeskorner.com/blog

I cut the fleece approximately 11 in. wide by the width of the fabric.  I then serged the edges using a variegated blue thread in the upper looper.  I crocheted this big loopy ruffle and then sewed it onto the fleece scarf after serging the edges.  This yarn was just some I had leftover from another project I made in the past.  It only took about 75 yards of yarn for both ruffles.

After making my above “sample” version and seeing that it turned out I decided to use this dark green fleece and make a couple of gift items.  I have a lot of family up in Michigan, where I am from, and they are all MSU fans.  I decided since MSU is going to the Rose Bowl this year this would make a fun gift.

Green Fleece Scarf with Yarn Ruffle Edging  www.kimberleeskorner.com/blog

This scarf I decided to add a pocket on each side so you can have a place to keep your hands warm or hold  your cellphone, ipod, etc.  The ruffle was then attached to the lower part of the scarf.  This particular ruffle was crocheted using 2 colors of yarn held together.  I really like how it turned out.

I also made another version of a hat for a gift.  It was super fast and easy.  I used my pointy hat basic pattern and shortened it and made a curved top then just serged the curved edges and turned up the lower edge and used a zigzag stitch for a small hem with white thread so it would be in MSU colors.  My son is modeling it in the below photos.

Fleece Hat  www.kimberleeskorner.com/blog

Back-Top View Fleece Hat  www.kimberleeskorner.com/blog

I still have extra fleece to use up and have another idea for a scarf.  I am hoping when the Christmas rush calms down I can get it done and post it on my blog before the New Year gets here.

I hope everyone is having a nice holiday season.  I have been a bit overwhelmed with completing my shopping and getting all my packages mailed out.  I feel a little better now that I got the last of the gifts mailed yesterday.  I am hoping they get there by Christmas.

 photo dbaf2cd4-dd2b-49d6-8838-f9aff3fe3cbb_zpsca4b926e.jpg

Sewing Navy Knit Top

3 Comments

This navy knit top is made from a Butterick pattern that I bought at least a year or two ago.  I am sure I got the pattern when they were on sale and had great intentions to sew it up asap but life got in the way – or other sewing projects!

Knit Top made by Kimberlee from Kimberlees Korner

I got really motivated to make this when I saw Deby from So Sew Easy post her finished versions of this top on her blog a couple of months ago.   I made a comment to her on how I also had the same pattern and she responded that it was really easy to sew.  I decided I needed to get it done!

One of the reasons I had put off making this top was while it said it was easy on the pattern it looked somewhat complicated after I had cut out the pieces.  There really are not many pieces to it – like maybe 4 or 5 – but it still looked like a challenge.  I have a lot of sewing experience and make a lot of my own clothes but I remember making this other twist front top a couple of years ago and it did not fit me correctly.   It was too low in the front and I didn’t like wearing it.

This sewing project was much more successful than my previous one.  I made the size 10 – the smallest size is an 8 and based on the measurements I went with the 10.  I did decide to adjust the lower V point up a little and I am glad I did or I think it would have been too low cut for my taste.  I think I brought that point up about an inch.  The gathered front area is very attractive and the top is comfortable to wear, too.

Navy knit top and pants sewn by Kimberlee from Kimberlees Korner

I also made some pants from the same fabric using the Bernina My Label pattern that I have for just the basic pull on pant.  They are really comfortable and the fabric has a poly blend with the cotton so they don’t get too baggy when you wear them.  I am not sure where I bought the fabric – maybe Joann’s.  I have had it in my stash for several months now.  I tend to buy fabric when it is on sale and stick with colors I like.

Back view of navy knit top sewn by Kimberlee from Kimberlees Korner

The above is the back view of the top.  Sorry it is a little wrinkled – I took the photos later in the day after I had been to church and sitting for a while.

I will definitely make this top again.  There are two other versions in the pattern.  They have the same front but one is sleeveless and the other is longer, more like a tunic, with long sleeves.  I think I will make the long sleeve tunic version next so I can wear it with some new leggings that I recently made.

Have a great day!

 photo dbaf2cd4-dd2b-49d6-8838-f9aff3fe3cbb_zpsca4b926e.jpg